You’re probably used to hosting webinars on platforms like GoToMeeting, Zoom, or Microsoft Teams.
But have you considered using social media to host your next webinar? If you’re used to features like replays and gated sign-ups, you can get those using some of the networks below (with a few caveats). But you also get a chance to have clients share and interact with you in a place they’re very familiar with. One network also offers paid live events, which you could use as a supplementary income stream. We'll give you the highlights and features of note in the popular platforms listed below.
No time to read? Watch our video overview:
Jump to a section:
Live event ideas
YouTube
Instagram
LinkedIn
Facebook
Live Event Ideas
There are plenty of meeting types you could host on social media. Webinars are the most common, but that’s not all you can do. Think about trying some of these other types of live events:
- Informational seminar – not selling, just educating
- How-to seminar (i.e., how to figure out how much life insurance you need)
- Mini-course spread over 2-3 sessions
- Q&A session
- Information on new laws/policy changes (like Washington’s long-term care act)
- 1040 overlay workshop
- College funding information
- Estate planning workshop
And if you need a refresher course in how to market an online event, check out our conveniently named post: How to Market a Virtual Event.
YouTube
When it comes to video, YouTube is probably the first social network you think of. There are three ways to stream on YouTube:
- Via a webcam with your laptop or desktop
- On a mobile device
- Using a third-party app that offers encoder streaming
The method that’s right for you will depend on (a) your experience, and (b) the type of content you want to share in your webinar/live event. For example, if you want to do things like share documents and show viewers your screen, avoid going live on a mobile device. Instead, you want a webcam that lets you toggle views between a screen capture and the camera. Common sense, right?
Requirements
In order to stream, you must have a verified channel. All this requires is providing a phone number, receiving a verification code, and entering that code to verify your channel. Click or tap here to get your channel verified.
Process & Privacy
On YouTube (as opposed to LinkedIn, as you’ll see below), you have the option to stream privately. The default is set to “public,” but you can change that in your stream settings before you go live. All live public broadcasts are available on YouTube Live at youtube.com/live. When it’s over, the video will appear on your channel for people to watch after the fact. If, at that point, you decide you want to change the privacy setting, you can do so in YouTube Studio.
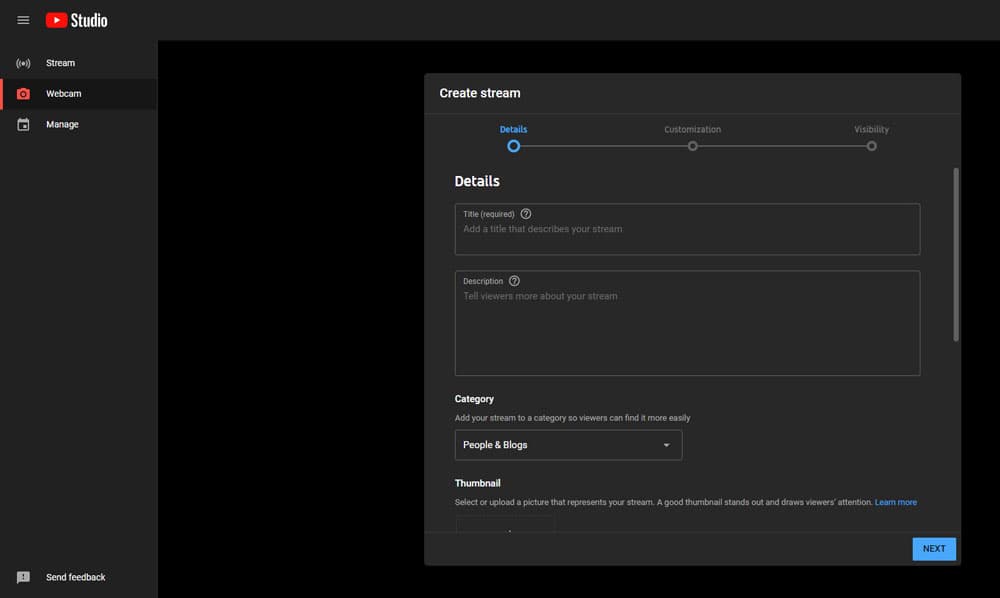
If you've never done live video, you're probably wondering: if I hit that Go Live button, does the broadcast begin right away? No. You have all the time you need to play with settings. You can even set up a live event for a future date. Once you select whether you want to go live now or at a future date, you can enter all the familiar information for your video, such as your title and description:
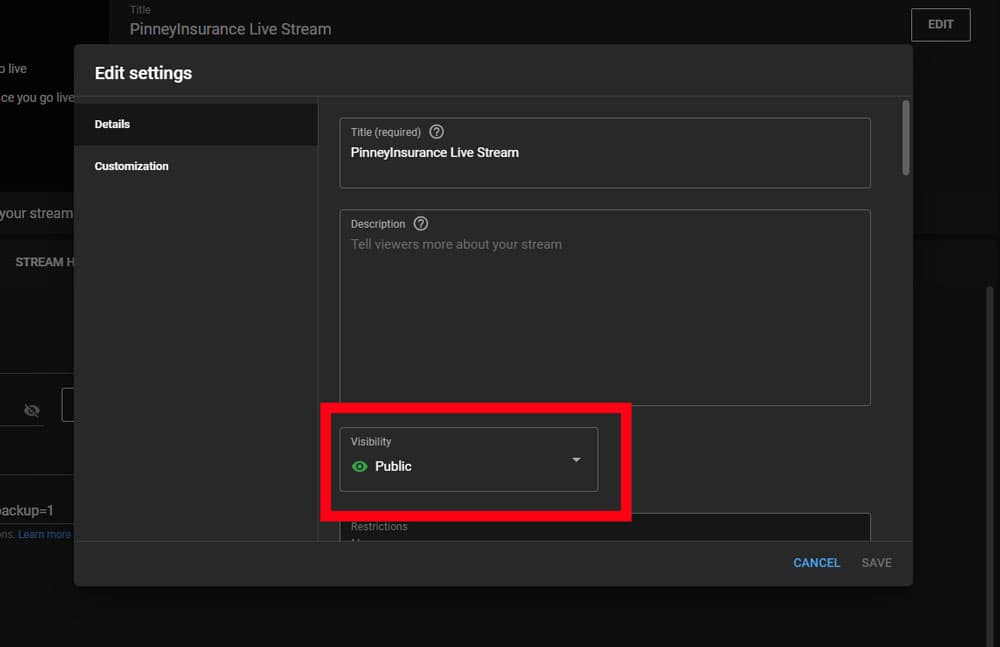
Once you enter your details, you still have time to finesse your setup. The image below shows you what the go-live screen looks like. One item to note - if you want to change your privacy setting, click EDIT. This is highlighted in red on the right.
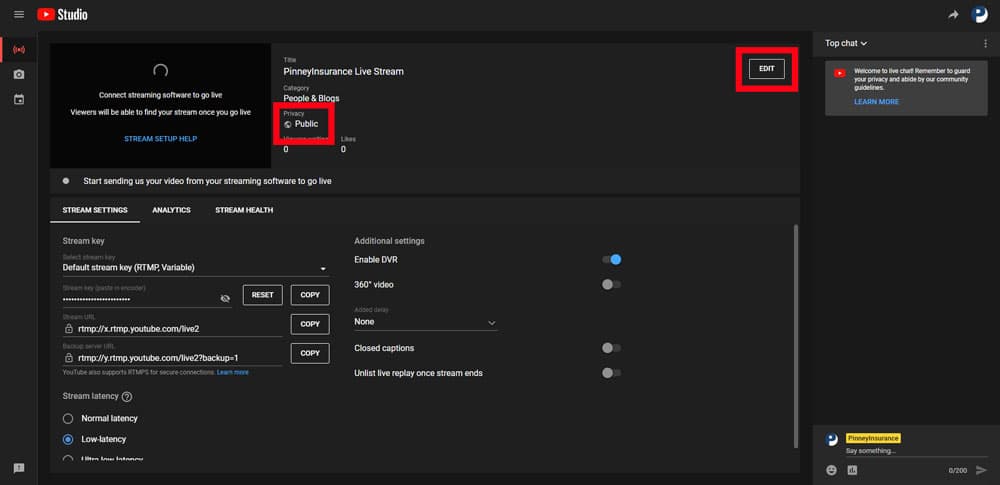
From the settings options, change your visibility as needed. As with regular uploads, you can select public, private, or unlisted.
During the live session, you and your viewers have access to the chat function. It's visible on the right of your screen. This is on by default, but you can either turn it off or have moderators keep an eye on it for you. If you keep the chat active, YouTube will record it along with your livestream. If you edit your video after the fact using YouTube’s trimming tools, you won’t see the chat replay, but it will be there in the finished product.
For a complete walk-through, check out YouTube’s before, during, and after checklist here.
You have two options for doing a livestream on Instagram: using a mobile device, or using a third-party app to go live from your desktop or laptop computer.
Requirements
There are none! You don’t need a special type of account to livestream. And as of this writing, you can stream for up to 4 hours. (Don't confuse livestreaming with other Instagram features like Stories or Reels, both of which have a time limit.)
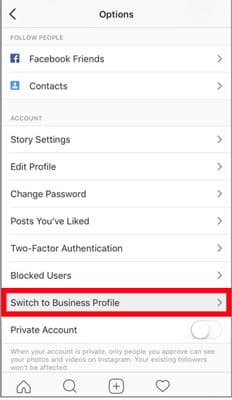
If you haven’t already, consider converting your account to a Business account. That’s the only way you can get analytics on your live video, including your peak viewership and total number of accounts reached. From your profile (on a mobile device), click the gear icon and look for the “Switch to Business Profile” toggle switch.
The one caveat with a business account? These accounts cannot be private. Private accounts can hide their posts and videos, requiring users to request access to them. Business accounts are meant to be seen, so this option goes away. Before you go live, you do have the option to hide it from specific people (using Story Controls) – but unlike YouTube, you can’t make the video private or unlisted.
Process
Instagram makes streaming super easy if you’re on a mobile device. All you have to do is tap the + at the top of your screen and scroll to Live at the bottom. On the next screen, click the 4 lines to add a title for your stream. As soon as you tap the button at the bottom of your screen, you’ll be live.

If you absolutely have to work from your laptop or desktop, you’ll have to use a third-party app to broadcast on Instagram. We don’t recommend this because Instagram isn’t built for desktop use. It will automatically crop your video to a vertical 9:16 aspect ratio, so anything that’s not in the center of your screen will get cut off. That makes it impractical for traditional webinars that require screensharing or document viewing.
A better strategy? Use Instagram for informal live sessions, as well as teasers for more formal webinars you do elsewhere.
If you’re absolutely determined to go live from your desktop, you will need to:
- Install yellowduck.tv (free)
- Create an account at restream.io (paid account required to stream to Instagram)
These two programs work together to allow you to go live on Instagram from a PC or Mac.
During your stream, a comment function will be live, but you have the option to disable it at any time.
After you end your stream, you will have three options: share a replay to your profile/feed (via IGTV), download it, or delete it.
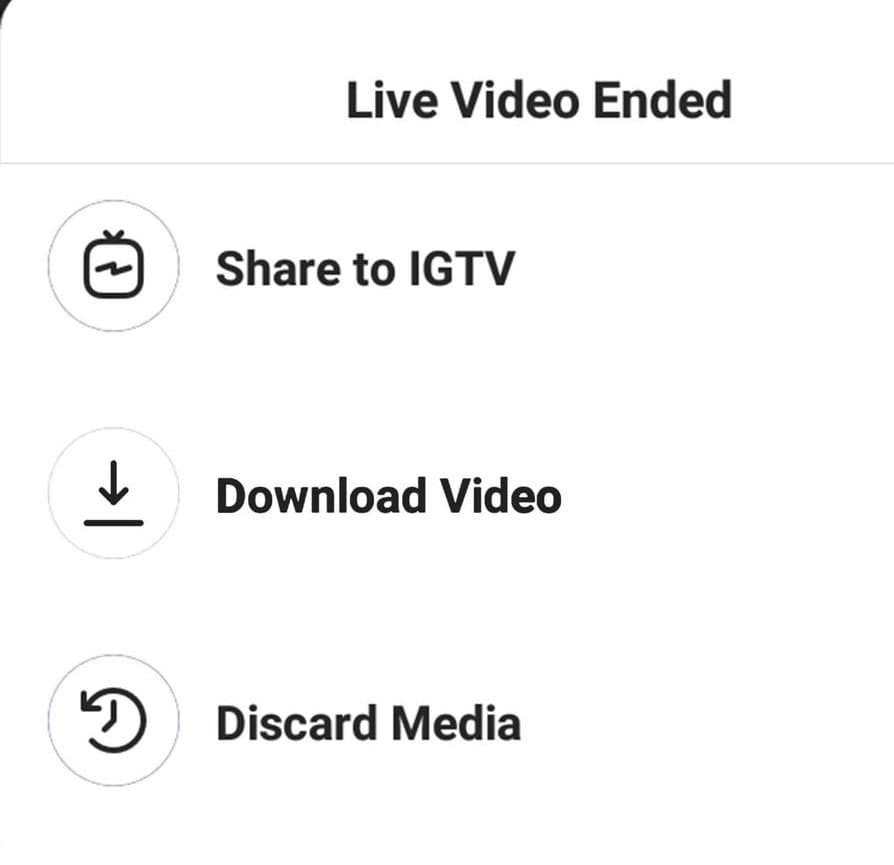
Keep in mind that unless you discard your video, it will automatically be saved to your Live Archive, where it will remain for 30 days. This is handy if you prefer to download and re-watch the video before deciding whether to share it to your feed. If you do want that video to appear on your profile for future prospects, sharing it to IGTV is the only way to make that happen.
Instagram only saves the video itself, so if you do share it after the fact, you won’t see comments, likes, or the number of original viewers. That count resets when you share the saved replay. There is also no way (as of this writing) to edit that video. So as you’re recording, consider what you may want to do when you reach the end.
LinkedIn is a natural fit for things like traditional webinars. You can present a live webinar on LinkedIn using a profile, page, or event.
Requirements
First, you have to meet the following criteria:
- At least 150 connections (to use live video through your profile)
- At least 150 followers (to use live video through a company page)
- Recent shares of original content
- History of following LinkedIn’s community policies
If that sounds like you, click or tap here to apply. Expect a wait time of a few business days – if for some reason you aren’t approved, you have to wait 60 days to reapply.
Once you’re approved, you have to decide whether to host your event using your profile or page. Starting in November 2021, there will be one good reason to use your business's page – LinkedIn is rolling out the ability to add a registration form to collect up to 6 fields of data about your attendees. This form will stay live before, during, and after the event, so you can keep collecting data on the people who show interest in the replay of your live video. If you want to export that information, you can download it or use a third-party tool like Zapier to send the information directly to your CRM.
The caveat for this really cool tool? It’s only available if you stream using method #1 as described below.
Privacy
One thing to be aware of with LinkedIn is that all livestreams are recorded and public. This means that you can’t broadcast to a select number of connections, followers, or event attendees. If you stream, it’s going out to the entire world. If you only serve clients in particular states, for example, this is something you want to make clear throughout the video.
Process
There are two main ways to livestream on LinkedIn: using their preferred partners, or plugging in an app like Zoom using a third-party custom streaming tool.
Method #1: Use their five preferred partners
- Vimeo
- Restream
- Socialive
- StreamYard
- Switcher
These preferred partners have tighter integrations with LinkedIn. For example, when you schedule a LinkedIn live session using one of these tools, it will automatically create a LinkedIn Live Event post for your LinkedIn profile or page feed. However, this will be rolling out to the certified partners below (called “custom streaming tools”) in September of 2021. However, those custom streaming tools will not have access to the registration form mentioned above.
Method #2: Use a custom stream through a certified partner
If you want to use Zoom or WebEx, you can only do so by using a custom stream through a LinkedIn Live Certified Partner:
- Brandlive
- io
- LiveU
- Mevo
- Switchboard
- Teradek
- vMix
- Wirecast
- Wowza
- Live
- Bigvu
- Cinamaker
- eCamm
- Grabyo
- Melon
- Loola
- Streann
- Videolinq
- Stage Ten
- Watchity
- Wildmoka
Once the livestream of your webinar is finished, the video will remain on your profile or page with a note that it was “Previously recorded live.” Anyone can watch, comment, or share that video, even if they didn’t attend the live event.
If you gated your video with a registration form, prospects still have to fill out that form to see the video. If, on the other hand, your session didn’t go well and you’d rather take it down, you have the option to delete it afterward.
Facebook is still an incredibly common platform among most target demographics. This graph is from Statista, with information gathered in July of 2021:
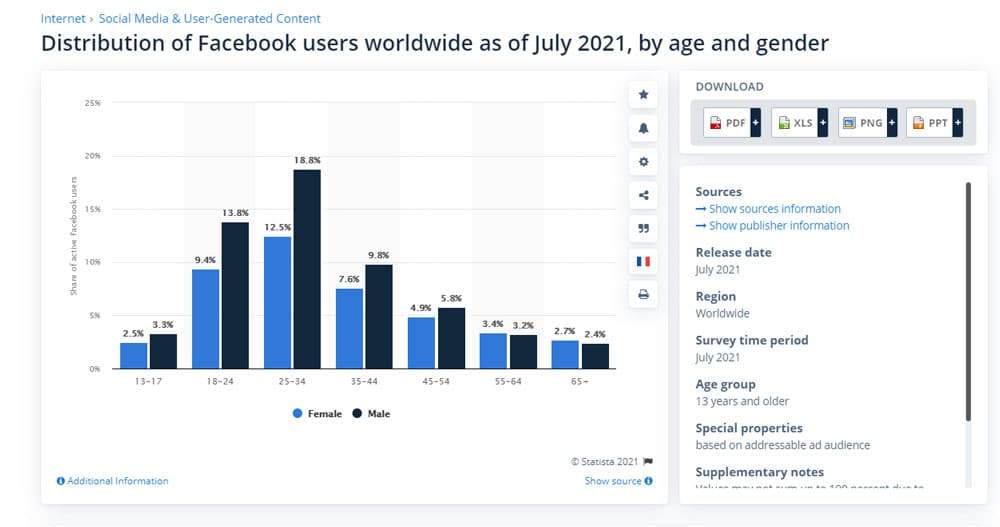
So although Facebook has taken some hits in the news recently, it’s still a go-to place for people checking in with family and friends. It’s also the only platform on this list that lets you run a paid live event. If you’ve written off Facebook for personal use, it’s still a viable tool for business use.
Requirements
None – Facebook allows anyone to livestream.
Paid Events
Did you know you can host free or paid live events using your Facebook page? If you go the paid-event route, you also have the option to send up to 50 free invites to anyone who follows your page. Once someone follows your page, they can receive the notification letting them know they have a free invite.
This sounds great, but what’s the catch? Well, as of this writing, you need to earn more than $500 to get a payout from Facebook. When you set up a paid event, you should also set up a payment account via Facebook's Creator Studio or Facebook’s Payout Hub. If you don’t break that $500 mark, you may have to wait six months to get a payout. Check that link above for the most current information.
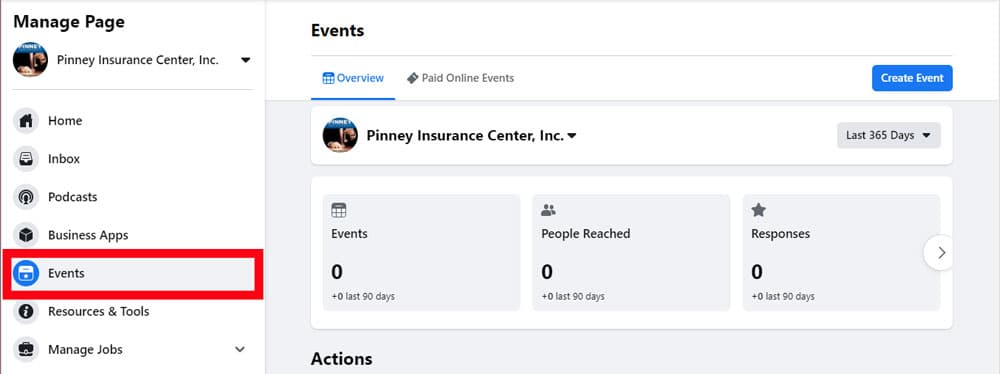
If you want to host a paid event, you have to turn on that function first. From your business page, click Events from your left-hand menu.
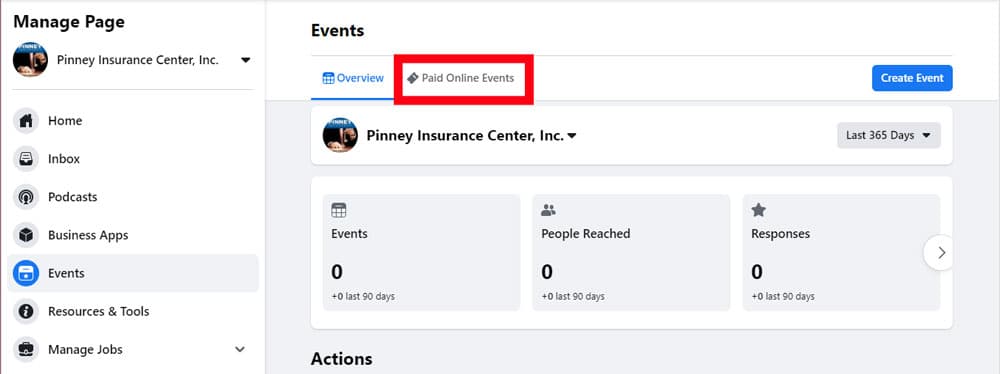
Click Paid Online Events.
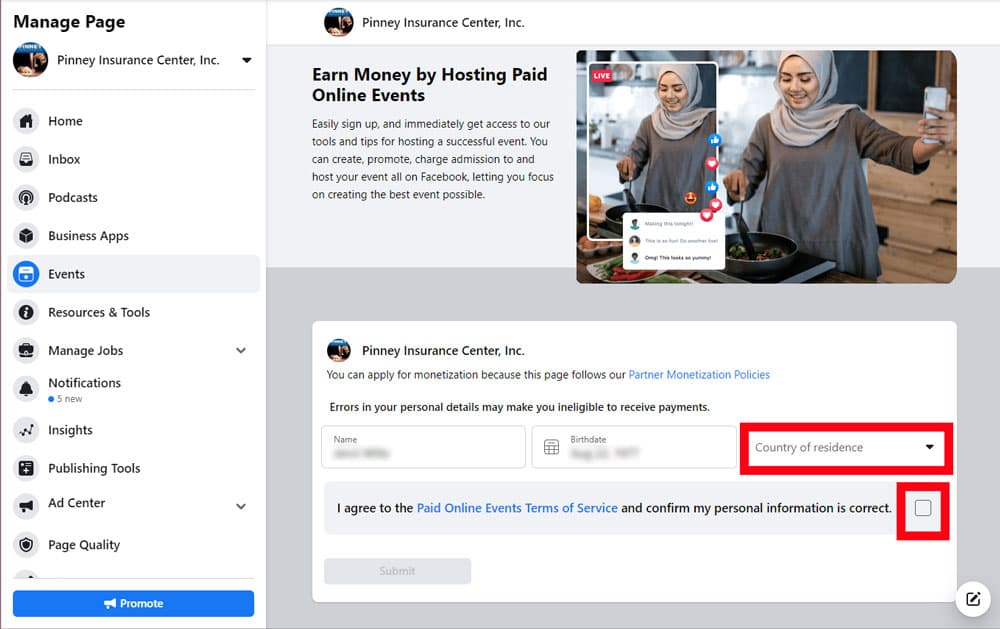
You’ll see your personal details, and a notice that tells you whether or not your page follows Facebook’s monetization policies. If it does, just select your country of residence, agree to the TOS, and submit your request.
Process
You can host a live event using Facebook Live or several third-party integrations. What’s the difference?
With Facebook Live: Participants can watch the webinar after the livestream is over. If you're doing a paid event, new prospects can also buy tickets to your event: (a) up to 15 minutes after the webinar starts, and (b) after the livestream has ended and watch after-the-fact.
Third party apps integrated with Facebook: Your livestream will not be watchable afterward, and all tickets for paid events must be purchased before they start. Only people who have paid before the start time will get the link to view the live event. Here are just a few of the third-party apps you can use to livestream through Facebook:
- Zoom
- Brightcove
- StreamYard
- Live
- vMix
- Switcher
- Telescope
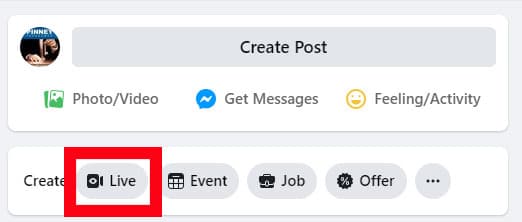
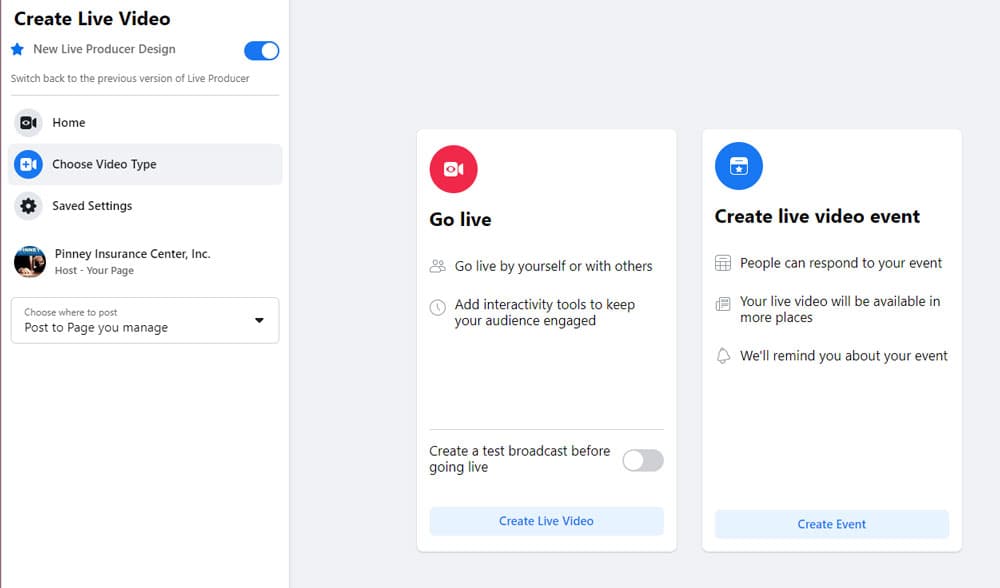
You can schedule a live video for the future, or go live right now. Start by clicking the Live button beneath where you’d start a regular post.
Here, select when you want to go live - now or in the future. If you're new to livestreaming, take full advantage of the test broadcast option in the Go live column.
Privacy
Facebook Live videos shared to a page are public. If you want to limit viewing to your Facebook friends, you’ll need to make your broadcast from your profile, not your business page.
That's our quick look at how to use social media to host webinars and live events!
Have you used any of these livestreaming options? Which one worked best for you? Or are you brave enough to share a horror story? We'd love to commiserate in the comments.