The best way to get feedback is to ask for it…so why not send a survey to your newest clients and ask them how you did?
Last week, we posted three tips to improve your agency’s customer experience. In that post, we highlighted Google Forms as a great way to request and monitor feedback from clients. In this post, we’ll show you how to add that step to a status in Insureio, making an automated client survey part of your workflow.
You can replicate this process using any CRM with email marketing capabilities.
Step 1: Create Your Survey Using Google Forms
We described this process in our previous post, linked above. Here’s a quick recap.
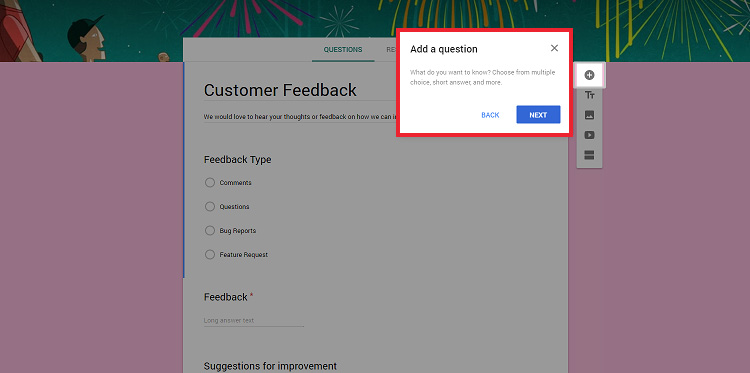
Google Forms are free to use, with a pre-designed template for a customer feedback survey. Click the down arrow to the right of the template gallery to locate it.

Style the template so that it matches your brand. Change the colors and background image, or add additional pictures, like a logo. Your questions can be multiple choice or short answer. When you’re done building your form, copy and paste its live URL and store it somewhere easy to find, like a text file. We’ll add it to an email later in this tutorial.

Later, after you email the survey link to new clients, you’ll come back here to view your results. Just click the Responses tab.

Step 2: Decide Where In Your Process to Add the Survey
Depending on your workflow, you may want to send this survey as soon as a policy is in force. You may want to wait a few days or a week. If you want to combine a survey with an up-sell, you might want to wait a month. It’s all up to you and what you want to achieve.
If you're working in Insureio, you can control the send time with the delay feature on the associated task. If you’re not familiar with Insureio's tasks, they make up your policy status rules, controlling which actions will happen and when. They’re similar to the automations found in email marketing software like MailChimp, ConvertKit, and InfusionSoft. Insureio’s status rules control more than email sends, but email is all we need for this process.
All subscribers have Insureio’s global status rules, which lay out the process for receiving, contacting, quoting, and converting a new lead. The final step in the process is a global status called Inforce, which means your new client has a placed policy.
This is the perfect place to insert a new task that will send your client survey.
Step 3: Create the Email That Will Contain Your Survey Link
If you’re not using Insureio, you’ll follow the same process you currently use to send an email to a client. Be sure to explain the purpose of the survey, and don’t forget to include your Google Forms URL.
In Insureio, we have a shortcut for creating this email. We’ll just clone an existing template and rework it to suit our purposes.
Clone a Template
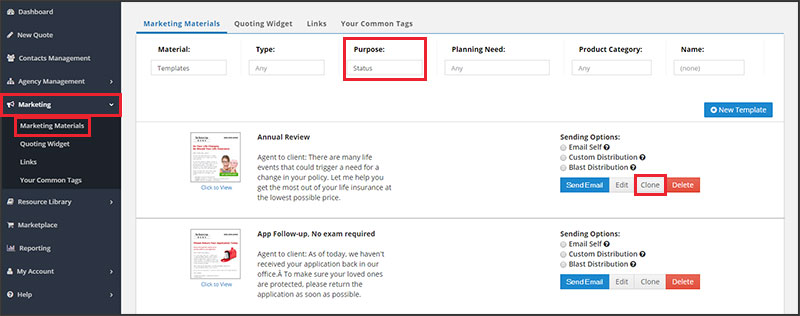
From your left-hand main menu, click Marketing and then Marketing Materials. Find the search options above the email templates. Click Purpose and then Status. This will display all the available Status emails. Browse and choose one to clone for your client survey email. When you find one you like, click the Clone button on the right.

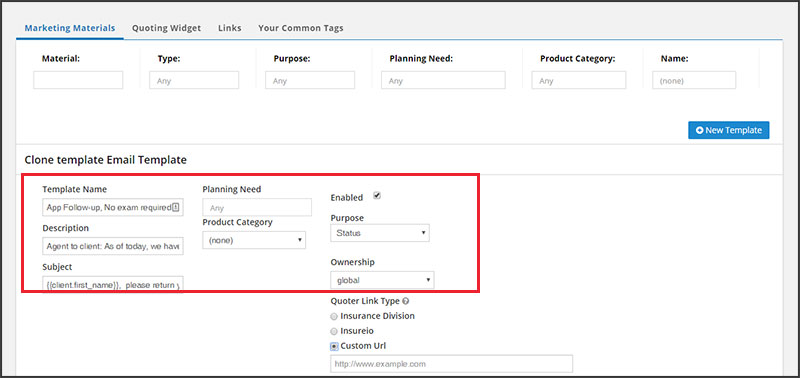
In the email editor, we’ll make a few changes to the metadata.

- Template Name: Choose a name that’s descriptive, like Inforce Client Survey. Keep this template name handy – you’ll need to enter this name into a task later.
- Description: Add a brief description of the email. Or use our handy shortcut - wait until you’ve added the text, then paste the first two lines here.
- Subject: Write a subject line for the email your client will receive.
- Enabled: This should be checked by default, but double-check to make sure.
- Ownership: Select “user” if you’re the only one using this template. Select “user and descendants” if you have staff or a hierarchy who will also need access to this email.
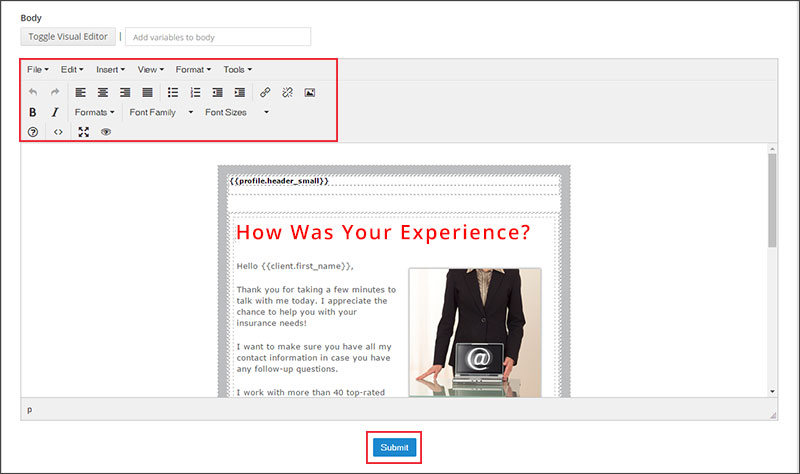
In the body of the email, we’ll rewrite the existing text and add a link to our Google Forms survey.
Click anywhere in the headline or body text. Delete the text you don’t want, and type your new message. If you want to delete the current image, just click on it and hit delete. If you want to add a new image, use the “Insert Picture” button in the text editor (highlighted in red in the image below).
When you’re done, click the blue Submit button below the email.

To test your email and make sure everything looks good, locate your template in the Marketing Materials section. Under Sending Options, click Email Self.

Step 4: Add a Task to the Inforce Status
From your left-hand main menu, click Agency Management and then Policy Status Rules.
Scroll down to the opportunity stage labeled Placed. You’ll see one status called Inforce.

Click the gear icon on the far right of the status name. Select Edit Tasks.

In the new task builder, click the blue New Task Rule button on the top right.

Fill out the task rules for our client survey.

- Name: Choose a descriptive name that tells you what happens during this task (i.e., “Send New Client Survey”).
- Assigned User: Leave this blank. We’ll be sending an email with this task, which is completed by the system. It does not need to be assigned to a particular user.
- Assignment Role: Select “system” since this is an automated task performed by the system (rather than a to-do task performed by you).
- Delay: How long after a case is put into the Inforce status should the system wait before sending your email? All times are entered using a 24-hour clock. If you enter “1,” the system will wait 24 hours before sending. If you enter "10," the system will wait 10 days before sending.
- Evergreen: Leave this blank. The evergreen status means a task will stay on your dashboard until it’s manually removed – helpful for follow-ups and phone call reminders, but not necessary for a simple email.
- Type: Choose “email.”
- Template: Type the name of the template you created in Step 3.
- Skip Weekends & Holidays: Do you want the system to skip weekends & holidays when sending? If you check this box, the system will send on the next available weekday.
Click the Save icon.

Ready to Try it Yourself?
That was easy, wasn't it! Whether you use Insureio or not, it will only take a few minutes to set up your automated client survey.
Don’t forget to log into Google Forms and see your real-time results. You might want to set a periodic reminder on your calendar to review results.
Remember, not everyone will respond to your survey, so the number of results won’t directly correlate with your number of policies placed. There’s no easy answer as to what you should expect – response rates vary widely.
- SurveyGizmo reports an average 10-15% response rate for a customer survey.
- FluidSurveys cites an average response rate for email surveys as 24.8%.
- CustomerGauge.com reports a successful survey as having a 10% response rate.
