
In a previous post, we explained how schema can boost your SEO and personal brand.
Click or tap here if you missed that post - in it, we showed you a no-code method for marking up your site with Google's Data Highlighter. But that’s by no means the only method. In this post, we’ll show you two other ways to do it - and two ways to test your site after you add your schema.
Luckily, there are free tools that can generate the code you need so you don’t have to create anything from scratch.
No time to read? Watch our video overview:
Part One: Generate the Schema Code
In our previous post, we showed you how to mark up your web pages using Google’s free data highlighter tool. You didn’t need to generate or place any code because Google did it for you. But it’s very easy to generate that code using one of the following free tools:
Both tools will give you code in the JSON-LD format, which is one of several available formats…but one that Google prefers. We’ve tried and like both tools. For this tutorial, we’ll use Merkle’s tool.
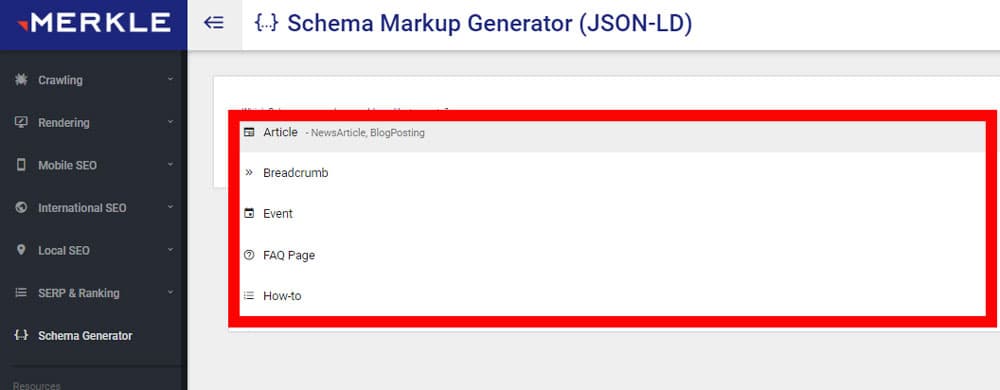
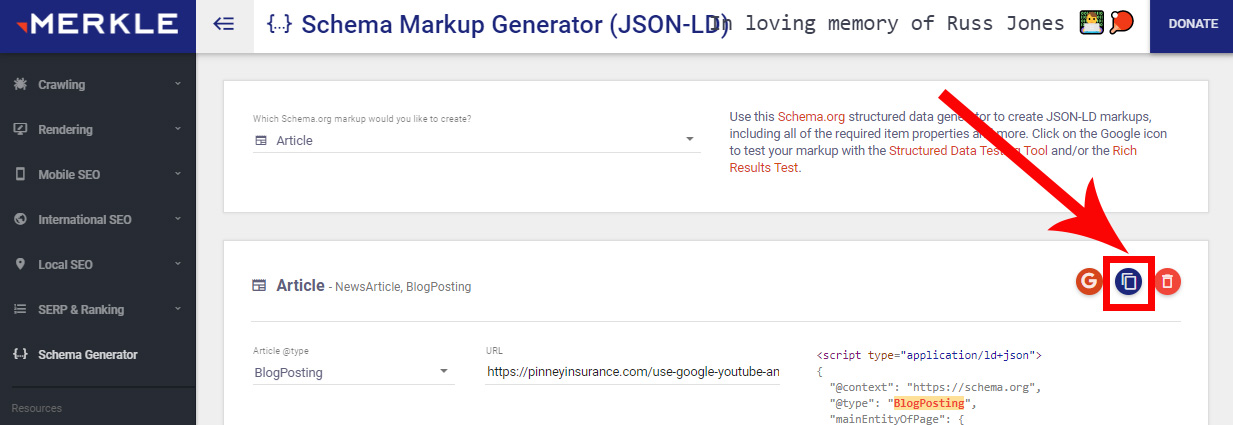
1. Select the type of markup you want. Likely options include Article (for a blog post), Event (for a page describing an upcoming webinar), FAQ page, How to, Local business (for your about or contact page), Person (for your about page), or Video. For this example, we’ll use Article.
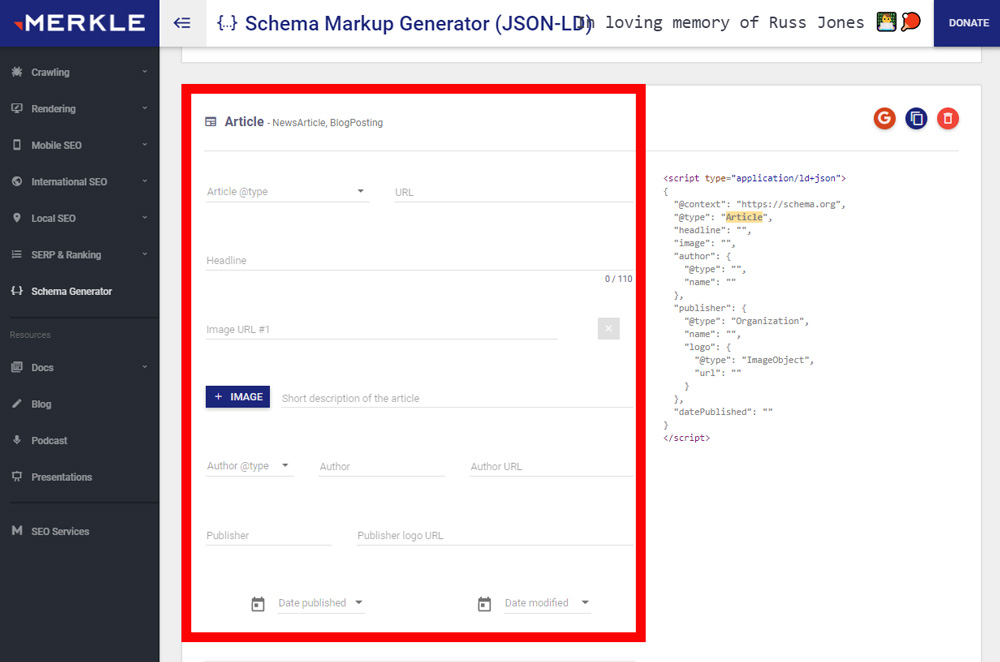
2. Fill out as many of the available fields as you can. Most of these are pretty straightforward – the article URL, the headline, the URL of a relevant image, the author name, an author URL (use the “About” page of your website), and a publisher name and logo URL (if you have/want a company name to be associated with this page). You’ll see the code generated on the right as you type.
3. Click the G button to test your code in either or both of the linked testing tools: Rich Results Tool or Schema.org Validation Tool (formerly Google’s Structured Data Testing Tool).

What’s the difference?
- Rich Results Tool: This is Google’s latest tool to validate schema code, but there’s a catch. It only looks for types of schema that Google can display in search results. Not all types of schema generate rich results in Google, and this tool will ignore those types.
- Schema.org Validation Tool: This tool has replaced Google’s deprecated Structured Data Testing Tool, letting you validate any type of schema currently supported by schema.org.
Here's how to use both of them.
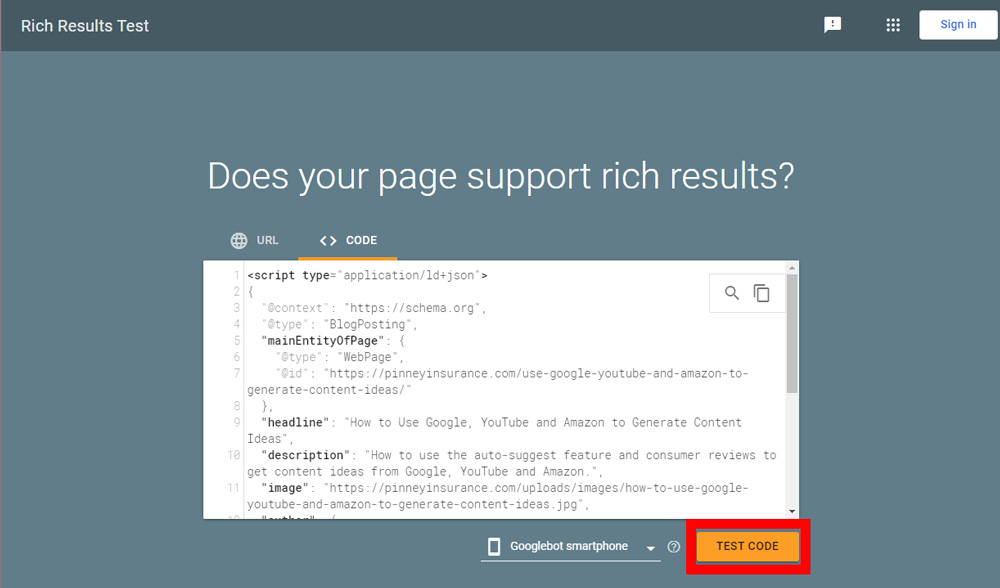
Rich Results Test
If you used Merkle's tool, as we did, you’ll see your code already in the tool. Click Test Code and fill out the captcha, if required.
If you get a green success message, congrats! Since we used an automated tool to create the code, you shouldn’t see any errors.
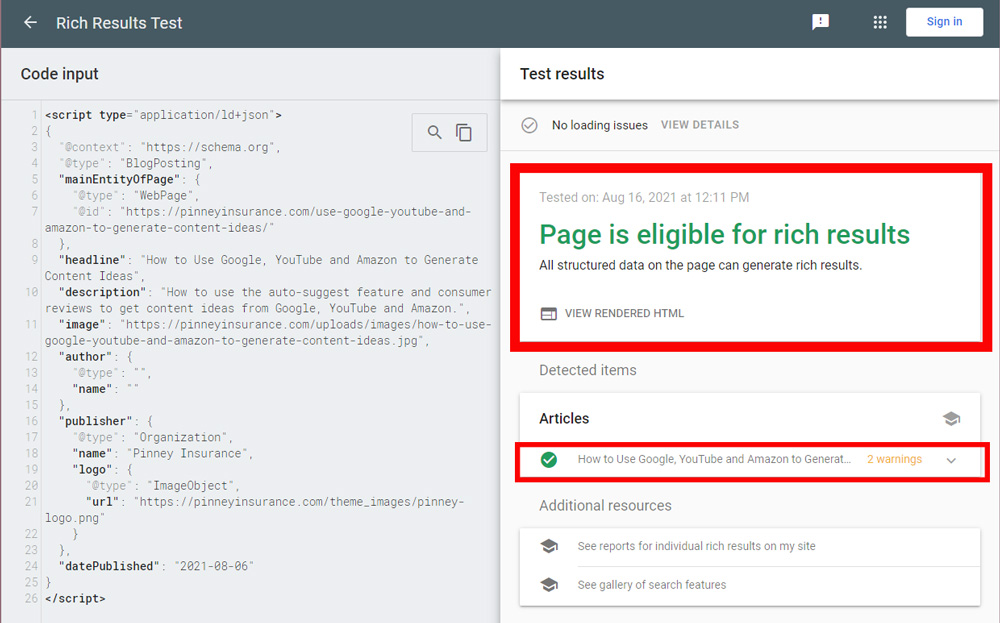
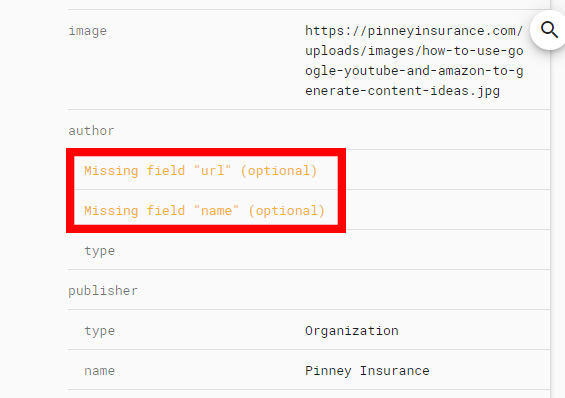
If there are any warnings, click the dropdown to see what they are. In this case, the warning is just to let us know there are optional fields we can still fill out.
Schema.org Validation Tool (formerly Google’s Structured Data Testing Tool)
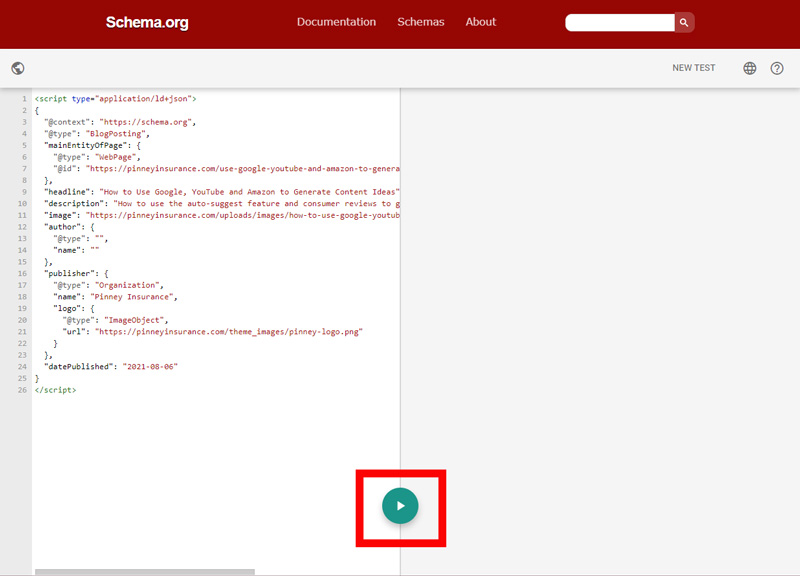
If you used Merkle's tool, as we did, you’ll see your code already in the left pane of the tool. Click the green arrow button to test it.
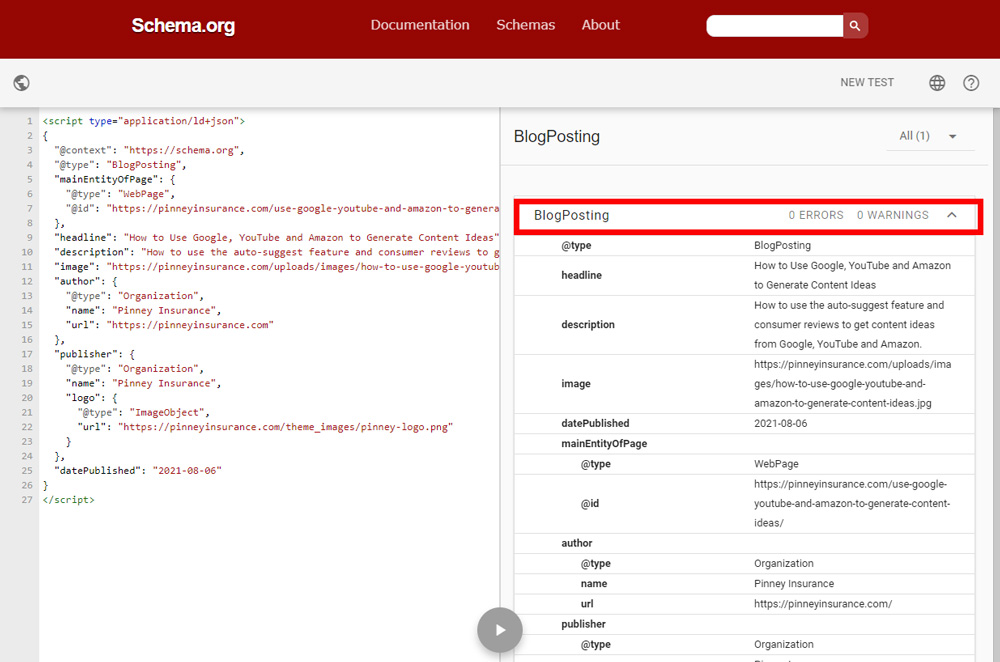
If you entered all the relevant information correctly, you should see 0 errors and 0 warnings. If there are any errors, it’s possible there are more fields that should be filled out. For example, some of the fields the Rich Results Tool considers optional are not considered optional by this tool.
4. Code tested good? Go back to your generator tool and keep that browser tab open. We’ll be copying and pasting that code into the website next.
Part Two: Add It to Your Site – HTML
Google’s John Mueller has said you can add your JSON-LD code either in the head of your web page or in the body – it doesn’t matter. (Source: SearchEngineLand.com)
There are arguments to be made for either location. Your code is in the form of a script, which is usually placed in a document’s head. But other forms of schema code (such as “itemprop” notations in HTML) are placed in the body, around what they represent.
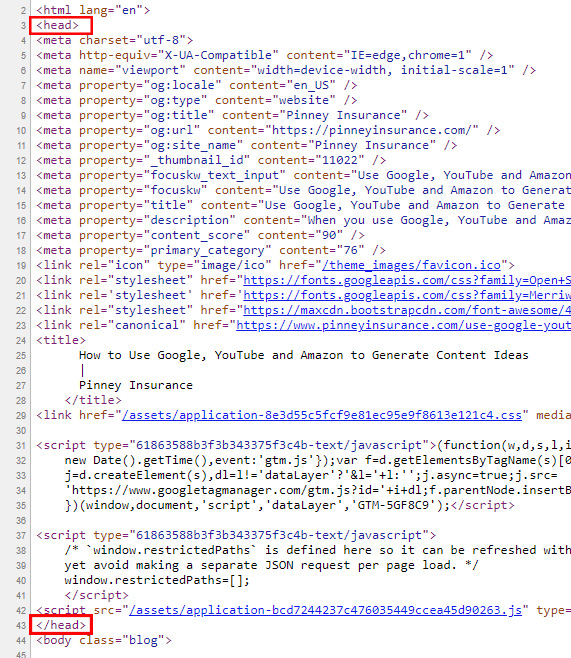
Select your desired location and click the copy button in your code generator. Paste the code into your desired location and save the page. If we wanted to paste ours into the head, here are the opening and closing tags we’d look for. Just place your code above the closing </head> tag.
Add It to Your Site – WordPress
There are multiple ways to add your JSON-LD schema code to WordPress. We’ll cover the two easiest.
Method 1: Use a Plugin
There are dozens of plugins, both free and paid, that walk you through the process. Free versions usually provide a basic markup for articles/blog posts, with paid versions providing additional fields and support for more types of markup, including video, products, and reviews.
- Yoast SEO (free and paid)
- Schema.Press (free and paid)
- Schema App Structured Data
If you use one of these, in most cases, you’ll have the chance to mark up each page and save your changes. The plugin will deploy the necessary code.
Method 2: Paste Code Into the Page or Post
If you don’t want to use a plugin, it’s still super simple. Just use one of the code generators linked above and copy your code.
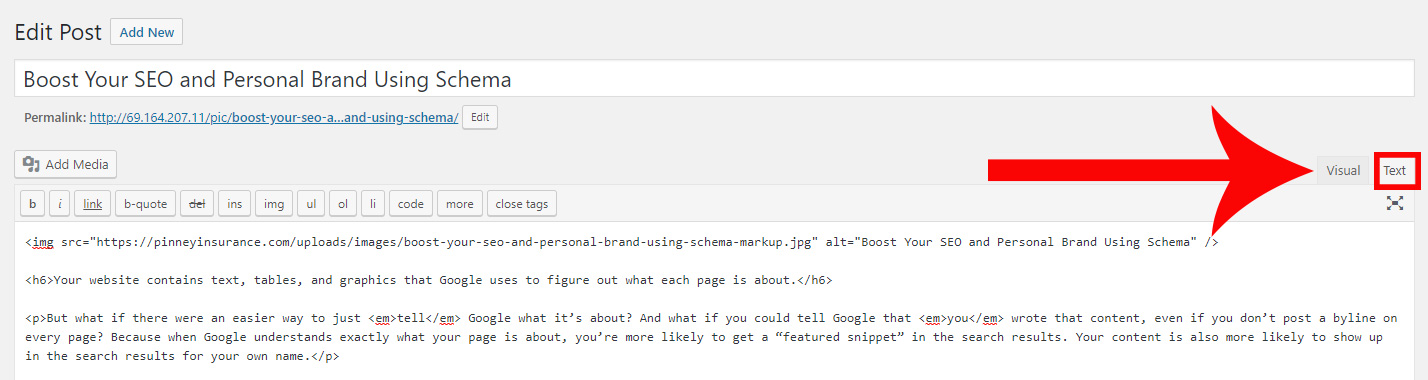
In older versions of WordPress, switch from the Visual editor to the Text editor. This displays all the html code in the body of your blog post or web page. Paste your code anywhere in this editor – at the very top or the very bottom is easiest.
Click Update to save your changes.
If you need to switch back to the visual editor, don’t worry – your code is still in place, even though you don’t see it.
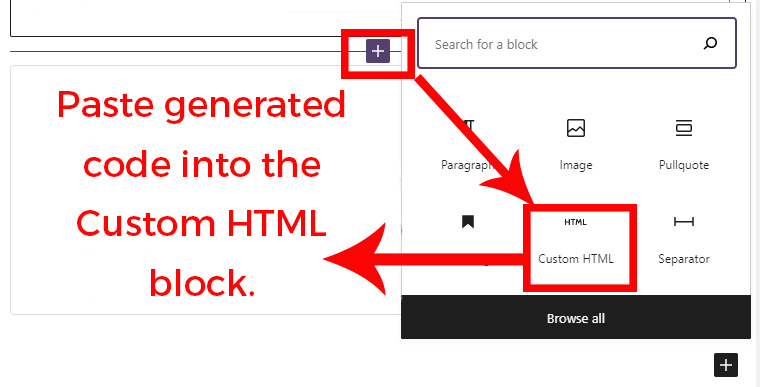
If you’re using Gutenberg, just add a Custom HTML block to the beginning or end of your page/post and paste your generated schema code inside it.
Click Update to save your changes.
Part Three: Test Again
Okay, your code has been inserted and saved…but it doesn’t hurt to run both tests again on the saved pages you updated.
Go back to both of the testing tools and make sure everything still generates zero errors:
Part Four: Ask Google to Recrawl Your Updated Page(s)
Now that your pages are updated and validated, it’s time to ask Google to recrawl them. The best way to do this is through Google Search Console. If you only want to recrawl a single page, Search Console is the only way to do it.
From your left-hand main menu, click URL Inspection Tool.

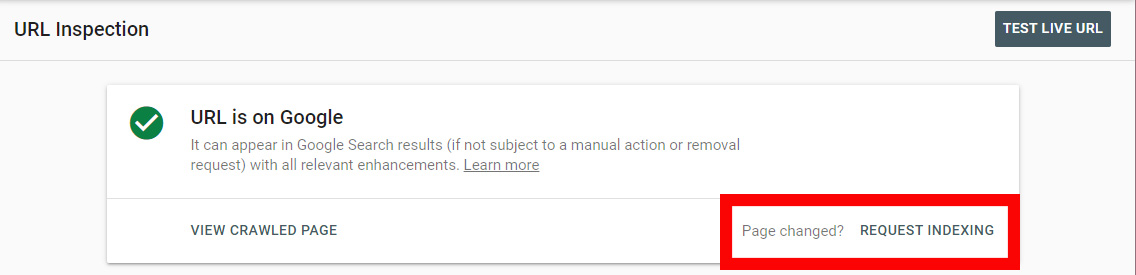
If you’ve already added schema to quite a few pages, you’ll want to ask Google to recrawl your whole site. Type your domain name in the search box at the top of the page and press Enter. If you’re taking it slow and updating one page at a time, enter the URL of the page you just changed.
Google will analyze your input and, most likely, tell you that it’s already been indexed. Look for the Request Indexing link and click it, since you’ve made changes.
Sometimes indexing happens in as little as 30 minutes. Other times, it could take days or weeks, depending on whether you made content-related changes as well.
That's our look at more ways to boost your SEO and personal brand using schema!
Have you already implemented schema on your site? How did you do it? Share your tips and tricks in the comments!