This is the third in a three-part series on repurposing your content. In this post, we’ll go over six simple workflows that help you get your content into multiple formats for as wide a distribution as possible.
If you read part one and part two of this series, you know how to turn text into audio and video (or vice versa). This time, let’s get specific. What tools work best together? How do you build a logical, do-able workflow from the options in our earlier posts?
Our sample workflows below will answer these questions and help you get started.
Jump to a workflow:
1: Text to Social Graphics + Presentation
2: Text to Lead Magnet + Presentation + Video
3: Text to LinkedIn Post + Video + Audio
4: Audio to Text + Video + Lead Magnet
5: Audio to Audiogram(s) + Video + Text
6: Video to Text + Audiogram(s) + Lead Magnet
No time to read? Watch our video overview:
Workflow #1: Text to Social Graphics + Presentation
START WITH:
A stat-driven blog post or web page (or research you already have from LIMRA, Life Happens, etc.)
Step 1: Turn stats and quotes into social media graphics.
Do this using Canva or Pablo (both free, with templates sized for various social media platforms). If you want to turn your quotes or stats into fancy Instagram stories, use the free app Unfold, available for Android and iPhone – it’s what Selena Gomez and Kim Kardashian use. If, you know, you care about that sort of thing.
Step 2: Turn your graphics into a slide deck.
Pull out the most important points from your text. Grab a few subheadings and supporting points and copy and paste them into a new document or text file. This new doc is your slide deck script. Now, paste your script and the graphics you’ve already created into a PowerPoint, Keynote, or Google Slides template formatted especially for SlideShare with a 4:3 aspect ratio. Make sure your name, logo, and contact info are on the last slide.
What's the deal with the aspect ratio? Well, the ratio for SlideShare is different from that recommended for YouTube. If you don’t mind vertical black bars on the sides of your YouTube videos, you can take the completed slide deck from this step, export as a video, and upload it to YouTube as described in step 3. But since all you’re really doing is pasting a dozen or so sentences, it’s best to have two properly sized templates handy.Click here to browse templates on Graphic River; be sure and read the description to see if the template includes a copy with the 4:3 aspect ratio.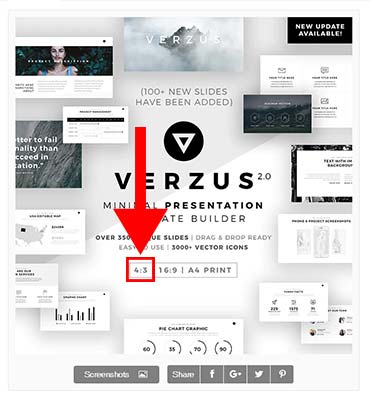
Step 3: Upload your slide deck to SlideShare.
The presentation you created in step 2 can be used in-house for client presentations or to play on a loop on a computer or monitor in your office/lobby. But until you upload it to SlideShare, you’re not benefiting from the SEO of the title and keywords. You can share the SlideShare link on social, embed it on web pages, and more. It’s also handy to have live copies of your presentations so you can always access them on the fly.
NOW YOU HAVE:
- Social media-ready graphics
- Presentation for client use (or to play on a computer/monitor in your lobby)
- SlideShare (good for SEO)
Workflow #2: Text to Lead Magnet + Presentation + Video
START WITH:
A blog post or web page
Step 1: Turn your text into a lead magnet (eBook) with Beacon.
Drop the URL of your post into Beacon, select your formatting options, and export as a PDF. You can give this away for free, or as a signup bonus when prospects join your mailing list.
Step 2: Turn your text into a slide deck formatted for SlideShare.
Gather 15-20 brief subheadings and main points from your post or eBook. Copy and paste them into a new Word doc or text file – this is your slide deck script. Next, paste those points into a PowerPoint, Keynote, or Google Slides template formatted especially for SlideShare with a 4:3 aspect ratio. Click here to browse templates on Graphic River; be sure and read the description to see if the template includes a copy with the 4:3 aspect ratio.
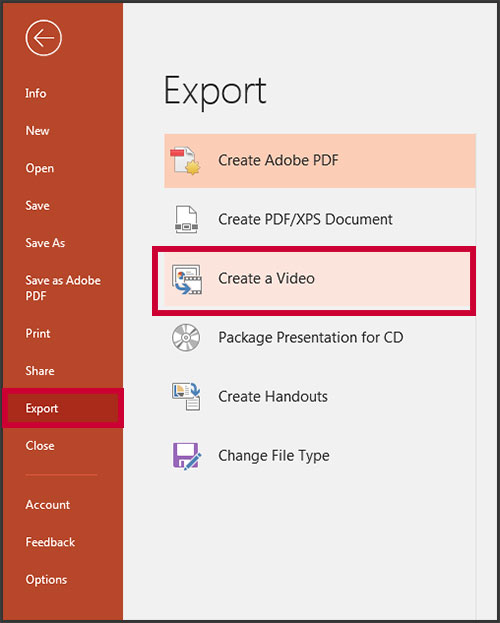
Step 3: Turn the same script into a video using a slide deck template formatted for YouTube.
Paste your slide deck script into a second template, formatted for YouTube this time (16:9 aspect ratio). Almost all presentations on Graphic River come formatted for this aspect ratio; you shouldn't have an issue here. Export as a video and upload to YouTube. EXTRA CREDIT: Add a voiceover.
NOW YOU HAVE:
- Lead magnet
- SlideShare (good for SEO)
- PowerPoint presentation (for use in client meetings and/or a webinar)
- YouTube video
Workflow #3: Text to LinkedIn Post + Video + Audio
START WITH:
A blog post or web page
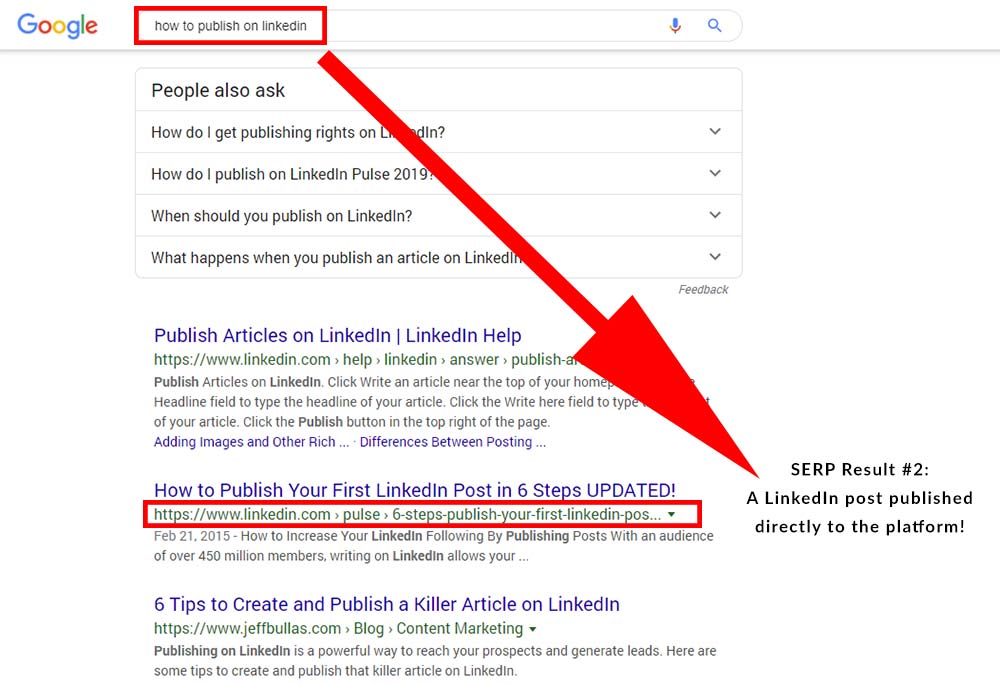
Step 1: Repurpose your blog post as a LinkedIn post.
As we mentioned in the second post in this series, you need to tweak the original a bit before you publish it on LinkedIn. The easiest way to do this? Come up with a new title, opening paragraph, and subheads. Then add a few extra subheads to break up the text even more. Images help, too, if you have them.
Remember, your LinkedIn posts are indexed by Google, so this refreshed version of your post gives you a greater chance of getting that content into the hands of prospects searching on Google. They're also far more visible on LinkedIn than shared posts (where you just drop a link).
Step 2: Turn text into video with Lumen5.
We do this all the time – it’s fun and easy. Provide the URL of your published post, or upload your own text. Let the algorithm take a stab at pulling out what to include in the video. You can add or delete as needed while looking at the transcript in the system. Lumen5 will add images and video, which you can swap from other offerings in their free content library if you want to fine-tune your video. Add music from their free library, and boom, you have a social-ready video to upload to YouTube, share, embed, etc.
BONUS: Prefer to post your video on another social network? You can pick the aspect ratio for the network you want when you start the process. If you’re all about IGTV, for example, this step still works.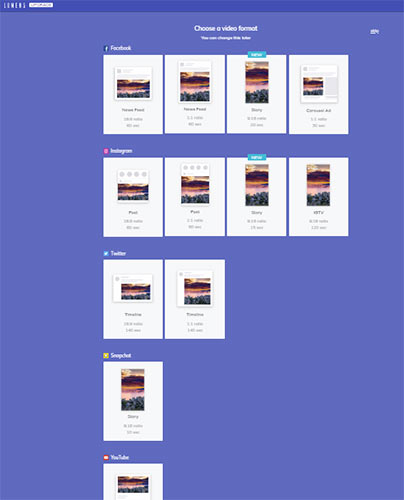
Step 3: Turn the original post into an audio file using Amazon Polly.
We covered how to do this in this post. Amazon Polly is free to use for your first year, and is incredibly cheap to use going forward. They even have “newscaster”-style voices you can use for a more authentic delivery. If you’re in this FTW (for the win), you’d record your own audio, but if you’re short on time or just want to test the concept, Amazon Polly is the way to go.
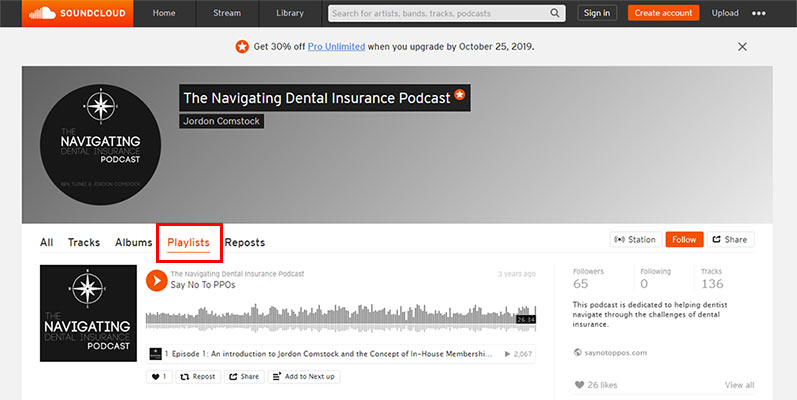
Step 4: Upload your audio to SoundCloud, then make & share a playlist.
Having a SoundCloud playlist is the next best thing to having a podcast. It’s a place where your collected audio can live online and be accessed by clients anytime. It’s less labor-intensive than a podcast, and is a good way to see if your clients and prospects are into audio as a medium. If you get good feedback, consider going further with audio content.
NOW YOU HAVE:
- LinkedIn post
- YouTube Video
- Embeddable audio file
- SoundCloud playlist
Workflow #4: Audio to Text + Video + Lead Magnet
START WITH:
An audio recording from a talk you gave, a webinar, a podcast you were on, or a free-form recording as you answer common client questions.
Step 1: Turn audio into a blog post with automated transcription.
Upload your audio file to Descript and let their automated transcription kick out the text you need to create a blog post or web page. Read through it to proof it, post it, and bam – now that content is ready for clients (and Google’s index).
![]()
Step 2: Turn the post into a video with Lumen5.
Just drop the URL of your published post, or upload the text of your transcription. Let the algorithm take a stab at pulling out what to include in the video. You can add or delete as needed while looking at the transcript in the system. Lumen5 will add images and video, which you can swap out from their library if you want to fine-tune your video. Add music from their free library, and boom, you have a social-ready video to upload to YouTube, share, embed, etc.
Step 3: Turn the post into a lead magnet with Beacon.
Drop the URL of your finished blog post into Beacon to get a PDF lead magnet, formatted for you. If your audio came from a seminar or workshop, you could send this PDF to participants so they can refer back to your words of wisdom.
NOW YOU HAVE:
- Blog post
- YouTube video
- Lead magnet
Workflow #5: Audio to Audiogram(s) + Video + Text
START WITH:
An audio recording from a talk you gave, a webinar, a podcast you were on, or a free-form recording as you answer common client questions.
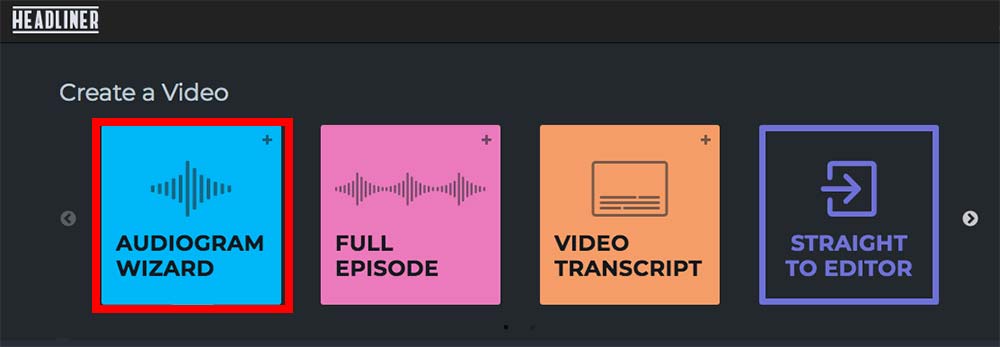
Step 1: Turn audio into audiograms for native social content with Headliner.
Use Headliner’s Audiogram Wizard to upload your audio file, trim it into a sound bite, and automatically add captions. Use the caption tool to add your name and contact info to the end of the audiogram, and download the finished product. Repeat as needed for as many audiograms as you can/want to create from your full-length audio. You’ll have video files ready to upload to Facebook, Twitter, Instagram, or anywhere else you like. Native social video, here you come!
Step 2: Add graphic(s) in Headliner to create a full-length video for YouTube.
You have two options here. You can either (a) create a full-episode audiogram using a single still image as a background – this is the fastest method. Or (b) use their editor to create a more dynamic video with multiple images or video clips in addition to your audio. Need images? Use the free, no-attribution images from sites like Pexels and Unsplash. Here’s their tutorial on how to add an image to your video timeline. Upload your full-length video to YouTube.
Step 3: Transcribe to turn your audio into a blog post.
You can keep the party going at Headliner, which also offers video transcription. Alternate transcription sites include Descript (3 free hours of transcription) and Trint (free trial). If you’re game, you can also use a word processing or note-taking app on your phone to transcribe a recording that’s playing on your computer. Just hit the microphone button on your phone and play the audio on your computer’s speakers.
NOW YOU HAVE:
- Native social video(s)
- YouTube video
- Blog post
Workflow #6: Video to Text + Lead Magnet + Audiogram(s)
START WITH:
Video of a speaking engagement or webinar
Step 1: Transcribe to turn your video into a blog post.
As we mentioned above, there are several options for transcription. If you’re starting with video instead of a raw audio file, your best bets are Trint (free trial) or Scribie ($0.10/min).
Step 2: Turn your blog post into a lead magnet.
Drop the URL of your finished blog post into Beacon to get a PDF lead magnet, formatted for you. If your audio came from a seminar or workshop, you could send this PDF to participants so they can refer back to your words of wisdom.
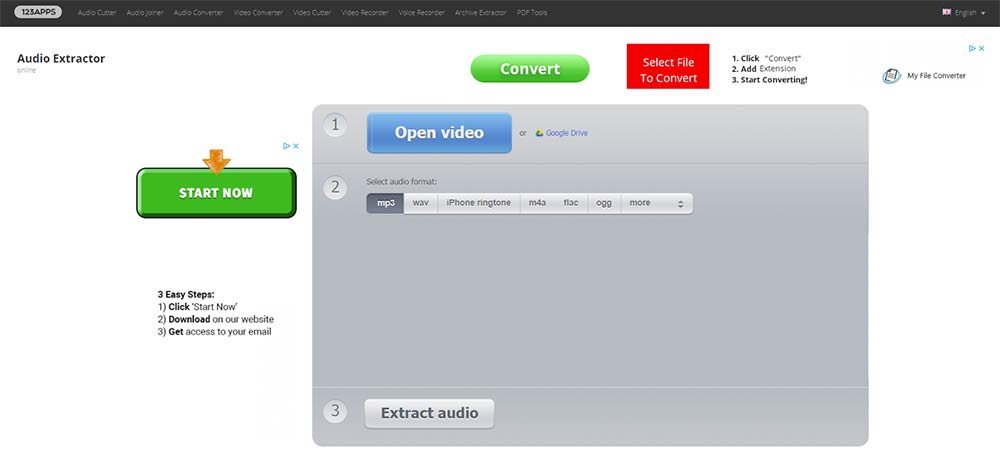
Step 3: Strip the audio from the video.
It’s easier to deal with audio alone when you’re creating audiograms. There are plenty of free online web apps that let you do this. Use audio-extractor.net, a free tool that’s fast and easy to use. It will prompt you to open your video, select the audio format you want, and extract. In the next step, you’ll use the audio file these apps let you download.
Step 4: Create audiograms with Headliner.
Use Headliner’s Audiogram Wizard to upload your audio file, trim it into a sound bite, and automatically add captions. Use the caption tool to add your name and contact info to the end of the audiogram, and download the finished product. Repeat as needed for as many audiograms as you can/want to create from your full-length audio. You’ll have video files ready to upload to Facebook, Twitter, Instagram, or anywhere else you want to promote your lead magnet. Native social video, here you come!
NOW YOU HAVE:
- Blog post
- Lead magnet
- Native social videos to promote your lead magnet
That’s our look at 23 ways to repurpose content!
These are by no means comprehensive. They’re just meant to get you started. If you like these ideas, flip back to post one and post two and see what other methods of repurposing help you get even more exposure for the content you’ve already created.
Did any of these ideas resonate with you? Do you want detailed walk-throughs for any of these techniques? Tell us in the comments!