Would you do more video marketing if you could make videos without appearing on camera? You can – and we’ll show you how.
HubSpot Research tells us that 54% of consumers want to see more videos from brands. In fact, they want videos more than they want an email newsletter or an image-driven social media post.
But not everyone is cut out to be on camera. For some, it’s a learned skill. They can conquer their nerves, get better at improvising, and end up being relatable and successful on camera. But for others, this isn’t the case. Being on camera is simply too stressful and too time-consuming. It takes too much time away from selling – and who needs that?
If you don’t want to be on camera, it doesn’t mean you’re locked out of video marketing. Here are 4 ways you can produce short, high-quality videos that don’t require you to be on camera or hire an amateur production crew.
No time to read? Watch the quick video recap below:
1. Use PowerPoint
Did you know your favorite presentation software can also export your presentation as a YouTube-ready MP4 file? If you’re using PowerPoint 2013 or newer, you can export any presentation as a video. This Office.com article walks you through everything for multiple versions of PowerPoint.
Before exporting to video, you may want to spiff up your presentation. Make sure it’s as concise as possible since videos under 30 seconds get the most views. You can also add narration (if you have a microphone) or slide animations. Alternatively, you can export your presentation as a video without sound, then add music in Windows MovieMaker or the Photos app that comes with Windows 10. Both let you add music to an existing video. A great source of royalty-free music is Incompetech.com, where composer Kevin Macleod offers thousands of songs absolutely free of charge for commercial use.
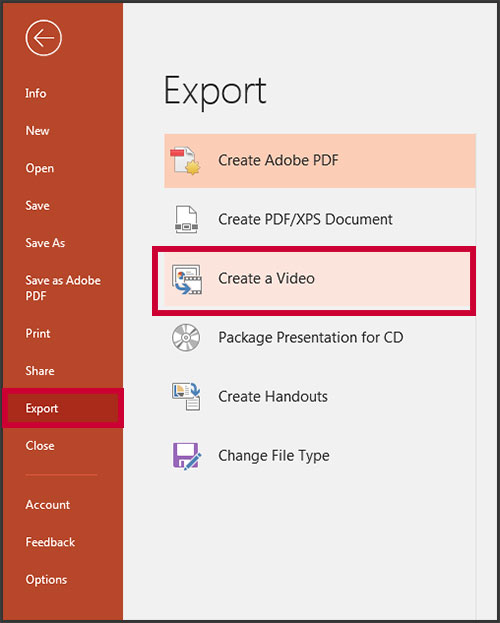
When you’re ready to export, click File / Export or Recording / Export to Video. Next, select Create a Video. Then choose a location to save your video. That’s all there is to it! Your nifty slideshow is now ready to upload to YouTube, Facebook, Twitter, or anywhere you want to establish a video presence.

2. Use Lumen5
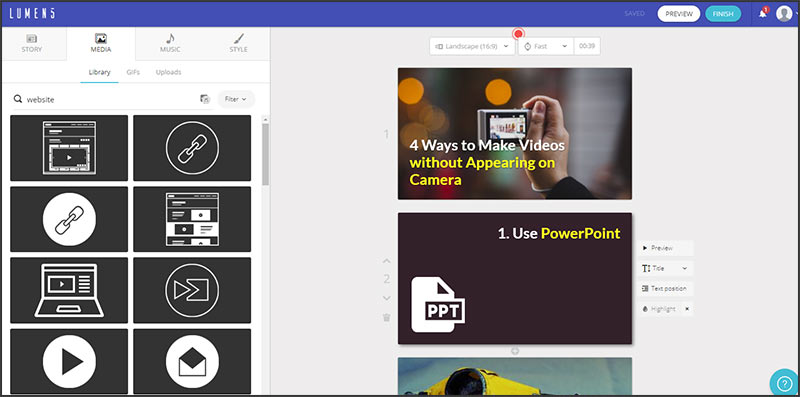
This free tool helps you turn any content into a video. Paste in the URL of your latest blog post, for example. The software pulls that text into your video-creation interface. Select the text you want to transfer to slides.
Based on your text selections, the software picks a background image for each slide. You can change it easily, using a free selection of stock photos. Tweak your font and text placement, then add music from hundreds of free choices. They render the video, and when it’s done, all you have to do is download it. It’s already compressed in a ready to upload to YouTube.
You may have seen a few of our Lumen5 videos in recent blog posts like this one and several of our Ask the Underwriter pages. They’re a good way to diversify your content. Someone may not have time to read an entire post, or they may not be sure they want to. Give them a taste of your content in a bite-sized summary video instead. One of our blog-based videos got 40+ views in its first week!

3. Use Screenshare Software
Another alternative to being on camera? Talk your way through it! Use screenshare software to walk viewers through the process of getting a quote, for example. Or show them how to fill out a needs analysis worksheet. Some apps only record video, while others include audio. If you have a webcam, check its help guide- you may already have everything you need.
There are also plenty of Chrome extensions like Screencastify and web apps like Screencast-o-Matic you can use.
Here are a few programs and apps that can get the job done.
- PowerPoint. Did you know it has a Screen Recording feature? If you’re using Office 2013 or newer, you can record some or all of your screen, plus audio (if you have a mic). Save that video as a separate file, then you can edit it, embed it in a presentation, or upload to YouTube.
- QuickTime or MacOS screen recorder tool. Both of these Mac tools come pre-loaded on your computer and let you capture videos of your screen. If you have a mic, they can also record audio.
- Jing (free). We use this in our office all the time. With Jing, you can capture a video of your screen that’s up to 5 minutes long. If you have a mic (built-in or USB), it can capture audio, too. Files save in the SWF format, so that’s the only catch. You’ll need to convert to MPEG-4, AVI, WMV, or another accepted format before uploading to YouTube. You can run it through a program like Swivel, recommended in the Adobe forums.
- Snagit ($50 one-time fee). If you’re willing to spend a little, Snagit records audio from a microphone plus your screen. It saves you the step of adding audio later – get it all captured at once, and save as an MPEG-4, ready for upload to YouTube. If you want to tinker with your video and edit it afterward, upgrade to Camtasia.
4. Use Free Explainer Video Software
“Explainer” videos – wait for it – explain something via a quick photo slideshow. You can create these videos using free online tools. Lumen5 works too, but we separated it out above because of the ability to easily import your own content. Consider it another option in this category.
The catch with these options? You’ll have a watermark (the software’s branding) visible on your video. For most viewers, this isn't visually disruptive. After all, they want to get a question answered, not to see Oscar-worthy aesthetics. Still, if watermarks bother you, upgrading to a paid account usually solves the problem.
- Adobe Spark (free). Use Spark’s pre-made story structures to create a slideshow, add text and music, then save as an mp4, ready to upload to YouTube. It’s available via web app and iOS app. The selling point here is done-for-you design.
- PowToon (free/paid options). At the free level, you can create an animated, whiteboard, or live-action video up to 3 minutes long. You can export to YouTube, or – get this – publish as a PowerPoint or PDF. If you create something you absolutely love, upgrade to a Pro account ($228 yearly) to remove their branding and export in HD. Check it out here.
- Biteable (free/paid options). This service makes it easy – just pick a template, add your text, and go! At the free account level, you can create 5 HD videos per month and publish them directly to YouTube and Facebook. The downside? You can’t download the video. If you want to download and keep a copy of the video for yourself, you have to upgrade to the paid version at $23/month ($276/year).
That’s our look at 4 ways to make videos without appearing on camera!
Have you used any of these tools before? Which ones do you recommend? Tell us in the comments!
Want to learn more about video marketing? Check out these related posts:


PRO TIP: Nick is awesome at video marketing - and now he has a course that'll teach you everything you need to know. From increased client engagement to SEO benefits, video marketing is huge, and Nick is at the top of his game. Click here for course details.
