Updated: 5/17/2023
If you want nearby clients and prospects to find you, optimize your website and social media profiles to make it easy for them.
Last week, we brought you 11 SEO tips to help your content start ranking in search engines. This is part 2, local SEO for life insurance agents. It was a special request from one of our Advanced Sales Academy participants, and we’re happy to help. If you’re interested in face-to-face meetings with clients, you can’t afford to skip local SEO.
Why Local SEO Is Worth Your Time
Local search users have a goal. They want to find someone or buy something, and they want to do it now. According to Google’s Consumer Insights, 88% of consumers who conducted a local search on their smartphones visited a related store within a week.
There’s just one problem.
Mark Hug pointed it out at LIMRA’s annual distribution conference way back in 2014.
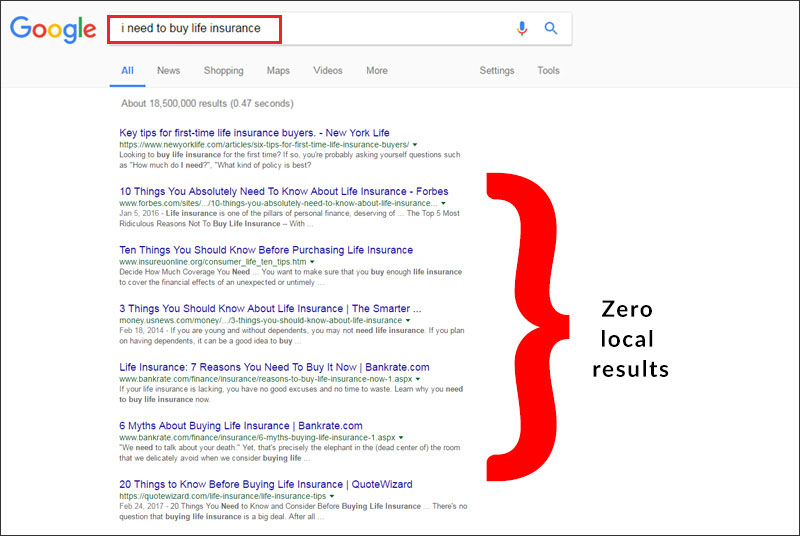
He used his smartphone to do a web search using the phrase “find me a lawyer.” He found three lawyers with offices less than a mile away. Next, he searched using the phrase “I need to buy life insurance.” The result? Articles from Money Magazine and Forbes.
At the time, life insurance agents weren’t doing a good enough job with local SEO to rank for searches like this – and the situation hasn’t changed much since then.
Even if you prefer to sell exclusively online, it’s a good idea to spend some time optimizing for local search. You never know how many local shoppers might find you and choose to do business with you online. Here are 5 ways to start gaining visibility in local search.
1. Standardize Your Contact Info
The number one issue affecting your local SEO rank is probably your contact information.
NAP consistency is an important part of Google’s local search and Local Pack algorithms.
It sounds easy, doesn’t it? Post your name, address, phone number, and URL on your website, social media profiles, online directories, and review sites. But many businesses have outdated information listed on these sites. Worse yet, some have mismatched information – a different phone number listed on their website and Yelp listing, for example. This confuses search engines and prevents that business’s listings from being identified as belonging to the same company or person.
Don’t confuse the search engines if you want local consumers to find you.
First, standardize your contact information (referred to in the SEO world as your “NAP”). Next, store a copy anywhere you may need it – on your phone, in your office, and in Google Drive or Evernote. Finally, refer back to this any time you add or update an online profile.
Here’s how to standardize your NAP:
- Your name. Do you go by a nickname on social media but use your full name on your website? Did you include a middle initial on some social media sites but not others? Do you have a name update after a marriage or divorce? If you do business with a company name, do you consistently use suffixes like "Inc" or "LLC"? Be sure you stick with one iteration of your name everywhere you use it online.
- Your address. Use the exact same address everywhere, right down to the abbreviation for your street name. Use the USPS.com zip code lookup function. When you input your address, it will show you the standardized version, as well as other ways that address might appear (i.e., with a suite number you might have forgotten).
- Your phone number. Be sure you always use the area code so search engines can determine your location. Also, if you’re really going to focus on local SEO, you may want to use your local phone number instead of your 1-800 number in your online profiles.
- On your website. Be sure your contact information isn’t hidden in an image. While that image is visible to site visitors, search engines can’t read it. Be sure your standardized contact info is on every page of your site, ideally in a header or footer.
There are paid tools you can use to help update your listings in the many online business directories out there. Moz Local will send your contact info to major business listing aggregators based on the data you input in their Excel template. As of this writing, the cost was $14/month.
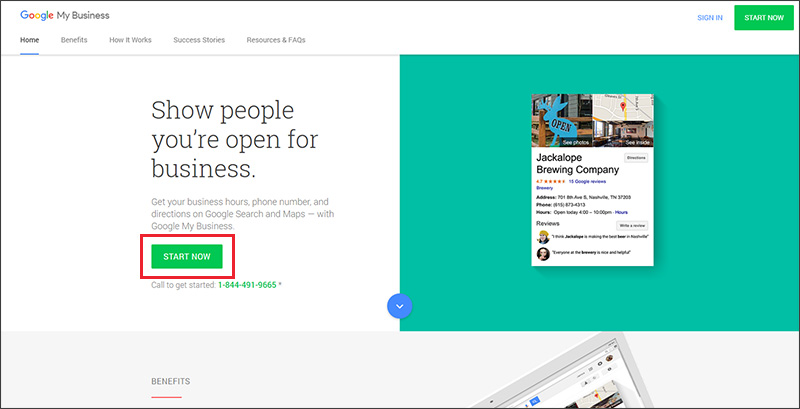
2. Get Familiar with Google Business Profiles
Your Google Business Profile (formerly Google My Business) is a dashboard that helps you keep track of your Google-based local SEO. It houses your local search listing, which means you no longer need to worry about having a Google Places listing. Your Google Business Profile dashboard also connects your Google Analytics and Google Adwords.
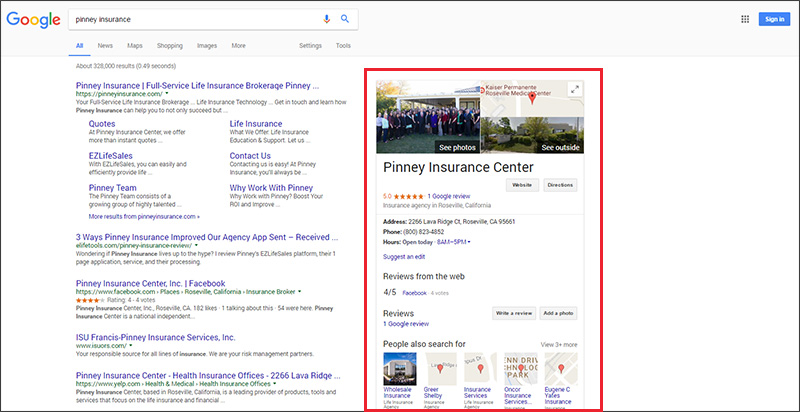
Having a Google Business Profile listing is what creates the helpful highlighted information about you on the right-hand side of Google's search results, called the Knowledge Graph. This adds authority to your business. According to SearchEngineJournal.com, Google's Knowledge Graph algorithm updates about every 2-3 weeks, so if you're adding new information to it, be patient. As an example, here’s what our Knowledge Graph looks like:
If you have duplicate listings in Google Maps, or multiple Google Business Profiles, this can hurt you. Google considers multiple profiles for the same business to be spam. Check out Moz's deep-dive on duplicate listings: how they happen, and what you need to do to fix it.
Get Verified
When you claim your Google Business Profile, you’ll also be asked to verify your business. Some businesses get the option to verify by phone or email, but the standard option is to use a snail-mail postcard. That’s how we verified our listing, and it was easy. Just provide Google with your address, wait to receive their postcard, then enter the card’s verification code in your dashboard. Here’s Google’s support page on verification, for reference.
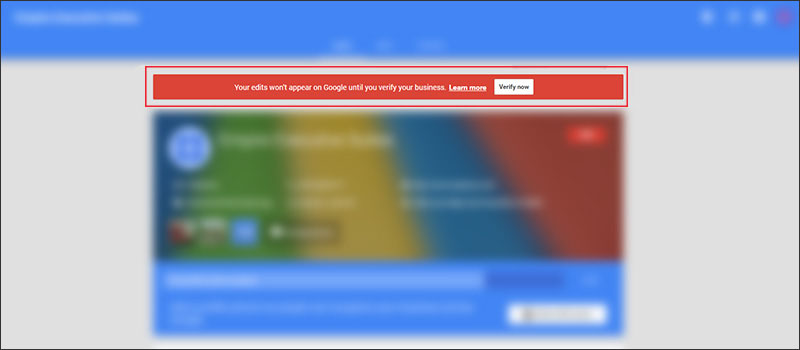
Once you’re verified, you can add and edit information about your business. Technically, you can add and edit this information before you’re verified, but it won’t show up on Google until you do:
Update Your Info
Your dashboard will have five sections up top: Home, Info, Photos, Reviews, and Insights.
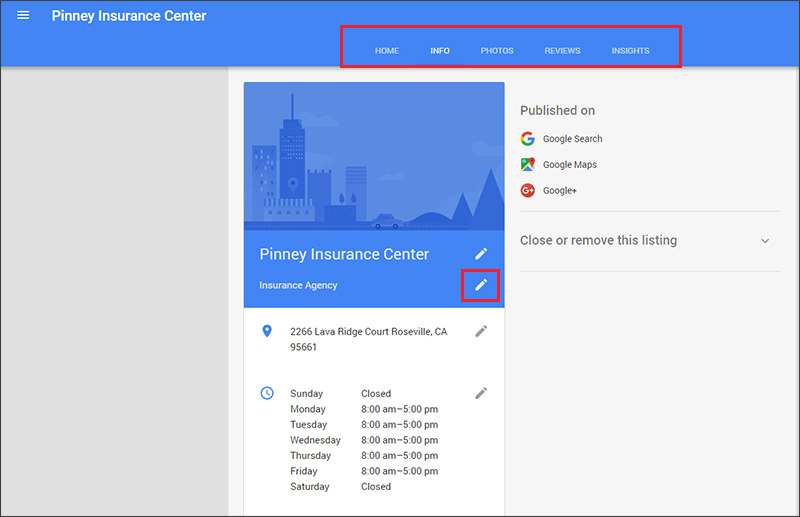
Here's what you'll need to monitor.
- Info. Update your basic contact info and choose the categories that represent your business. The most relevant category is “Life Insurance Agency,” but if you offer additional types of coverage, choose those as well. To start, click the pencil icon boxed in red in the image above.
- Photos. Upload high-res photos of you, your staff, office, lobby, and exterior. The goal is to give a prospect a good feeling about you and your business.
- Reviews. When people leave reviews on Google, they will appear here. You'll have the option to reply to them here. There are a couple of easy ways to get more Google reviews:
- Add a review request to thank-you or in-force emails.
- Add a review request to your About page – something like, “If you’ve worked with us, we’d love for you to review us on Google.”
- Ask for reviews on social media.
- Make it easy for people to add their reviews. Whitespark has a free Google review link generator. Use this link in emails to your clients, onboarding materials, and more.
- Insights. Google will tell you approximately how many visitors found you through online search, whether they used search or maps, and what people do next (visit your site, request directions, call you, view your photos, etc.). For example, here’s what the customer actions graph looks like in our dashboard:
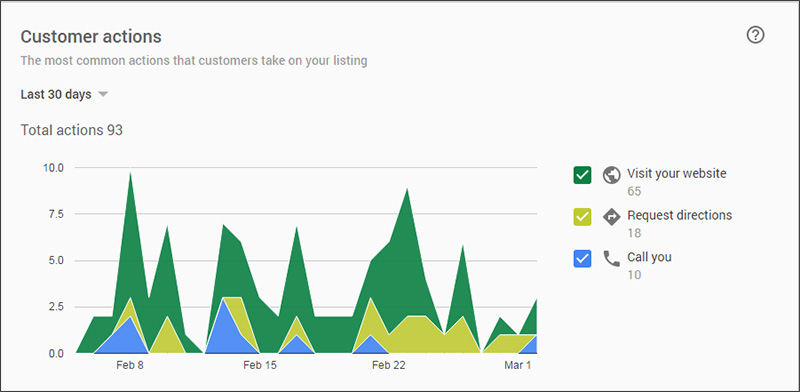
Be sure you check your insights occasionally to make sure your local SEO is bringing you new prospects.
3. Create a Presence on Social Media, Yelp, and Other Directories
Your social media profiles show up prominently in search results, as do review aggregators like Yelp and Angie’s List. Second-page results often include directory listings such as YellowPages.com and WalletHub.com.
The more of these links you have, the more authoritative your business appears to consumers.
Also, since your Google listing and your Facebook page (not profile) can both contain reviews, it’s important to monitor them. Having these links in search results also gives consumers a wide variety of ways to approach you, which is always a good thing.
Social Media
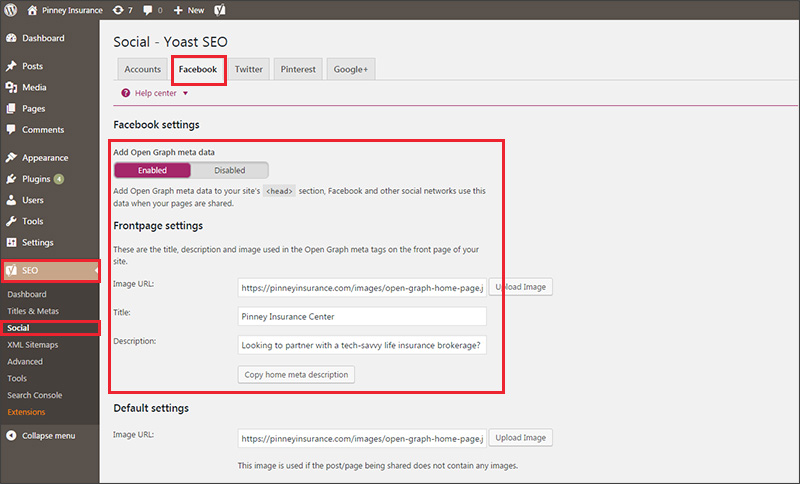
The best way to ensure your social profiles show up in search, local or otherwise, is to add Open Graph meta data to your site. If you aren’t using WordPress, your web developer can add this code to your site’s <head> section. If you have a WordPress site, all you need is the Yoast SEO plugin we talked about in our previous SEO post.
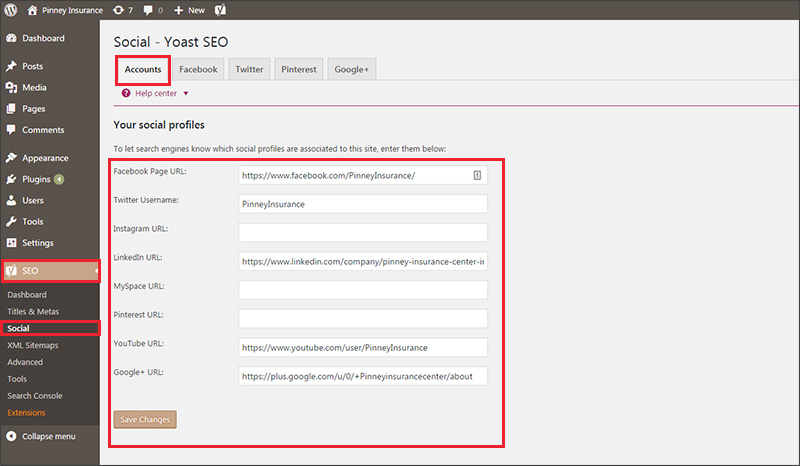
Using the Yoast plugin, there are 2 steps to add your Open Graph data. First, from the SEO menu on your left-hand side, click Social. This takes you to the Accounts tab, where you can fill in all your relevant social media profiles.
Next, click the Facebook tab. Here, click “Enabled” to add Open Graph meta data to your site. Fill in the requested information, including a default image URL, title, and description. This is what will display in search results when someone shares your site. If you're not sure which image to pick, a screenshot of your home page (sized to 1200x628 pixels) would do the trick.
Yelp & Other Directories
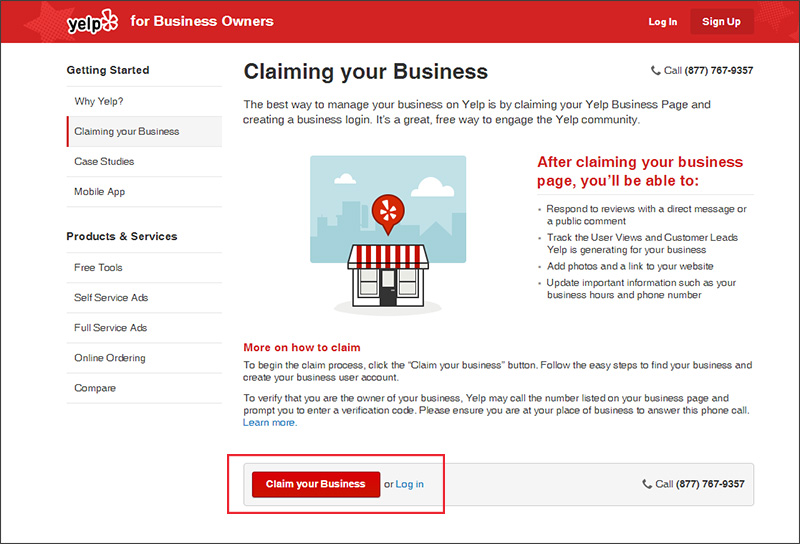
The first step in managing your Yelp presence is to claim your business - click here to do that. In most cases, Yelp will call your business phone number and give you an automated verification code to enter. After you’re verified, you can add photos to your business page, reply to reviews, track views, and more.
Now, Yelp does have a few caveats regarding reviews. For starters, they don’t allow you to ask for them explicitly. Instead, just let your clients know you’re on Yelp. Acceptable uses include adding a Yelp badge to your website, or posting a sign at your location that says something like, “I’m on Yelp.”
In addition, there are a number of other places you may want to create or claim a business listing:
4. Choose Your Local Search Keywords
In our previous SEO post, we talked about basing your pages and posts on long-tail keywords. You also want to create pages or posts optimized for local search keywords.
First, brainstorm a list of keywords someone might use to search for you in your area.
For example, your list should probably start with “life insurance agent [your town].” Other options include “buy life insurance [your town]” and “find [your town] life insurance agent.” If you live in an urban area, your list should include keyword variations that include major neighborhoods and/or suburbs – anywhere you want to do business.
Next, add a few popular variations to your list. Google’s suggestions can help with this. Here’s what they suggested when we searched for “life insurance agent in Sacramento”:
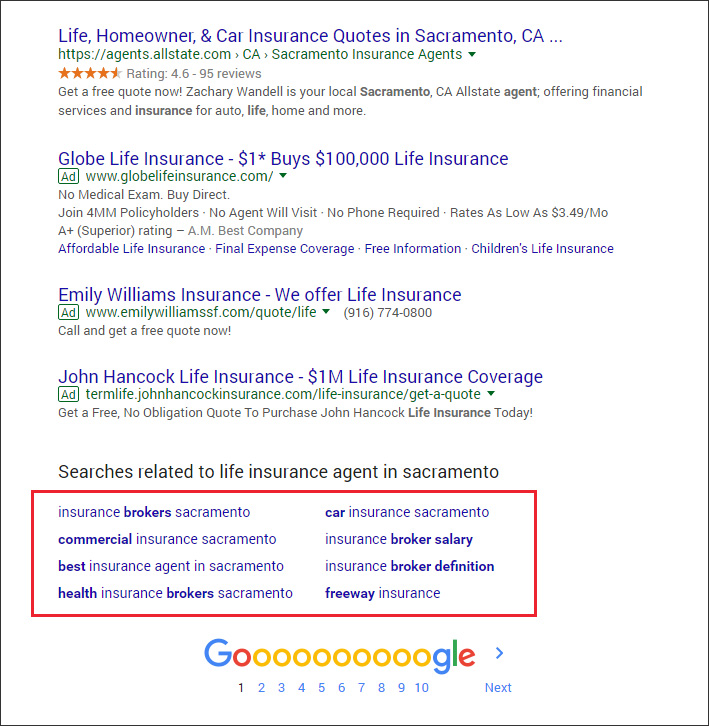
While not all of these are helpful, take a look at the third suggestion in the left-hand column. How would you like to show up for this search term? Not bad, right? As you’re fleshing out your list, add state abbreviations, words like “best,” and the names of popular review services:
- Best life insurance agent in [your town]
- [2-letter state abbreviation] life insurance agents
- Life insurance office [Your town]
- [Your town] life insurance agent yelp
Next, Google the phrases on your list and take a look at the results. Do you see any social media sites or directories you’re not on in the first page of results? In addition to gauging the competition, these searches will also give you ideas for new places to create a listing or ask for reviews.
5. Create Unique Localized Content
Create at least one page or post on your site optimized for each local keyword you're targeting.
Use the tips and techniques from our previous SEO post. Pay special attention to the title tag – that’s your headline within the search results. In 55 characters or less, what do you want a searcher to know? What kind of first impression do you want to make?
We did a search for “buy life insurance in Sacramento.” Once you scroll past the ads, here’s what our results looked like:
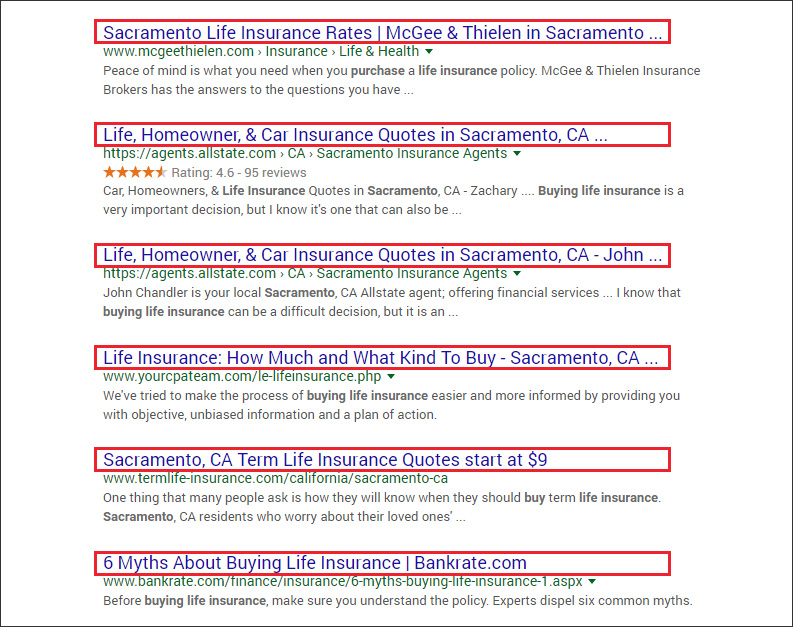
Just from these results, we can glean a few things:
- Space is precious. Don’t repeat words (note how “Sacramento” is repeated in the first result).
- Try to make sure your whole message is contained in those 55 characters (note how the third message only displays the agent’s first name, then trails off with an ellipsis).
- Reviews matter – see the star rating and number of reviews for the second result? Those are Google reviews.
- Want to stand out? Try using a call to action in your title tag, or asking a question.
TIP: Does your agency have offices in multiple locations? Plan on creating at least one page per location. You don’t want duplicate content on these pages, so you’ll need to find a way to rephrase or reframe the same basic information in the page text. One good way to do this is to be very specific about each location, with details like the following:
- Who works in this office?
- Do the hours differ from your other locations?
- What’s the parking situation like for visitors?
- Where do employees or clients grab coffee nearby?
- What local events do your employees or partners attend?
- Do you have testimonials from local clients?
That’s our introduction to local SEO for life insurance agents!
If you put each of these tips into practice, your local SEO should start to gain traction. Do you have more specific questions about local SEO…or SEO in general? Ask us in the comments, and we’ll do a follow-up post.
