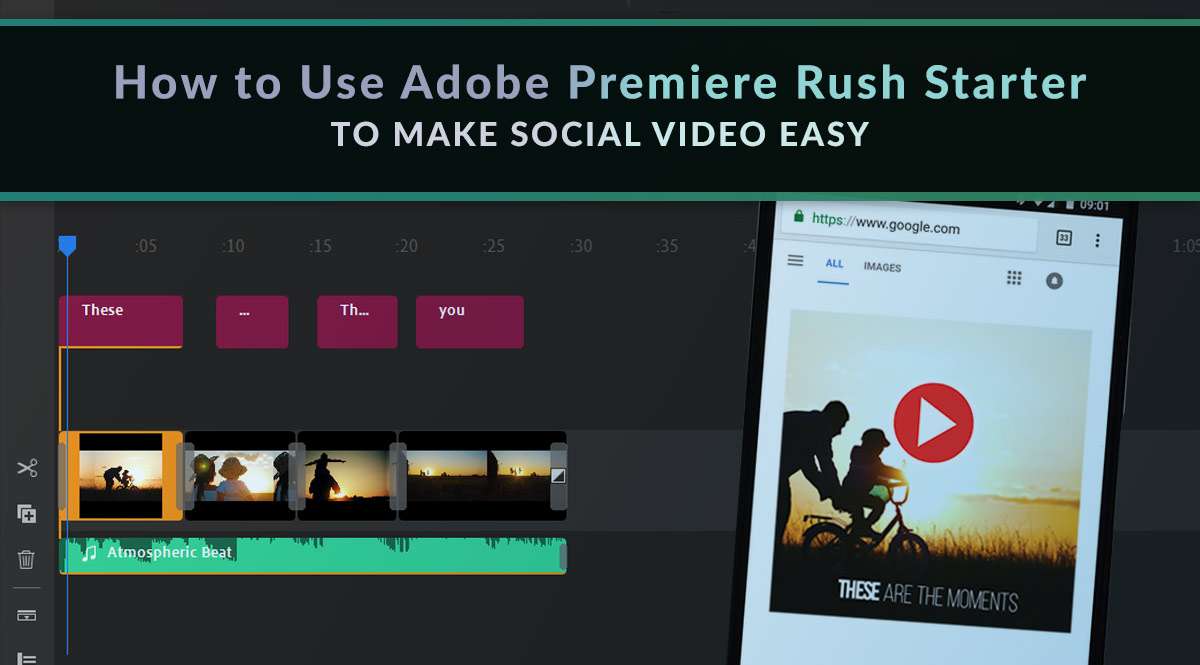
In a prior post, we showed you how to use a free tool called Adobe Creative Cloud Express.
With that tool, you can make social media images and quick animated videos for your posts and stories. But what if you want something a little…more?
Adobe Premiere Rush Starter is free video editing software that's easy to use. With a paid upgrade, you can access additional features - but the good news is that you don't need to. The free features let you create everything you need to post videos to Facebook, Instagram, YouTube, and more. Download it as either (a) an app for your phone, or (b) software for Mac or Windows. If you use the app on your phone, you can shoot video with the program's built-in editing capabilities.
The bottom line? If you can drag and drop, you can use this tool. We’ll show you how.
Jump to a section:
Create a Project in Premiere Rush Starter
Add Text
Add Transitions
Add Color Correction
Add Audio
Export Your Video
What You Get with a Paid Account
Create a Project in Premiere Rush Starter
Unlike Creative Commons Express, Premiere Rush is software you need to download either on your computer or mobile device. We’re using the Windows version. If you’re using iOS or Android, you may want to have these get-started guides handy since your screen arrangements might be a little different. However, the editing process we describe below will be exactly the same. All you need to activate the software is a free Adobe Creative Cloud account.
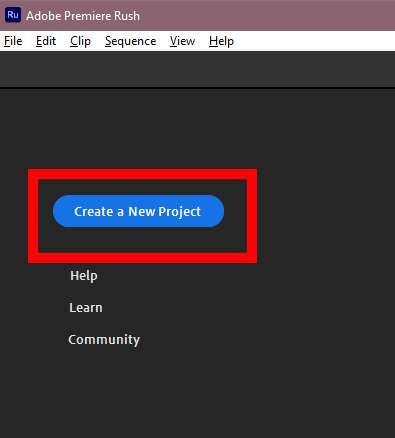
Once you have the app or software downloaded to your device, open it up and click Create a New Project. On a mobile device, click the plus button at the bottom of the screen.
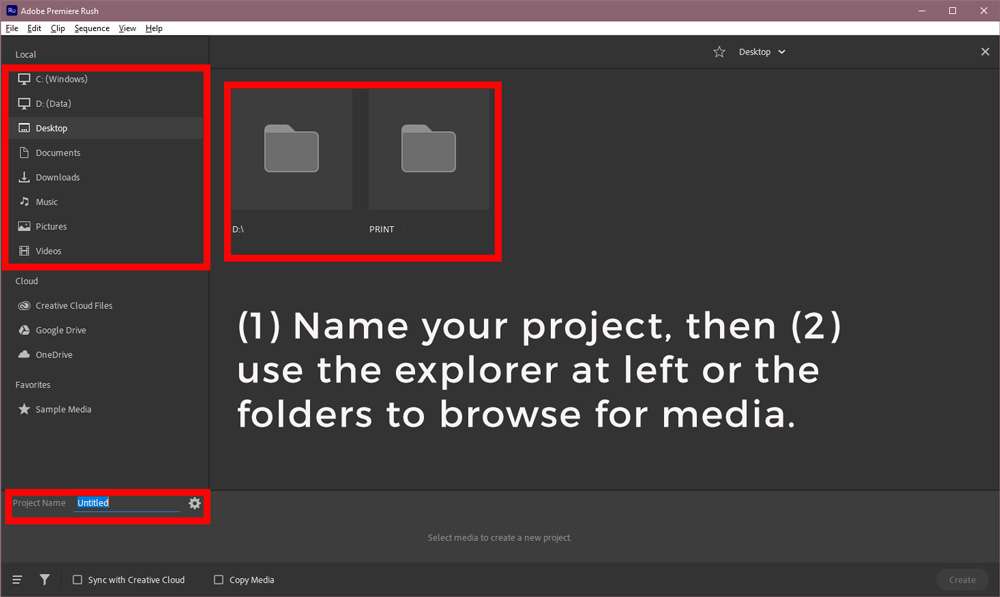
Your first step is to pick any media item to get started. Use a photo, a music file, a video clip from your camera roll, or a stock video clip you downloaded from a service like Envato Elements. Use the options on the left or the folders in the middle of your screen to locate the files you need. It's also a good idea to name your project (at the bottom of your screen).
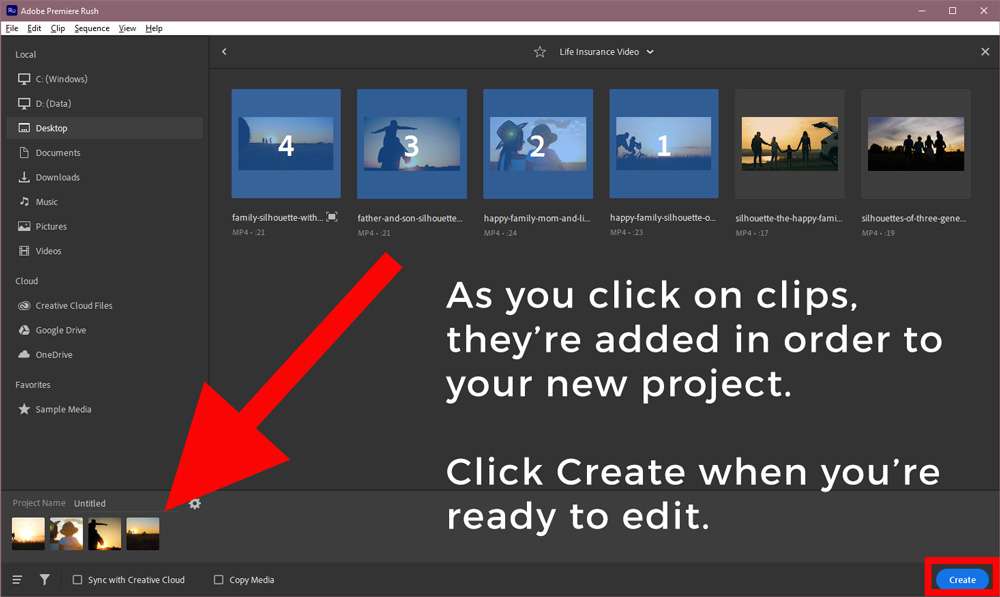
For the purposes of this tutorial, we already downloaded a few “happy family” video clips from Envato Elements and put them in a folder on the desktop so they're easy to find and add to this video project. If you know you’re going to use more than one clip in your video, click on one clip at a time and Premiere Rush will add them to your project in that order. You can always re-arrange them later. Click Create when you’re ready to start editing.
This is what your new project looks like. It’ll start out in the aspect ratio of the media you selected. For example, if you selected vertical video you filmed on your cell phone, that’s the aspect ratio you’ll see.
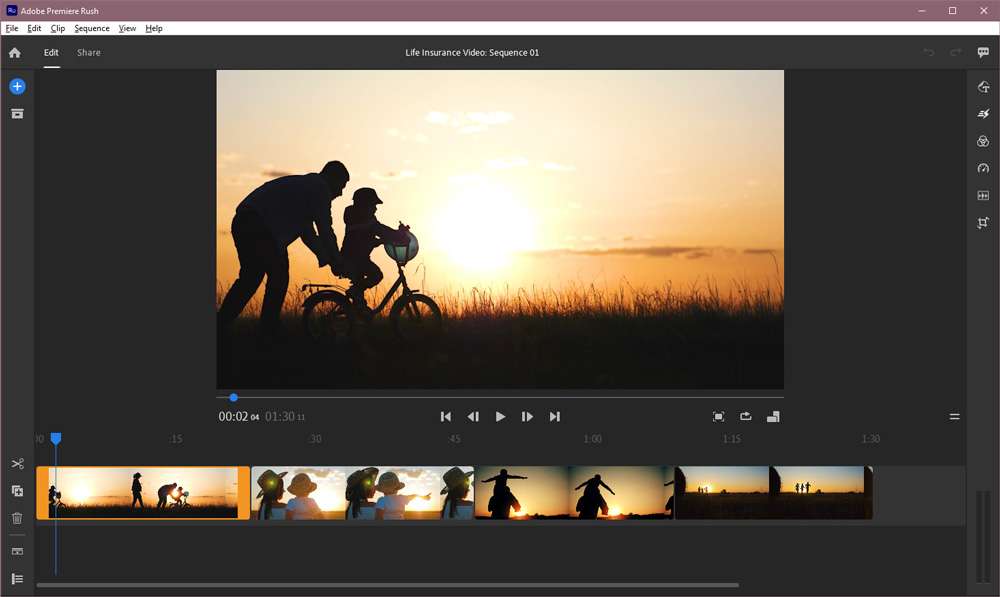
We selected video clips that were filmed in traditional landscape ratio, so that’s what we see. If you want to change this, click the Sequence option in your top menu bar and then Aspect Ratio. Take a look at your options and select a different aspect ratio. You can choose landscape, portrait, or square. We’re going to change ours from landscape to 1:1 (square) so it works for Instagram. Once we do that, here’s what we see:
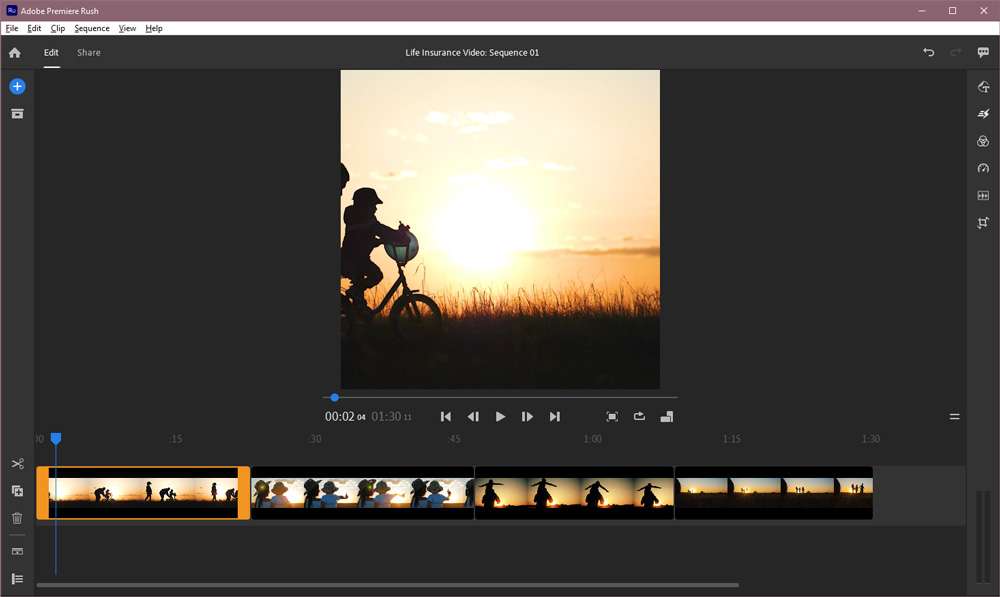
As you'll see, the editing workspace has a preview of your final product (in the middle of your screen) and the timeline, which shows you how the elements of your video are laid out in sequence (at the bottom). The timeline is where you make all your edits. The preview is where you can see what those edits do to the final product. Let's go over a few navigation basics before we move forward.
- To preview the final product: On a computer, press the spacebar to preview/play your video. Press it again to stop.
- Alternate method: On a computer or mobile device, use the control buttons (play, forward, back, beginning, and end) visible beneath the program monitor (where your video previews above the timeline).
- To make an edit in your timeline: Click or tap the element you want to edit. Anytime you want to insert an element, be sure your blue playhead is in the correct position where you want the new element inserted. If you insert something in the wrong place, you can either drag and drop to move it or undo the action (ctrl+z on Windows), reposition the playhead, and reinsert the element.
To select any clip on the timeline, click or tap on it. You'll see orange handles appear on either side of the clip. Click either orange handle and drag it to trim a clip. For example, clicking the left orange handle and dragging it to the right will cut out the beginning of the clip. Clicking the right orange handle and dragging it to the left will cut out the end of the clip. Keep in mind you aren’t trimming the original copy of the source clip – you’re just trimming what will be seen in your final video project. So edit away without worrying that you’re destroying original source material.
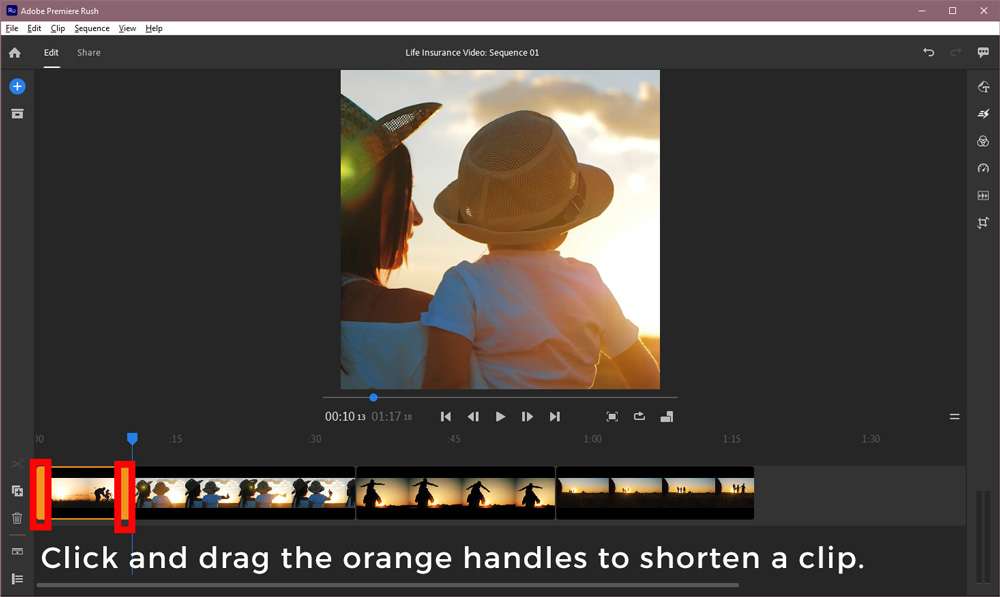
We shortened each of our four clips until the total video length was under 60 seconds. You can see your total video time under the playback monitor, as shown below.
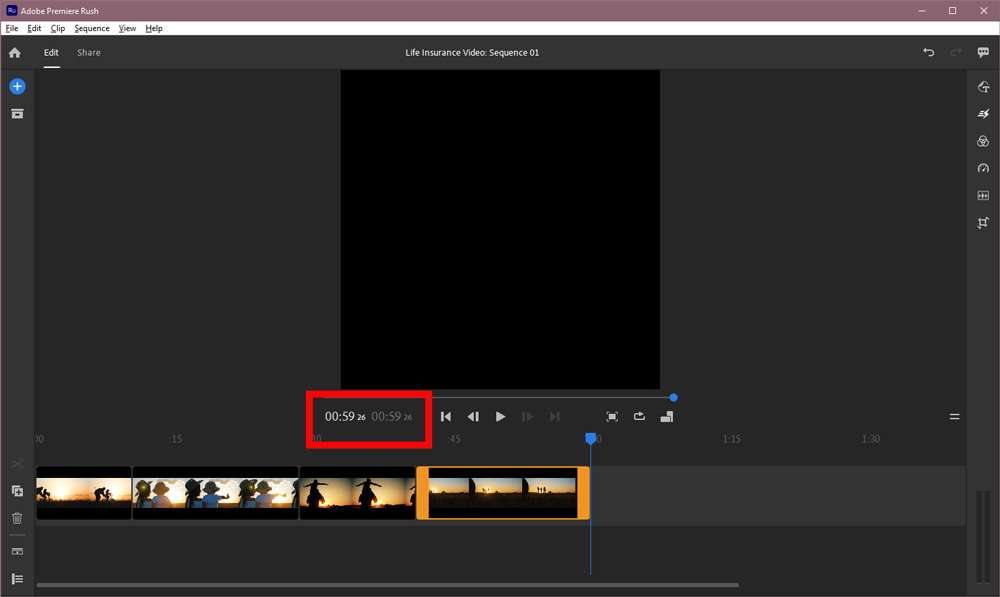
All right, we’ve got a 0:59 second video…with no text or nifty effects. Let’s add some!
Add Text
The menu on the right side of your screen has all the controls you need to add text and effects to your clips. Hover over any icon if you’re not sure what it does to see a tooltip.
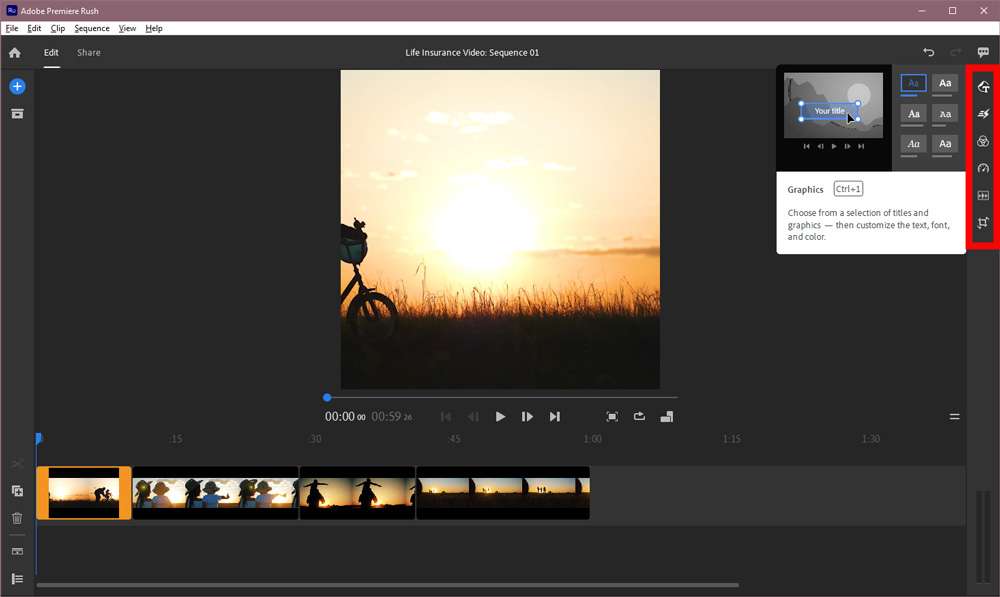
We’re going to add some text. When you click the text icon (first in the right-hand menu), select Add Graphic and browse from the available options that display on your left.
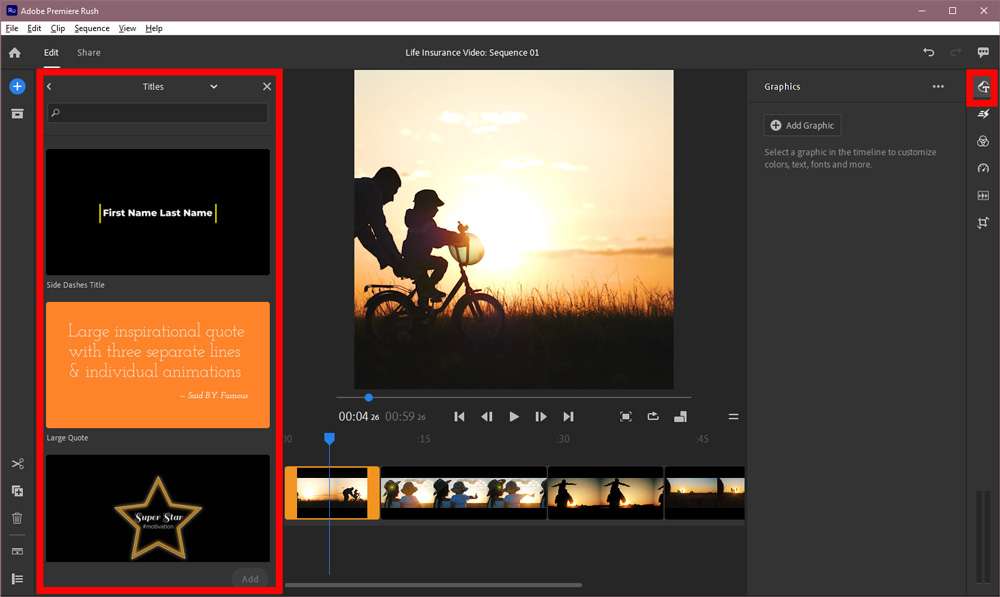
Click any graphic and then click the Add button in the lower-right to apply it to your video. You’ll see the graphic appear both (a) on your playback monitor, and (b) in a new row on your timeline, above the clips you’ve already selected. The layers on your timeline work just like the layers in Adobe Creative Cloud Express we went over in a previous post.
REMINDER: Be sure the blue playhead is positioned at the point where you want the graphic to appear. Premiere Rush will insert the graphic wherever it is positioned.
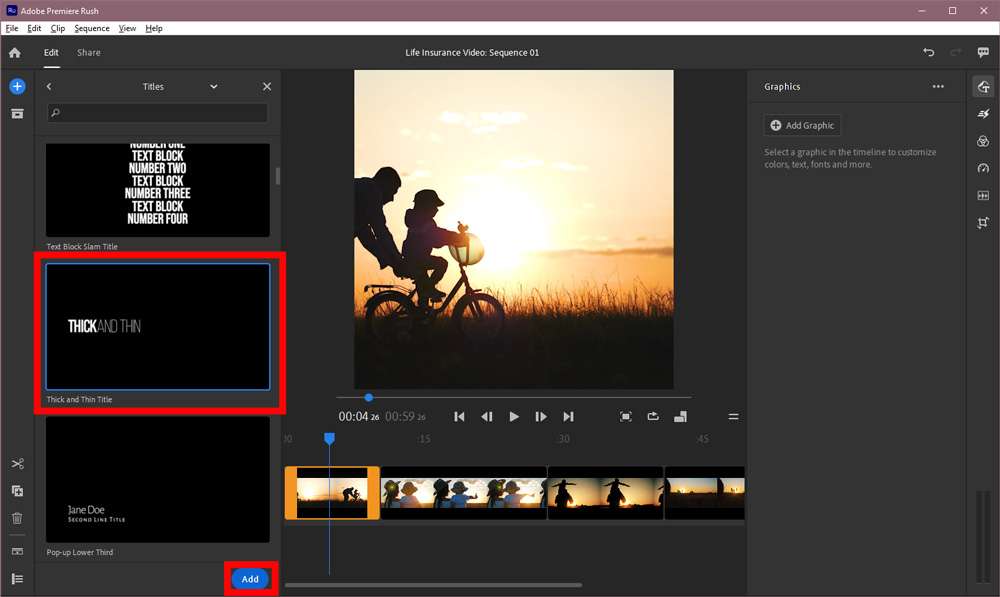
Want to adjust the graphic’s placement? Make sure the graphic layer is selected in your timeline, then click to select the text in the playback monitor. You'll know you have the text selected when a large, thin rectangle appears around the text. Drag your text to wherever you’d like to place it.
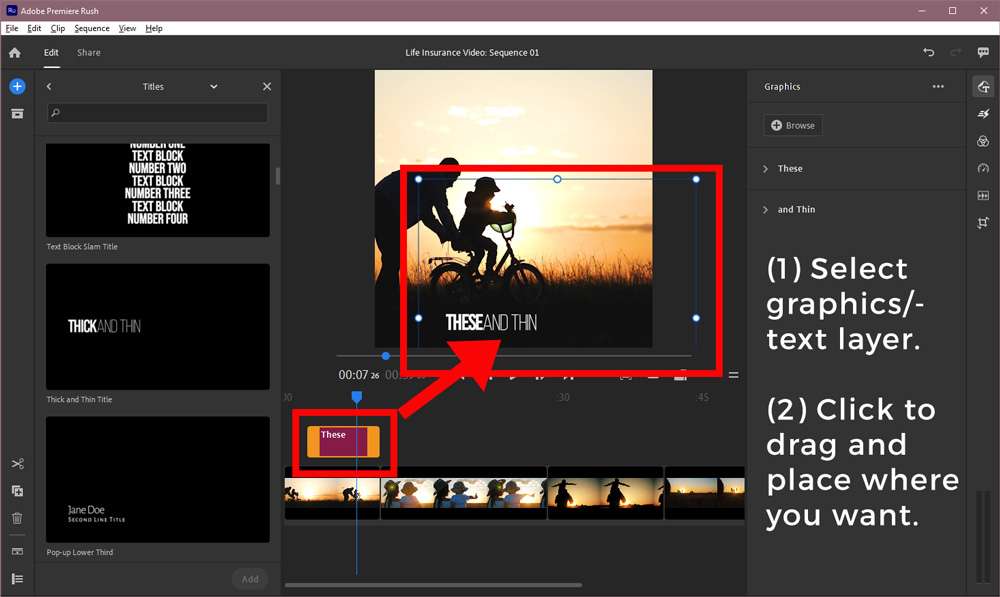
Now, let’s update what the placeholder text says. Step one? Click on the word/phrase you want to change where the text is displayed in the program monitor. Once it appears in a thin blue box, you can type/delete as needed.
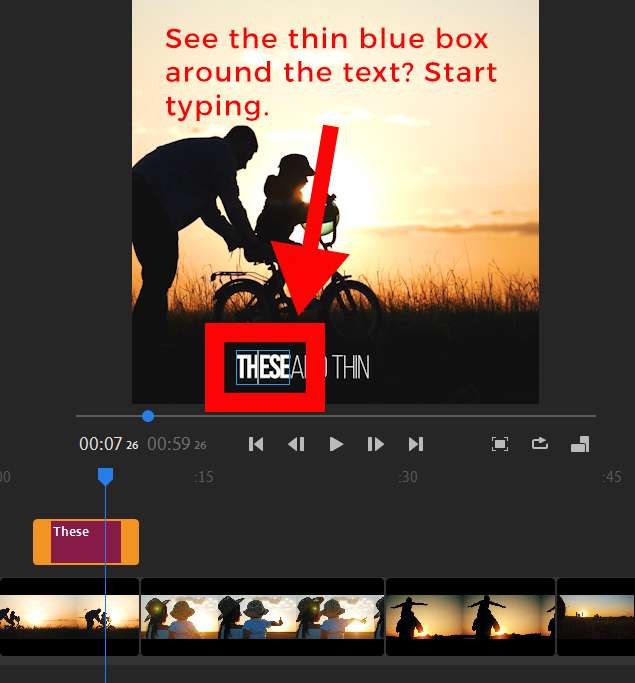
On the right, beneath your Graphics header, click the twirldown arrow beside the word/phrase you want to update. You can change the font, size, color, and more using the options provided.
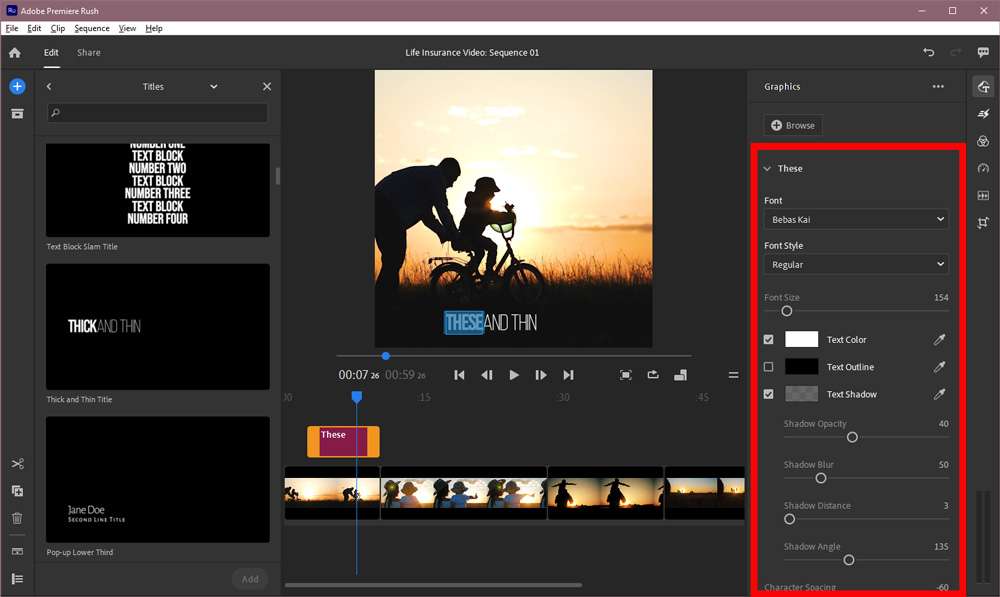
Repeat this process for any text graphics you want to add over each clip.
Add Transitions
Now, let’s spice up the transitions between clips.
Click the second icon in your right menu to pull up the Effects options – Transitions, Pan and Zoom, and Auto Reframe. Click Transitions to view the available options.
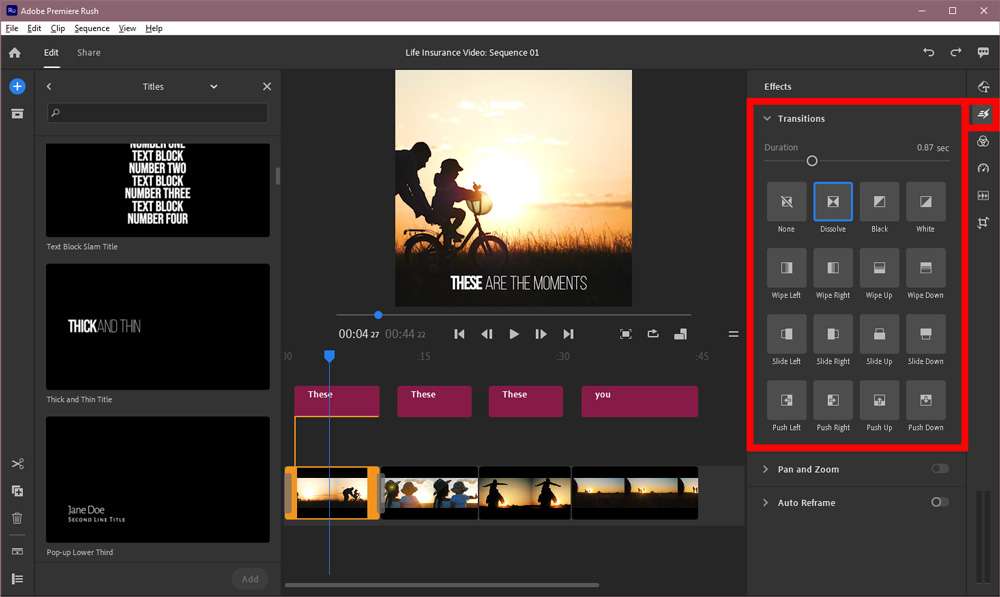
To apply a transition, make sure you have a clip selected in the timeline (you can tell because the orange handles will appear on both sides). Drag a transition onto the appropriate part of the clip – the beginning or the end. You’ll now see an orange bar appear between that clip and the clip that follows. You can use the Duration slider on the top right of your screen to make the transition longer or shorter. We lengthened each of our transitions to at least 1 second.
To preview the whole thing, position your timeline's playhead a bit before the orange transition indicator and press the spacebar (or hit the play button in the program monitor controls).
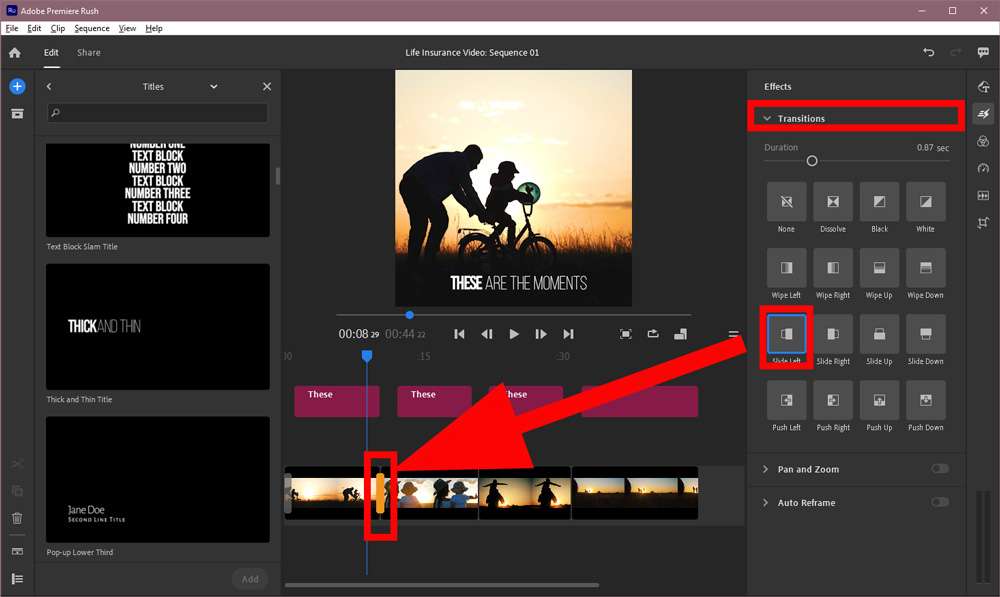
Repeat this process as many times as you like. We added a total of three transitions between each of our clips.
Add Color Correction
If you selected several clips or images that don’t blend well together color-wise, you can change that. Click on the third icon from the top (color) in your right-hand menu. You’ll see a range of nifty built-in presets you can use.
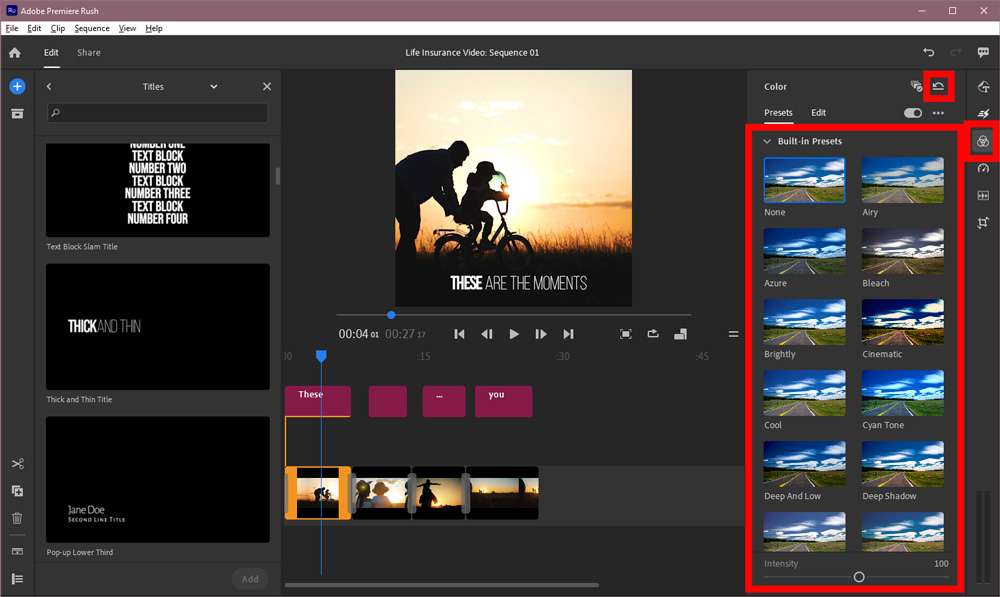
To apply one, click on any clip to select it and then click on a preset. You’ll see the color change instantly. Don’t like it? Ctrl+z undoes it – as does the “Reset to Default” button in the top right of your Color options, as shown above.
Add Audio
We’re not done yet! Well, we could be, but Premiere Rush Starter also offers soundtrack music that’s licensed for personal or commercial use. If you want to add a track, click the fifth icon in your right-hand menu to bring up your Audio options. Click Browse.
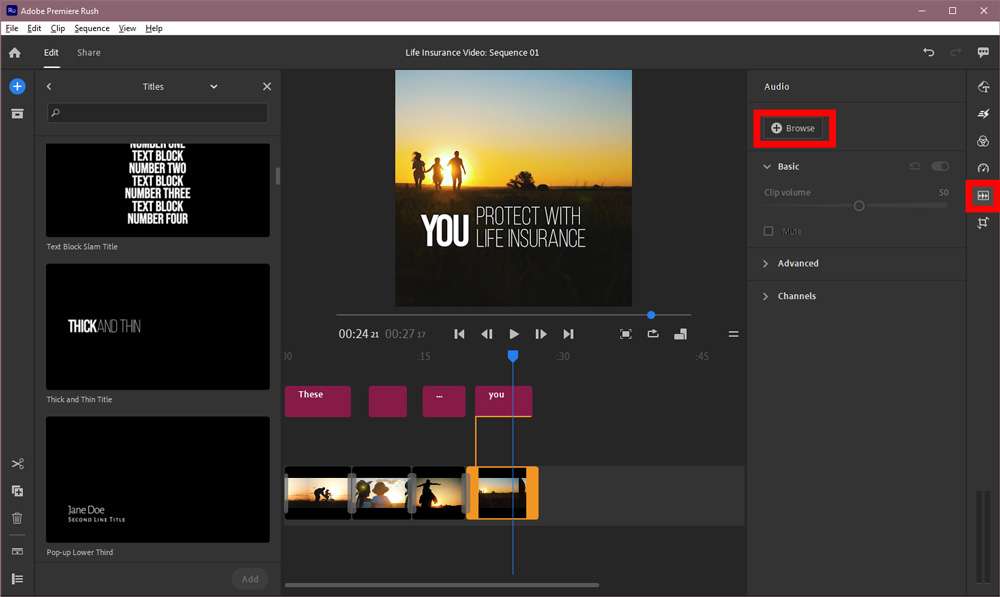
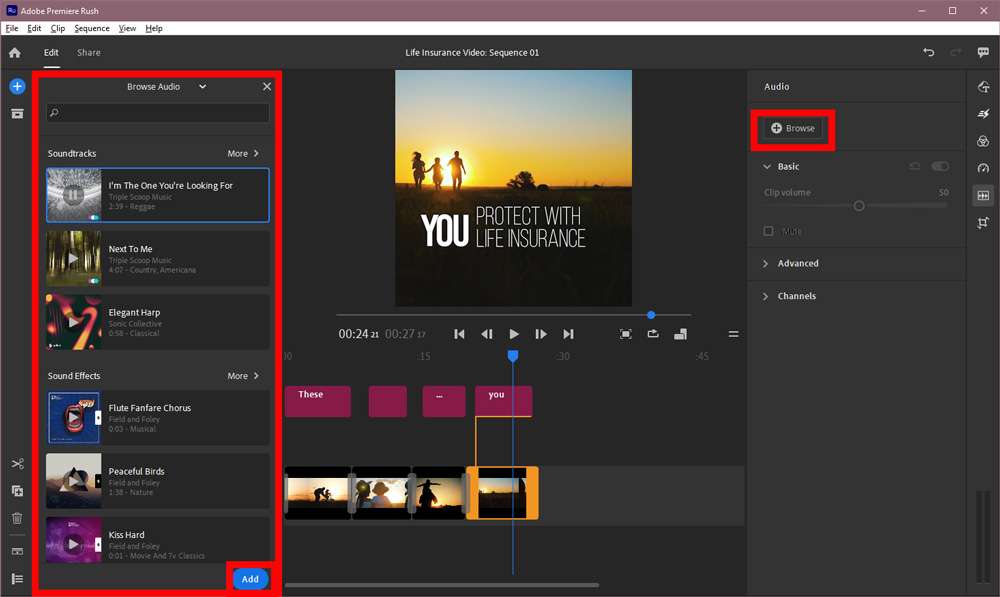
Click or tap on any audio track in the Browse Audio menu to listen to it. Like it? Click or tap Add (at the bottom of your list of audio track options). You have music, sound effects, and audio loops to choose from.
But what if you want to add your own voiceover? You can do that, too. To add your own track, click the blue plus button to Add Media.
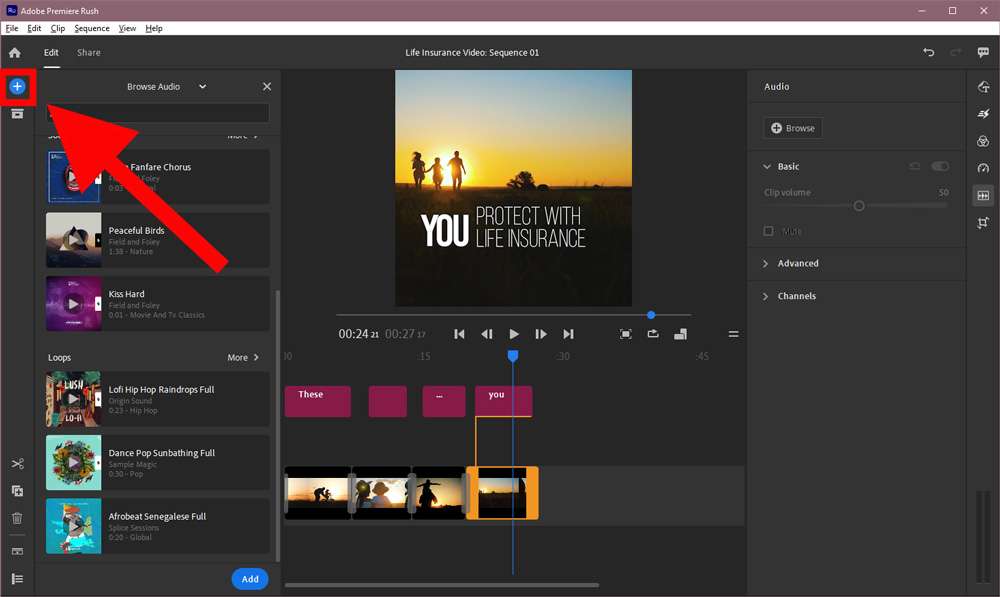
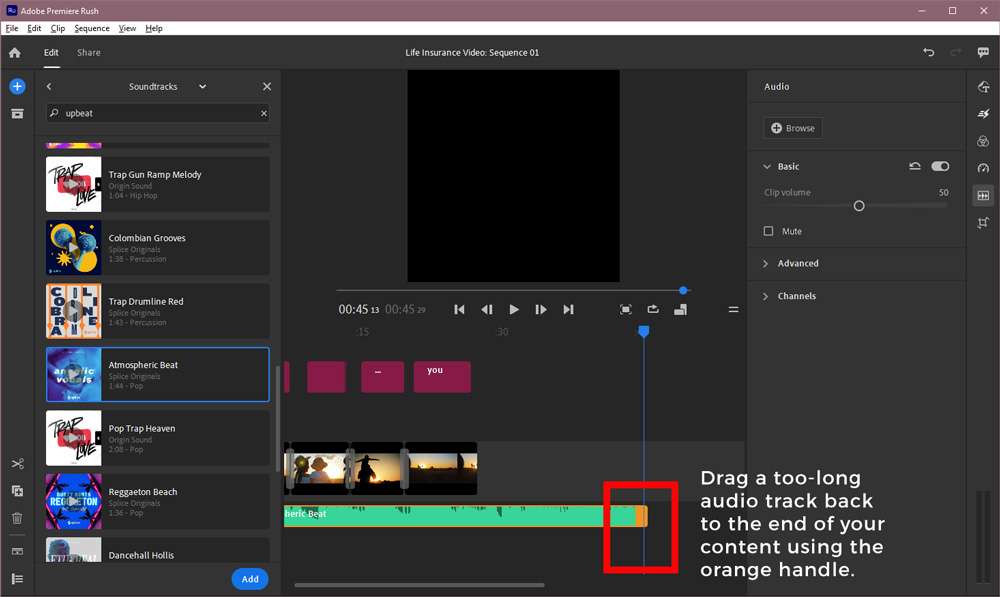
Premiere Rush Starter will add your track to the timeline. Remember that it will add the track at wherever you have the blue playhead parked, so make sure it’s at the beginning of your video. If you forgot to do that before adding your track, just drag the track back to the beginning of the timeline. Your track may also be longer than the content of your video. If that’s the case, just use the orange handle at the end of the track to trim it to match the length of your content.
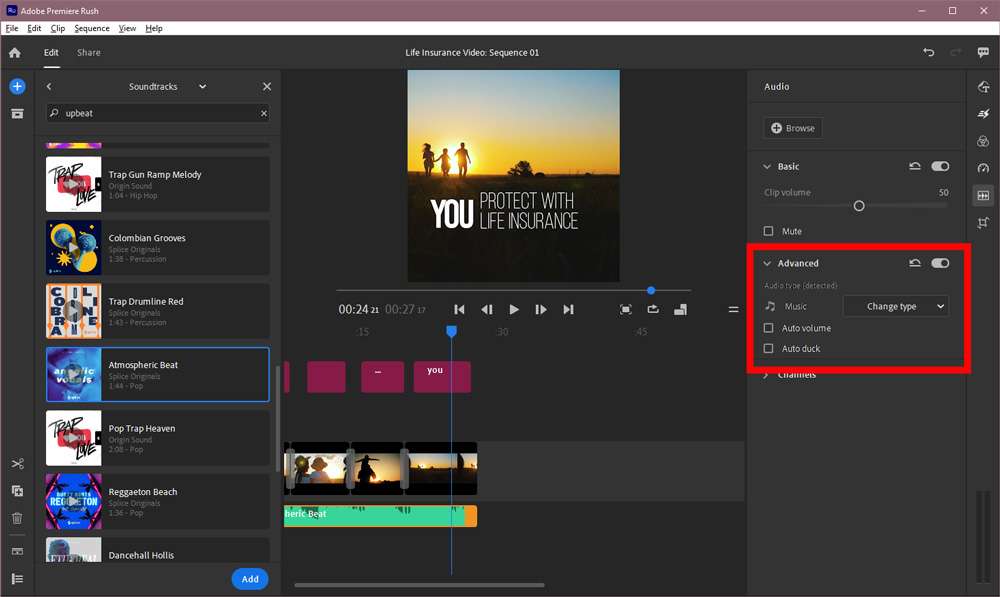
If you’re uploading voiceover narration, you can still use background music, too. Just make sure you select your music track in the timeline and twirl down the Advanced Audio options. Select Music as the type of track (if it’s not automatically selected for you). Next, select Auto Duck. The software will automatically turn down the music anytime it detects the voiceover.
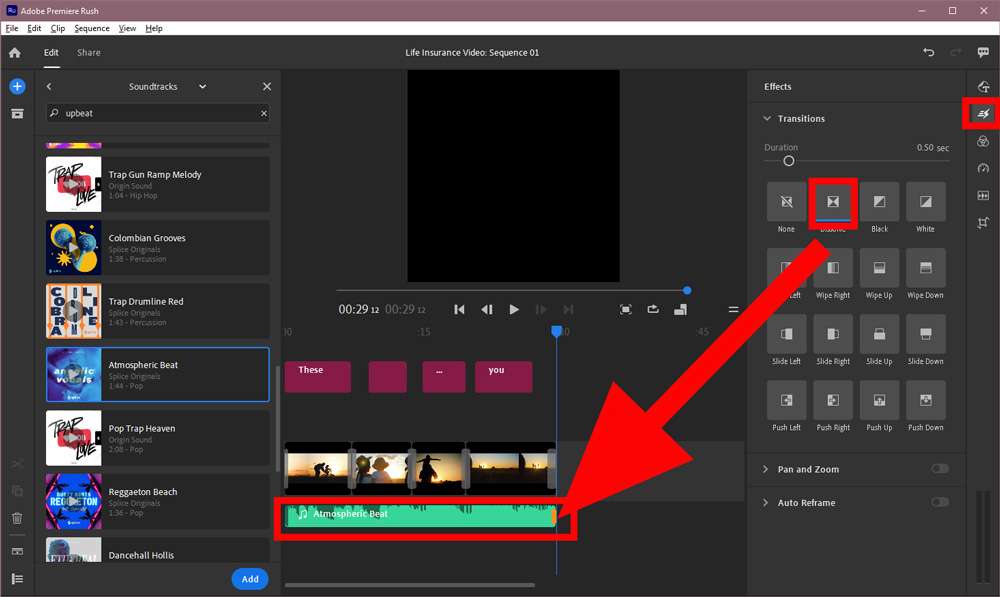
You can also use transitions on your audio track. For example, if you want to fade out your music, select the music track in your timeline. Select the transitions icon in your right-hand menu. Click or tap the Dissolve transition and drag it to the end of your music clip. Voila!
Export Your Video
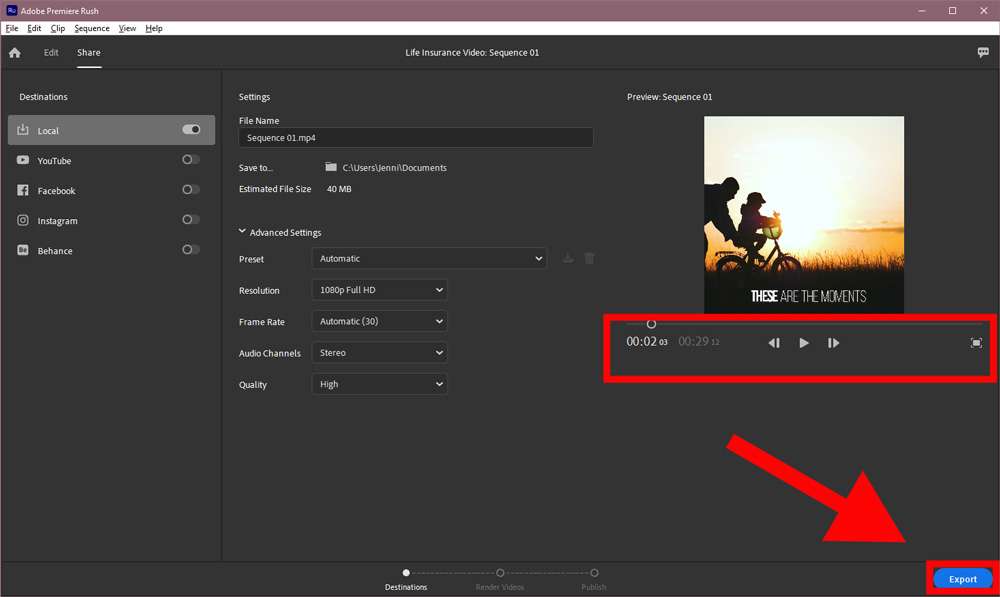
Okay, it’s a masterpiece and you’re ready to export. Congrats! Go to File / Share in your top menu bar. There, you can name your file and select where to save it.
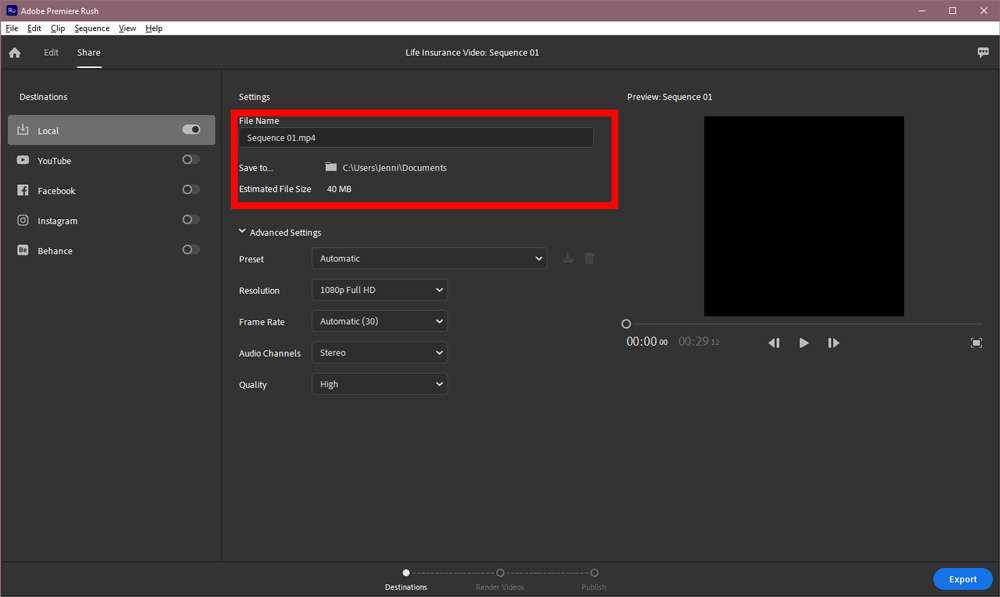
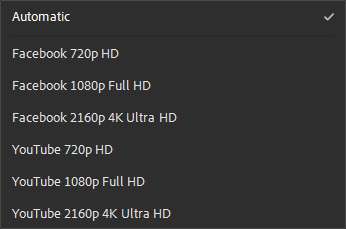
Under Advanced Settings, you have helpful settings that export your video specifically for particular social networks. Super handy!
If you like, you can use the playback monitor here to preview your video one last time before you publish. Ready to go? Click Export in the lower right of your screen.
Once your video is saved, upload it wherever you like. That’s Premiere Rush in a nutshell!
As with any software program, the best way to learn it is to play around with it. Get in the habit of looking to see what's selected in the timeline before clicking on any editing options and you'll be just fine.
What You Get with a Paid Account
As we mentioned in our post on Adobe Creative Cloud Express, you can upgrade to a paid account for $9.99/month or $99/year. That upgrade gets you access to the following:
- A wider selection of free stock photos for your images & videos from Adobe Stock
- More fonts to use from Adobe Fonts
- 100GB of cloud storage
- Shared access to saved images, branding options, and projects for your team members
- In Creative Cloud Express: more features, like instant resize
- Premiere Rush – the paid version includes more audio editing tools, the ability to export in higher resolution (4k), and the ability to sync projects between mobile and desktop
- Photoshop Express (light photo editing)
- Spark Video (create photo slideshows)
Now, the question is…are you going to get enough value out of these to justify the price?
Maybe. Maybe not.
With the free version, you can export unlimited videos without watermarks, so it’s a tough call. You might do fine without paying a dime.
But at $99/year, the suite isn’t very expensive. All you have to do is land one client via social media and you’ve paid for it. Even if you never use Photoshop Express or Spark Video, there’s enough in Creative Cloud Express and Premiere Rush to give you some bang for your buck.
That's our look at Adobe Premiere Rush Starter!
What do you guys think? Is this something you could see yourself using?
