
We’ve been talking about video a lot lately, and we’ve had a few questions about how to send a video to a client. The first step? Creating your YouTube channel, covered in this post. Once you’ve got your channel created and your video uploaded, here’s how you send that video to a client via email.
Why Linking Works Best
As we mentioned in the YouTube post, when you “send” your client a video via email, you’re not actually emailing them the video file – you’re linking to it. Video files are large, making them difficult (and sometimes impossible) to transmit over email. Email servers have attachment size limits, and video often exceeds these limits.
Your video file is also uncompressed. Even if it’s small enough to meet your email provider’s attachment size limit, that file is still larger than it needs to be, as far as your viewer’s needs are concerned. For example, if your recipient is on a mobile device with data limits, you’ll cause them to burn through quite a bit of data to download and view your video. That’s not the kind of user experience you want.
So what’s the solution?
When you want to send a video to a client, what you’re really going to do is send a linked screenshot of your video. When your recipient clicks the video image, they’ll be taken to YouTube (or the third-party video network of your choice, such as Wistia, Vimeo, etc.). Not only does your third-party network store your video, they also compress it. It will load quickly and play as smoothly as possible based on your recipient’s internet connection.
Here's how to do it.
Step 1: Take a Screenshot of Your Video
This is the image your client will see, so you want it to be appealing. Access your YouTube channel, click on your video, and start watching it. Pause the video at the point you want to grab your screenshot.
Need a little help picking the perfect screenshot? Hover your mouse at any point in the video’s timeline and YouTube pops up an image of that frame.
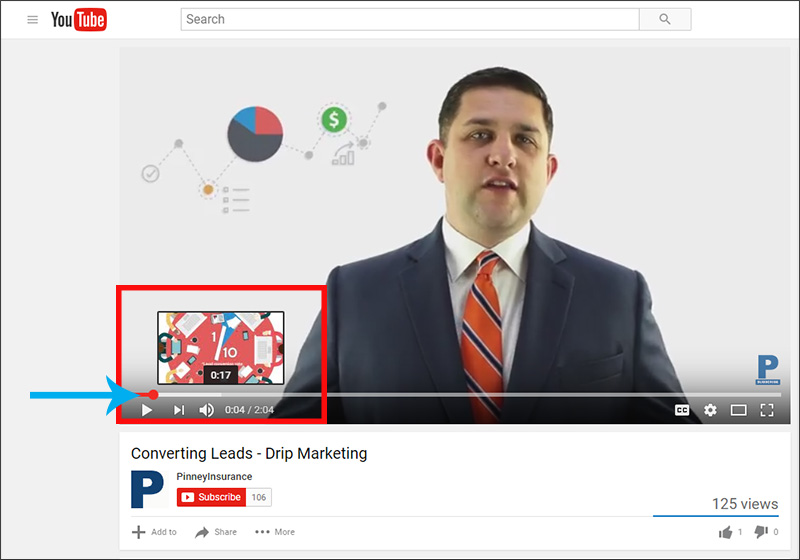
See an image you like? Click to be taken to that point in the video. When your video is paused on the frame you want, grab a screenshot – it’s Alt + Print Screen on a PC, like we’re using in this tutorial.
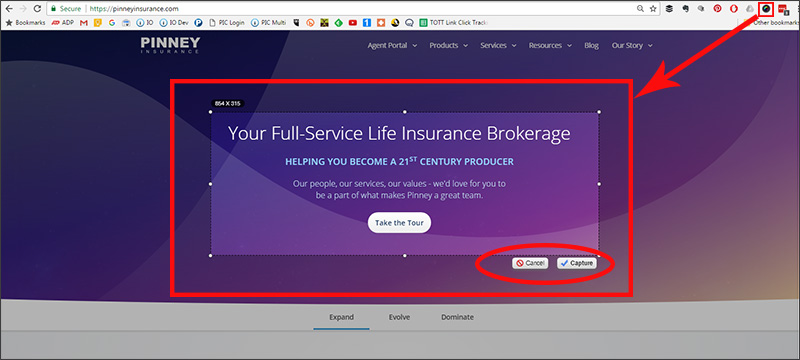
TIP: Using Google Chrome as your browser? There’s a popular Chrome browser extension called Awesome Screenshot that will let you capture a specific part of your screen without the need to crop, as described in step 2 below. If you take frequent screenshots, this free extension can save a lot of time. Once it’s installed, all you do is click the browser extension in your upper-right-hand corner, and click-and-drag to capture the area of the screen you want. Here’s what it looks like:
Step 2: Crop Your Screenshot
Next, we’ll load that screenshot into a photo editing program for a quick crop. For the purposes of this example, we’re going to use Microsoft Paint. You can also use Adobe Photoshop, GIMP, Canva, PicMonkey, or just about any basic photo editor.
As mentioned above, if you’re using a browser extension like Awesome Screenshot, you can crop within the extension’s photo editor immediately after you take your screenshot. Awesome Screenshot will then allow you to download your finished screenshot, so be sure you save it in a location you’ll remember, then continue with step 3 below.
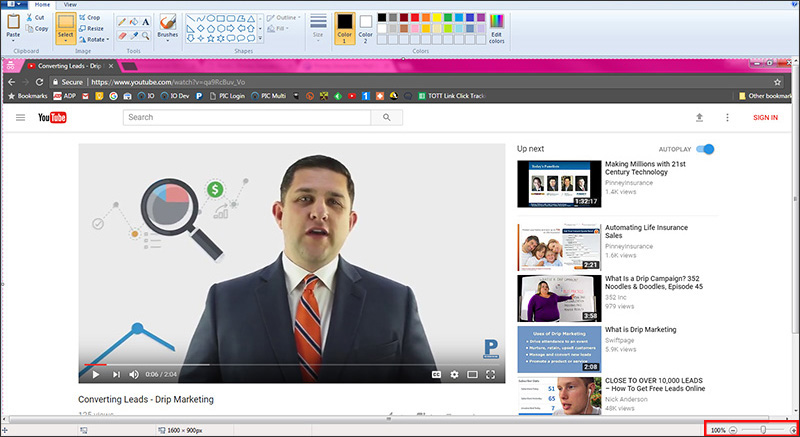
Open your photo editor and paste in your screenshot – it’s Ctrl + V on a PC. Depending on your photo editor, you may need to open a new blank document first, then paste in your screenshot. If needed, zoom out so you can see the entire image. To zoom out in Paint, hit the minus button on the bottom right of the program window.
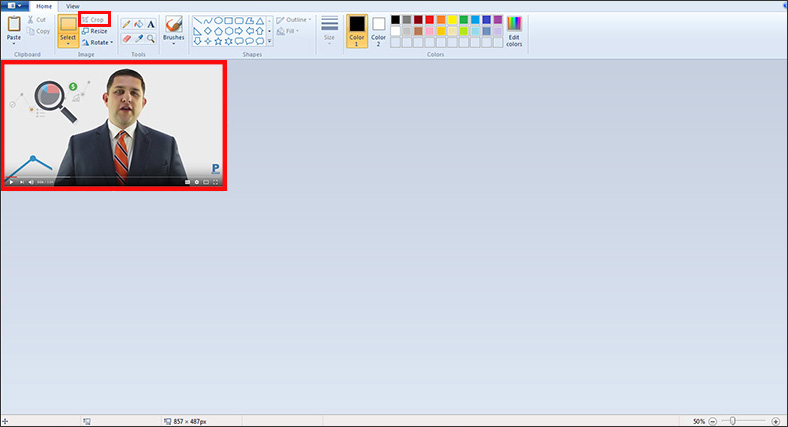
Next, crop your image so it contains only your video. In Paint, click "Select." Your mouse pointer will become a crosshatch. Click the top-left corner of your video in the screenshot. Holding down your mouse button, drag the dashed rectangle until it borders your video. Everything outside the rectangle will be cropped out.
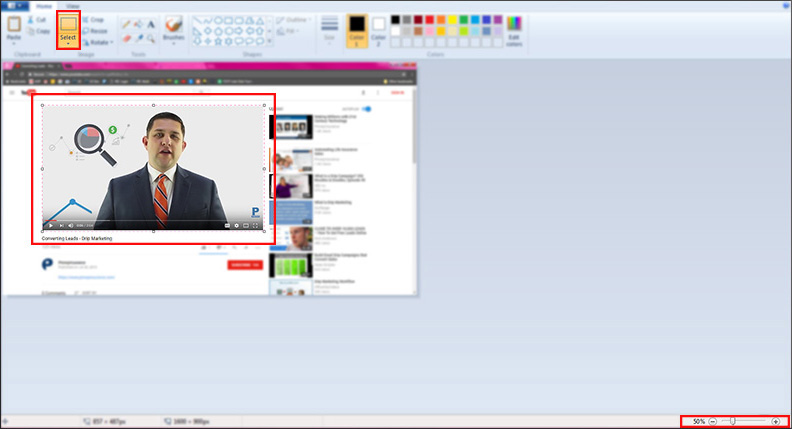
Click the "Crop" button (a rectangle with a line through it, to the right of the "Select" button). You should now see the still shot of your video in all its glory.
Should I resize my image?
That’s up to you. There is no hard-and-fast rule for image size within emails. Some clients will read your email on Apple devices with retina displays that can handle more pixels per inch. Some clients will read your email on a smartphone that won’t display more than a few hundred pixels.
Most email marketing service providers recommend limiting images to 600 pixels wide or less; you may want to double that if you think many recipients will read your email on a retina display (1200 pixels wide). In this case, your image probably won’t be wider than 1,200 pixels since you just cropped out a significant portion of the original.
You can easily check your image size in Paint – it’s listed for you at the bottom of the window.
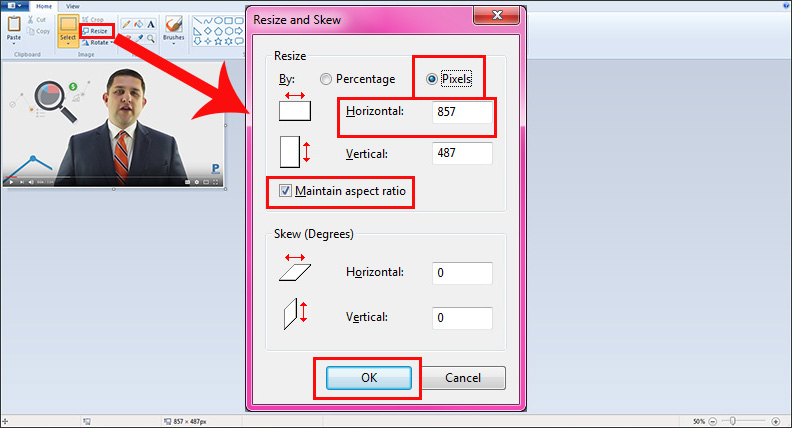
If you want to resize in Paint, click the "Resize" button (beneath "Crop"). In the "Resize and Skew" dialog box, click "Pixels." This is the current size of your image in pixels. As long as your image is less than 1,200 pixels wide, you’re good to go. If your image is more than 1,200 pixels wide, be sure the “Maintain aspect ratio” box is checked, and change the horizontal measurement to 1,200 pixels or fewer. Click "OK."
Click "Save As." Give your image a name and save it in a location you’ll remember.
Step 3: Get Your Video’s Link
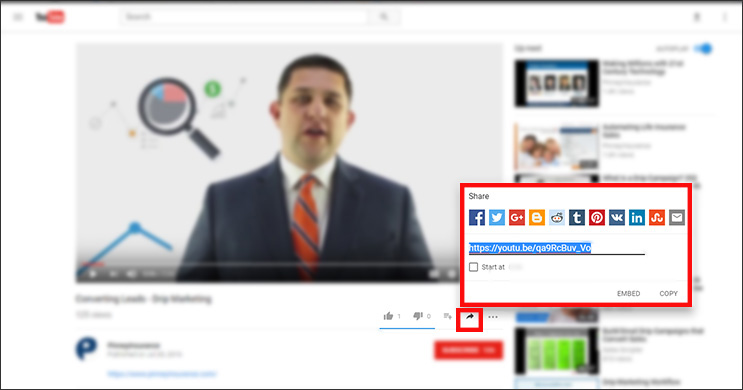
Click back to your video in YouTube. Look beneath your video title or channel name – you’ll see a gray arrow. This may be labeled "Share," if you’re logged in. Click it, and you’ll get a dialog box that gives you the link to your video. Copy this link and paste it into a text file, Word doc, or other easily accessible place.
Step 4: Insert Your Screenshot into the Email
Create the email you want to send to your client. Whether you use a common email provider like Outlook or Gmail, or have a more robust marketing program like MailChimp or Insureio, the process will be similar. For the purposes of this example, we’ll be using Insureio, but we’ll also explain how to do the same thing in Outlook.
We’ve created the email we want to send to our clients, but it’s missing the image and video link:
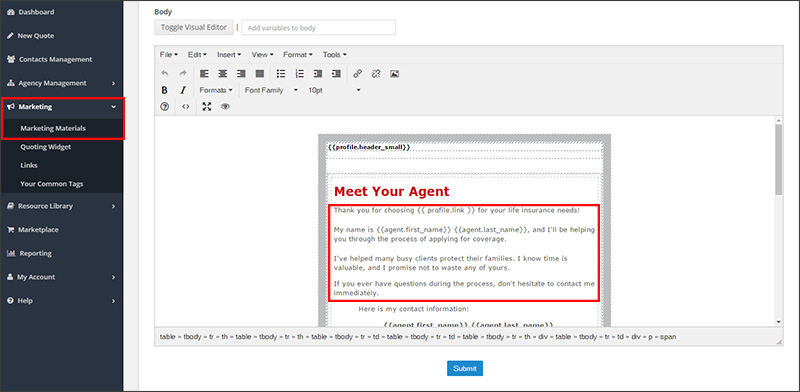
Using your email program’s text editor, use the "Insert Image" function. Select the screenshot of your video, and insert it into the email. In Outlook, select "Insert" and then "Pictures" and select the image on your device. In Insureio, you can only insert a URL. If you have a website or account at a photo-storage site like Imgur, upload your image there first. Next, insert the image URL into the "Insert Image" dialog box. If you don't have either, create a new contact in Insureio and upload your image in the File Management section of the contact profile. Clicking an uploaded image will open that image in a new browser tab. Copy and paste this URL into "Source" field in the "Insert Image" dialog box.
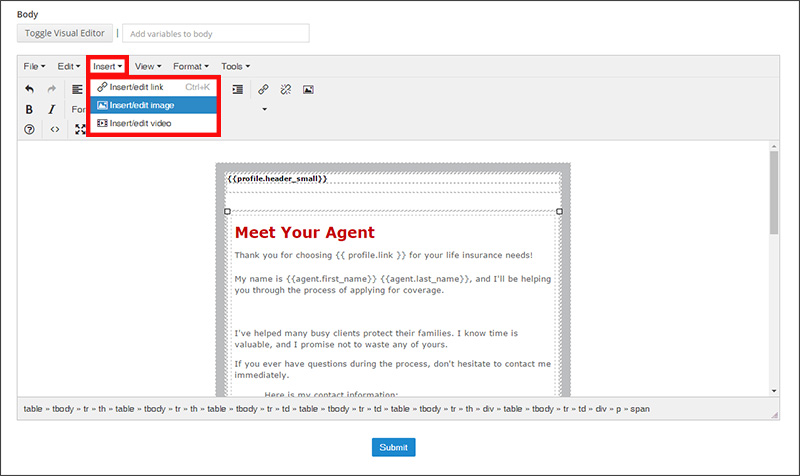
NOTE: You might be wondering why we’re not using the “Insert/edit video” link. If you click that link, you’ll still need to insert a source URL for your video – you can’t insert the video itself. You can also embed your video using YouTube’s embed code, but many email clients (including Gmail) won’t play an embedded video for security reasons. In the end, your recipient will still likely need to click outside the email to play your video.
Add Your Alt Text
If your email program allows, add the image’s “alt text.” This is what displays in place of an image when:
- Your recipient’s email provider blocks images without their knowledge or at their request
- Your recipient uses a screen reader due to visual impairment
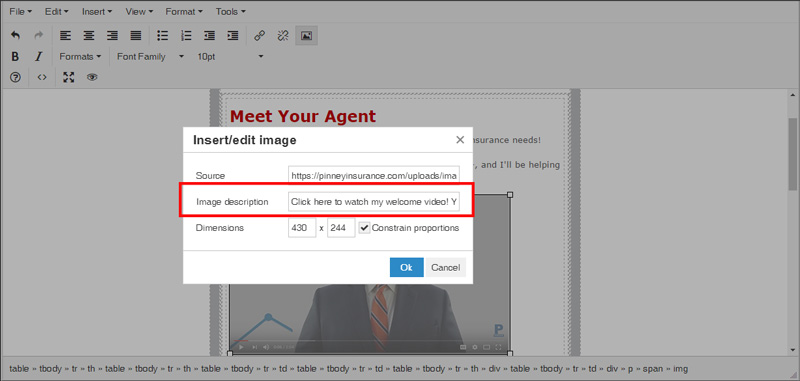
In Insureio, add your alt text in the "Image description" field. Your alt text should describe the image so that if it doesn’t appear, your email recipient knows what the image means or contains. In this case, since the purpose of the image is to get your recipient to watch a video, your alt text should say something like, “Click here to watch my welcome video! You can also paste this link into your browser: [insert your video URL here].”
In Outlook 2013 and newer, right-click your image and select "Format Picture." Select "Layout & Properties," then "Alt Text." You can enter a title and description for your image.
Step 5: Link Your Screenshot to the Video
Our last step is applying the YouTube video link to the image.
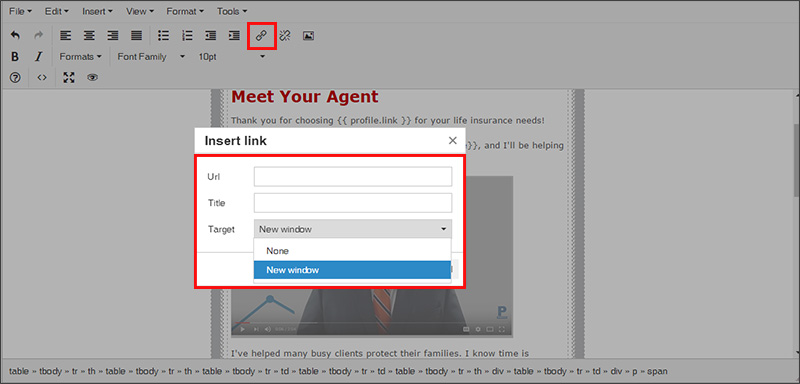
In Insureio, position your cursor right before the image and drag down with your mouse to select it. With the picture selected, click the link icon. Paste or type your YouTube video’s sharable URL into the URL field, and give it a title (“My Welcome Video,” for example). In the "Target" dropdown box, select New window. This means your video will open in a new window, rather than taking the viewer away from your email. Don’t forget to click "Submit" to save these changes to your email template. Now you're ready to send this email – complete with your video screenshot and link – to any client or prospect!
In Outlook, click to select your picture. Click "Insert" and then "Hyperlink." Link to “Existing File or Web Page” and paste your YouTube video’s sharable URL in the "Address" field. Click "OK." That’s all there is to it!
This may seem like a lot of steps, but it's a fast process once you've done it a time or two. Your clients will appreciate the connection video creates, and you'll stand out among the competition!
