This post is a follow-up based on the great tips we got from Nick Ayers on using video at every step of the customer journey. We heard from some of you who want to communicate using video, but need guidance on the nuts and bolts of getting the video from your device to your clients. We’re here to help!
The best way to share or send videos to clients and prospects is to upload your video to a third-party video hosting site and share it from there. YouTube is the most recognizable and readily accessible of these sites. We use YouTube here at Pinney, but you may have noticed that Nick and i80 Insurance use Wistia. The right provider for you will depend on your budget and goals for using video.
For the purposes of this post, we’ll use YouTube because it's free and familiar to many of you. Once you have a YouTube channel, you can upload any videos you create for individual clients or the general public. Using the built-in privacy settings, you can ensure that only the people you want to see a certain video have access to it. To share the video, you can send a link, embed the video on your website, or link a screenshot. We'll cover all these options in a future post. First, we need to show you how to create your YouTube channel.
Step 1: Decide Whether to Use a Brand or Personal YouTube Account
YouTube is owned by Google. To upload video to YouTube, you need a Google account. Keep in mind that Google differentiates between brand accounts and personal accounts. Because YouTube tracks the videos you watch and like, as well as displays your profile photo on your YouTube channel, you may want to keep your personal account separate from your brand account. This is easy to do – you can create a brand account that’s managed by your personal account, without a separate login and password. Here’s how to decide:
- My brand does not have a Google+ page or Google My Business listing. Proceed to Step 2 below to create a YouTube account. The instructions will tell you when YouTube needs to know that your channel is for a brand. Later, you can add your personal Google account as a manager, if you have one. This means you won’t have to juggle multiple logins to upload or manage your channel.
- My brand already has a Google+ page or Google My Business listing. Log into the Google account you used to create that Google+ page or Google My Business listing. Then proceed to Step 2 to create your YouTube account. If you also have a personal Google account, you can use this Google tutorial to add that account as a manager so you won’t have to juggle multiple logins going forward.
Step 2: Create Your YouTube Channel
Go to YouTube.com. Click the Sign in button at the top of your screen.

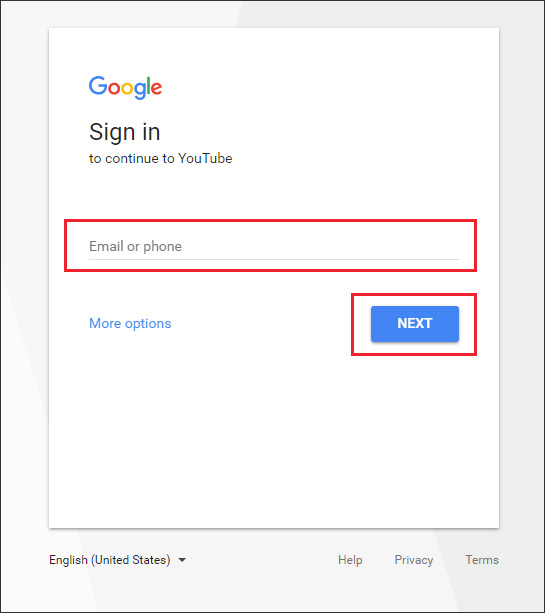
Here, you'll sign into Google using your personal account (if you don’t have a brand account) or your brand account, if you already have one. Fill in your email address or phone number and click Next. On the next screen, you’ll enter your password and click Next.
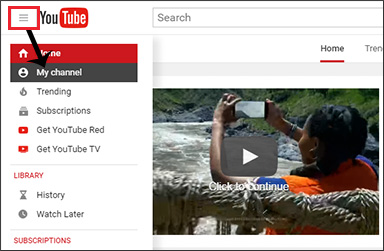
Once you're signed in, you'll see your YouTube home page. Click the hamburger menu in the top-left hand corner. From the dropdown, select My channel.
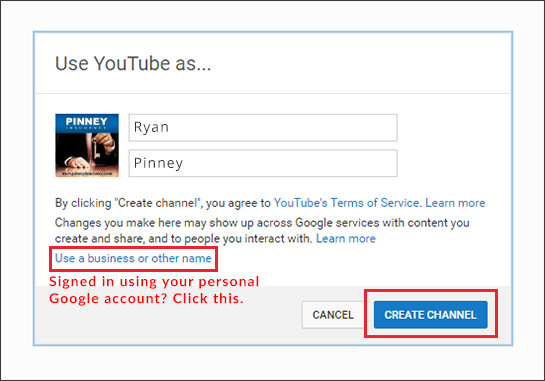
On the confirmation screen, you have the option to create your brand account. If you signed in using your personal Google account, click Use a business or other name. If you signed in using your brand account, click Create Channel.
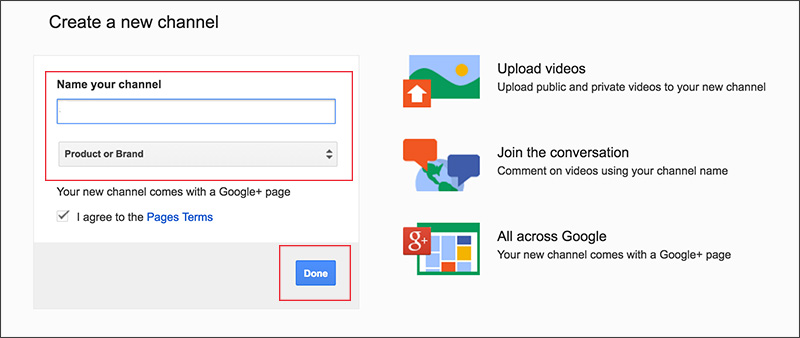
Name your channel and choose your category (Product or Brand, Company Institution or Organization, Arts Entertainment or Sports, or Other). Click Done.
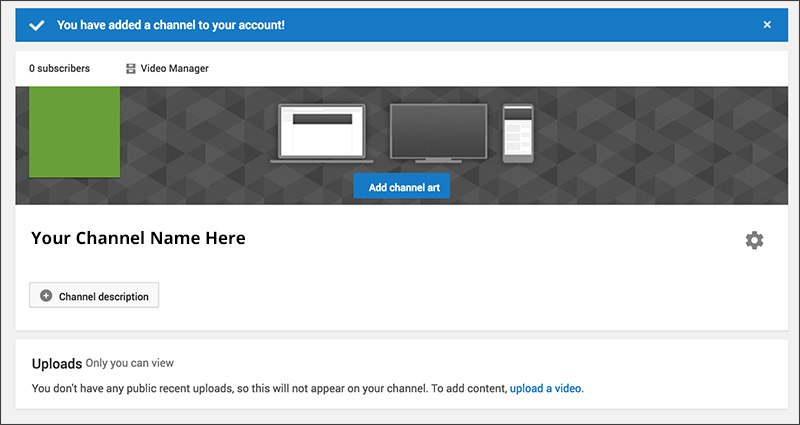
Voila! Here’s what your new channel will look like:
Step 3: Optimize Your Channel
There are four things you want to do to optimize your channel before you upload your first video. If you’re in a rush and just want to upload and send your video, technically you can skip to Step 4 – but be aware that if your video viewer clicks your channel name, they’ll see the blank channel information as shown in the image above. A few minutes now can ensure your video viewer has a great experience with you and your agency.
Here's how to optimize and brand your channel.
Channel icon/profile image
If you already had a brand account, the profile image associated with your brand’s Google+ or Google My Business listing will appear here. If you created a new account and don’t have a channel icon/profile image, you’ll want to upload a square image with dimensions of 800 x 800 pixels. Hover your mouse over your icon and click the edit icon (it looks like a pencil). Already have a channel icon but want to change it? Here’s YouTube’s help page that explains how your change may also affect your other Google pages or listings.
Channel art
Your channel art is the banner that appears at the top of your channel page. You can create a custom image with your brand logo or a photo (YouTube offers a handy template here). If you’re short on time and design skills, YouTube also offers a gallery you can pick from. You may also find that a simple stock photo does the trick – try Pixabay, Pexels, and Unsplash for high-quality royalty-free photos. Choose a photo that’s at least 2650 x 1140 pixels. To upload your channel art, hover your mouse over the existing channel art and click the edit icon.

Channel description
Click the Channel description button below your channel art and menu bar. Write a few short sentences (1,000 characters max) that tells a viewer who you are and what to expect from your channel. Include the URL of your website or landing page, too, so your channel visitors know where to go for more information. This won't display as a hyperlink, but visitors can copy and paste it into their browser to find you elsewhere online.

Channel links
You can add up to 5 links to your channel that appear when someone visits your channel’s home page. If you have a website or landing page where prospects can get a quote, that’s ideal. This screen is also where you can leave an email address for business inquiries. Here's where those links are visible:

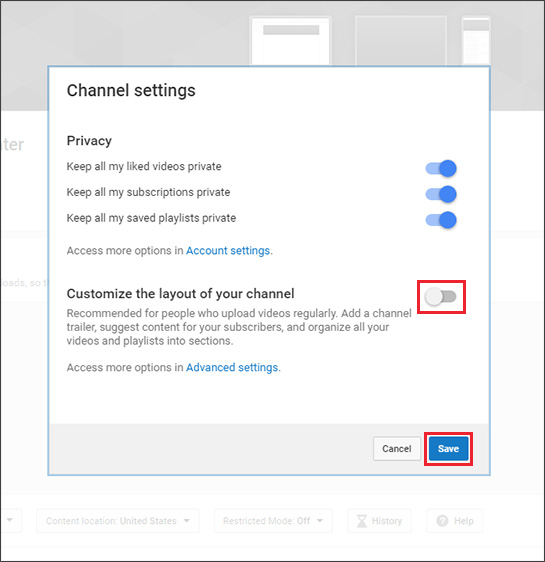
To add your links, click the gear icon to the left of the red Subscribe box.
Click the toggle to customize the layout of your channel. Click Save.
Now you’re back on your home page. Hover your mouse over your channel art and click the edit icon in the top right of the channel art. From the dropdown menu, select Edit links.

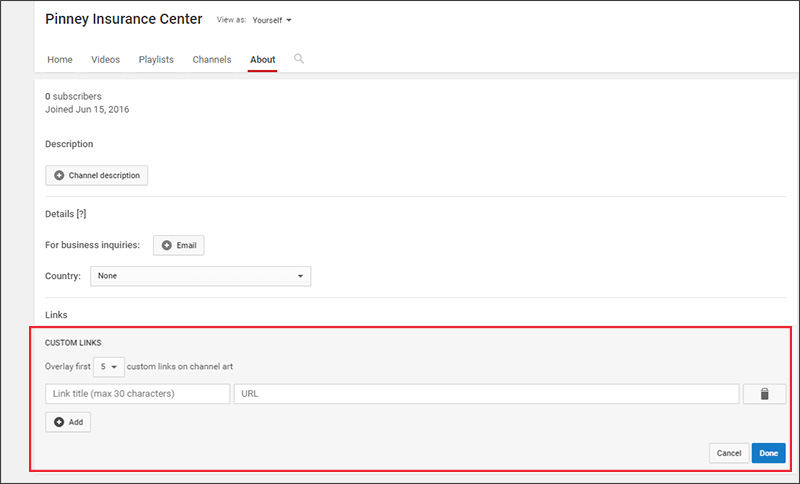
On the next screen, find the Custom Links section and click Add.
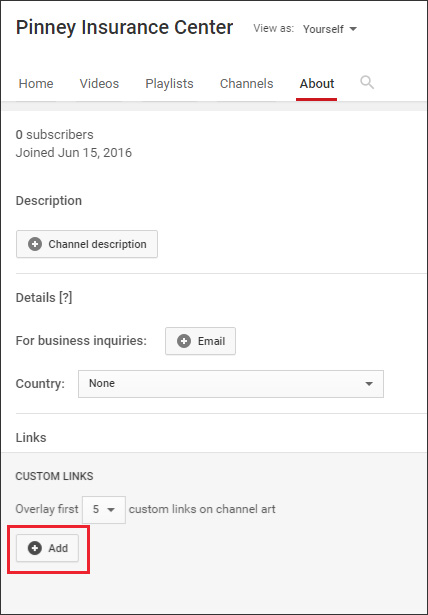
Enter a link title (“Get a Free Quote” or “My Website”) and the corresponding URL, then click Done.
Step 4: Upload Your Video
Now that your channel is ready for viewers, you can upload your first video. Click the upload icon at the top of your screen.

Next, select one of three privacy settings for your video:
- Public (everyone can see this video)
- Unlisted (only you can see this video), or
- Private (only people with a link can see this video).
If you’re uploading a video for a client proposal, like Nick Ayers does, use Private. If you’re just doing a test video to get comfortable with the process, choose Unlisted. Never used YouTube before and feel a little nervous about uploading? Choose Unlisted or Private and preview your video once it's uploaded; you can always change the setting to Public later.
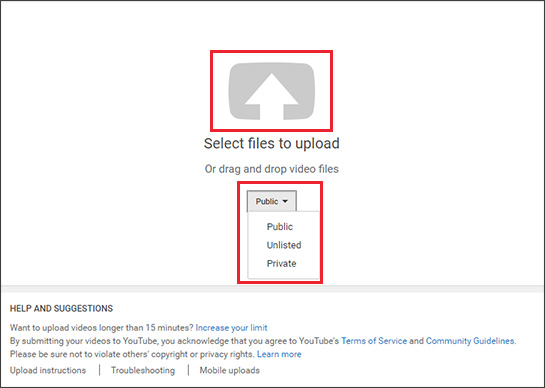
Once you’ve selected a setting, click the upload arrow and choose the video you want to upload.
Note: If you want to upload a video that’s longer than 15 minutes, you’ll need to verify your account. This is easy to do using a verification code delivered by phone or text message. Click here for details.
Video Metadata
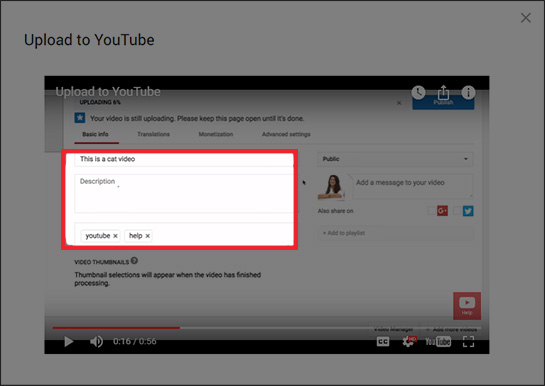
While YouTube is uploading and processing your video, you can fill in the metadata. On this screen, you will:
- Add a title. Make sure it's descriptive. If your video is public, this should entice the viewer to click.
- Write a description. Explain the purpose of the video, possibly including a URL on your site that contains more information or next steps.
- Add keywords. If your video will be public, these are the keywords someone might search for to find your video.
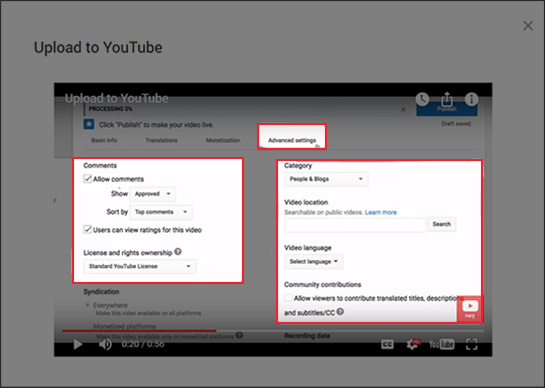
Now click the Advanced Settings tab. Here, you can specify the following optional settings:
- Do you want to allow comments on this video?
- Will users be able to see ratings (thumbs up / thumbs down) for this video?
- Select your video rights – in most cases, this will be “Standard YouTube License.”
- Pick your caption certification – in almost all cases, this will be “This content has never aired on television in the U.S.”
- Will you allow this video to be embedded on web pages?
- Select a category. These are limited to YouTube's preselected options, and are admittedly pretty limited. Your best bet is "Education" or "People & Blogs."
- If your video was shot on location, you can add that location here.
- Set your video’s primary language.
- Choose whether you want to allow users to contribute translations or subtitles.
- Enter the video's recording date.
- Do you want viewers to see video stats (i.e., number of times watched)?
Thumbnail Image
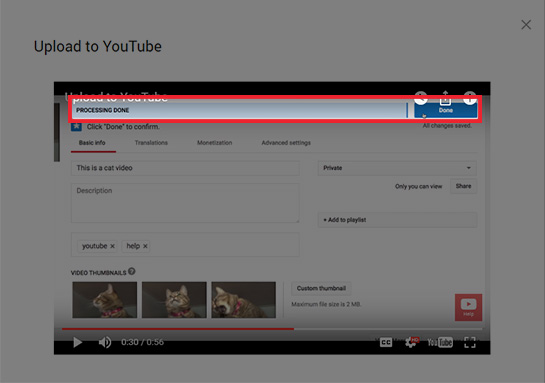
Click back to the Basic info tab. When your video is ready, the top bar (in blue) will say “Processing Done.”
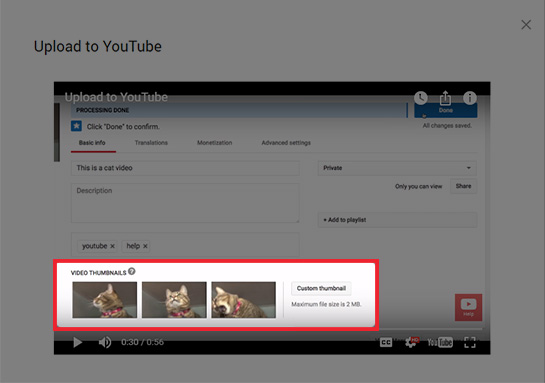
You'll then see several options available for a thumbnail image. Choose the one you like best – this is what will appear when people browse YouTube and come across your video. If you verified your account (see the NOTE above), you can also upload a custom thumbnail. Remember, if your video is unlisted or private, that thumbnail won’t be visible to browsers or shared via social media.
Publishing Your Video
Now it’s time to finish up! If you chose to make your video public, the blue button on the top right of your screen will say Publish. If your video is private or unlisted, it will say Done.
Click that button to finalize your upload. YouTube will give you the link to your completed and processed video.
That's all it takes to create your YouTube channel and upload your first video!
