New Year, new you—is that what your social media profiles say about you? If not, January is a good time to improve your LinkedIn profile for 2017.
Chances are, you’ve got more to share than you realize – and more that could catch a potential client’s eye. In this post, we’ll talk about how to update your profile to make it more attractive to clients, recruiters, and future business partners.
Update 1: Manage Your Activity Broadcasts
There are two kinds of LinkedIn updates – the ones you want everyone to know, and the ones you’d rather make without alerting the whole world. If you have “nuts and bolts” updates to make, such as changes to your name or adding old positions you forgot to add when you set up your profile, turn off your activity broadcasts. Your connections won’t be notified when you make these necessary but less-than-glamorous changes. When you turn your activity broadcasts back on, that’s when you’ll make the changes that tell people what you’ve achieved.
Here’s how to do it:
Hover over your profile photo in the top-right menu bar. Click Manage, to the right of Privacy & Settings.

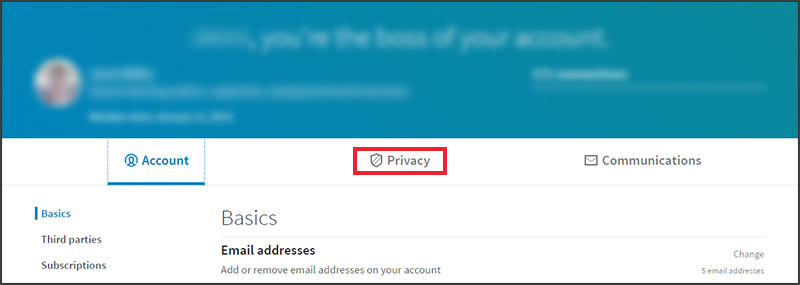
Click Privacy.
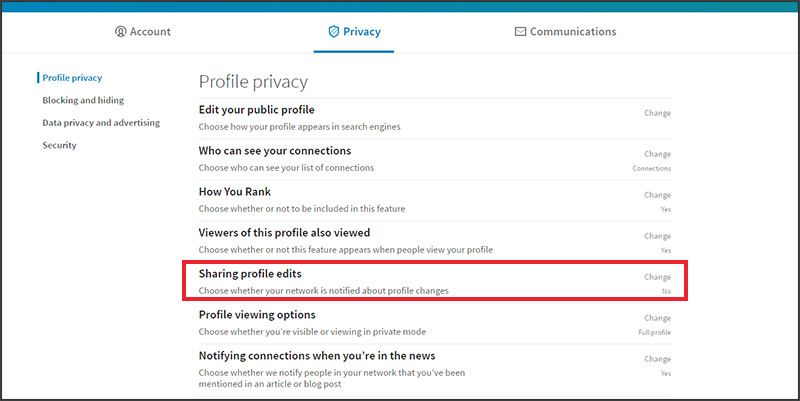
Find Sharing profile edits – click Change.
Slide the toggle to No to hide your profile changes.
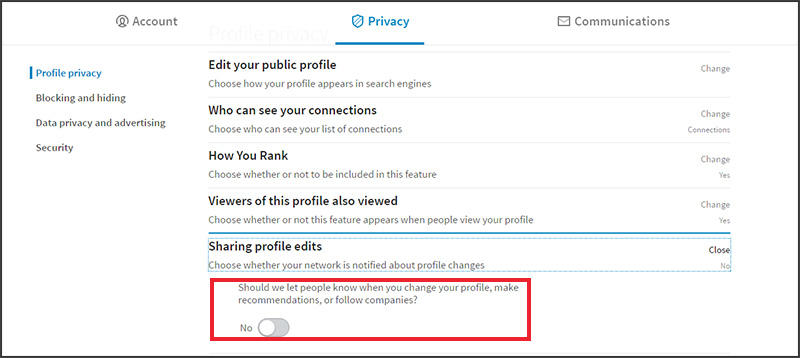
To turn sharing back on, toggle this switch back to Yes.
Update 2: Check Your Headline
Your LinkedIn headline gives you 120 characters…are you using them to your fullest advantage? You might think the headline doesn't matter much, but it shows up in every search result that includes your profile. For example, if someone searches for "life insurance agent" and your profile fits the search criteria, they'll see your name and your headline in the search results.
Now, imagine how many of those results are simply going to say “life insurance agent” or “life insurance broker.” While that may be an accurate description, is it going to catch someone’s eye while they’re scrolling pages of results where everyone is a life insurance agent or broker?
TIP: Include a niche, specialty, skill set, knowledge base, or anything that sets you apart from the crowd.
Bland: Life Insurance Agent
Better: Life Insurance Agent for Growing Businesses – Protecting Investments with Integrity
TIP: Use a character counter while working on your headline. There’s no sense in writing the perfect headline, then counting and realizing it’s 175 characters. Click here to use LetterCount.com – just enter your text and hit Count characters.
Update 3: Check Your Summary
To put your best digital foot forward, here are a few suggestions:
Ask someone to proofread
After you’ve looked at your summary a few times, your brain will start to see what it thinks should be there, not what actually is there. According to Marta Kutas, director of the Center for Research in Language at UC San Diego, the human brain uses context to jump ahead and interpret what the next word in a written statement should be. This is why you can read your summary ten times and still miss a typo. Get a fresh pair of eyes to make sure everything is 100% correct.
Write your summary as if you’re talking to someone
Many summaries are too formal, or only include a list of bullet points that belong on a resume. If you’re actively seeking a job, that might make sense. But if you’re on LinkedIn to attract clients, you should start a conversation the same way you would in real life.
Similarly, if you’re on LinkedIn to make business connections, treat your summary like an elevator pitch. If you were in an elevator with your ideal new business partner, what would you say? Chances are, you wouldn’t rattle off a list of your current job duties. Instead, you’d explain what you do, mention notable achievements, and state what kind of opportunities you’re looking for as you grow your business.
- Bland: Demonstrated success in life insurance sales. Detail-oriented with strong organizational skills and can-do attitude. Proven ability to work in a busy environment including research, sales, and marketing.
- Better: I help families use life insurance to create a more secure retirement. My specialties include college planning and longevity planning. Let’s work together to create a financial plan that protects your assets and grows your wealth.
Update your job duties
Most jobs change with the times, as new technologies emerge that we all have to learn to use. As a result, you have more skills now than you did five, three, or even two years ago. For example, you might have started as an insurance salesperson. Now, you might also be a digital marketer! You may have added a niche, skills, or certifications. Have you added your new skills to the description of your current position?
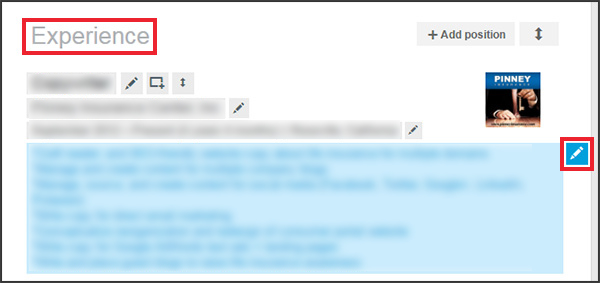
If not, scroll to the position you want to update in the Experience section. Hover over the text that describes that position, and click on the blue Edit icon to make your updates.
Update 4: Check Your Links & Contact Info
Have any of your contact details changed in the past year? Did you create a new website? Start a Twitter account? Move your blog from wordpress.com to a self-hosted domain? It’s a good idea to double-check what’s in your profile and test all your links.
To double-check your contact info:
Hover over the Profile option in the top menu bar. Click Edit Profile.

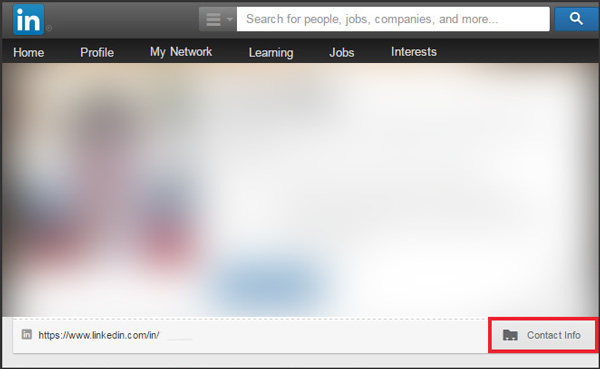
Click the Contact Info link on the bottom of your profile header.
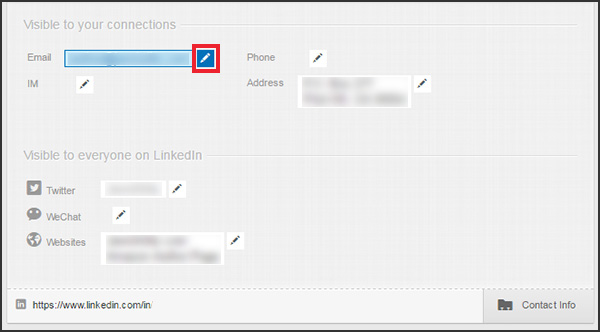
Review your info. Hover over any field to bring up an editing icon. Click the icon to edit. You'll be taken to a profile editing screen to make your changes.
Update 5: Add New Skills, Projects & Positions
Take a step back and think about 2016. We know, 2016 was a rough year...but think about the good parts—your professional achievements. Did you learn new skills? Take a new job? Start or finish a big project? It’s time to add those milestones to your work experience section.
Add a Skill
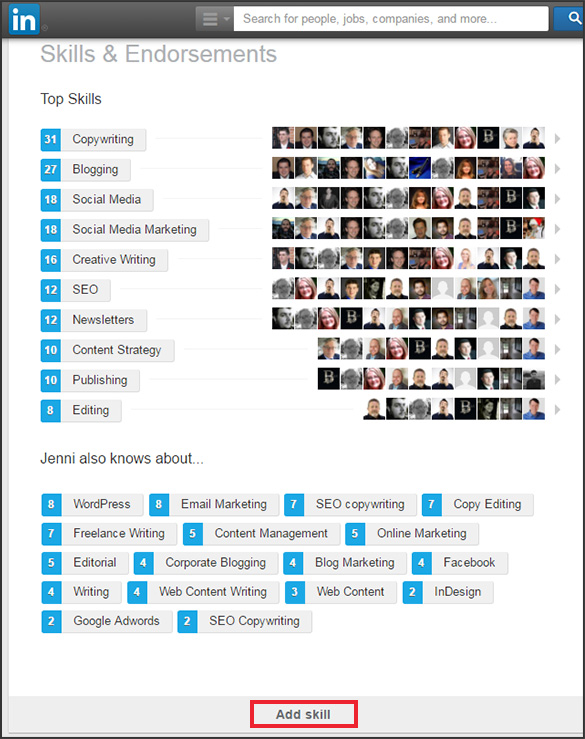
Scroll to the Skills & Endorsements section of your profile. Click Add skill.
Add a Project
To add your first project, hover over the Profile option in the top menu bar, as described above when we double-checked our contact info. Click Edit Profile. Beneath your summary, click Add project.
To add a new project once you've already added a project, scroll down to the bottom of your profile. The Projects section will appear toward the end, above your Recommendations. Click Add project.
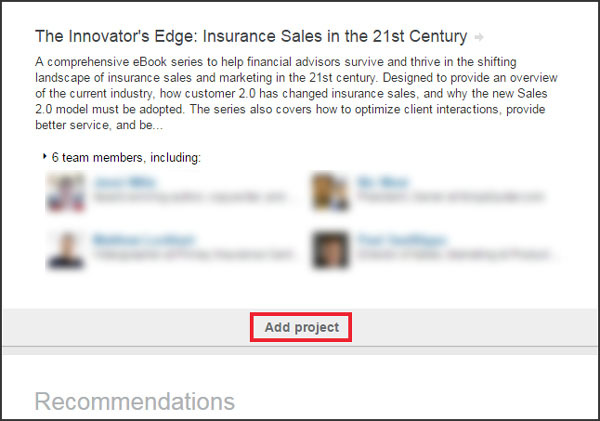
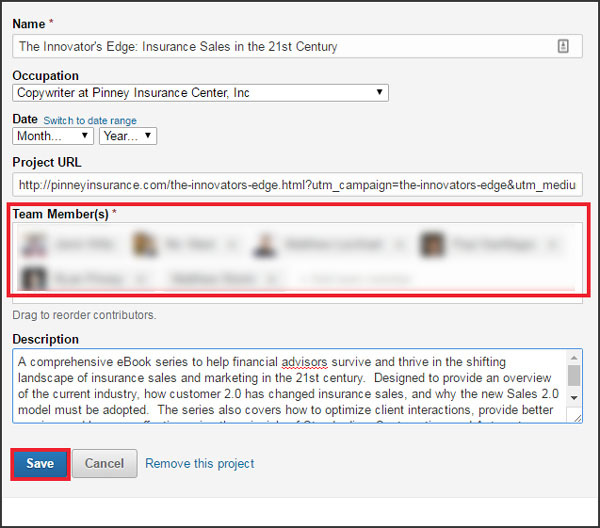
Fill in all the detail you can. Assign the project to a particular job with the Occupation dropdown menu. You can also add Team Member(s) if you worked on the project with others. Click Save when you're done.
Add a Job
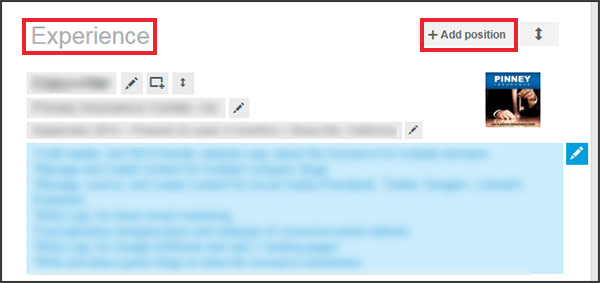
To add a new job, click the Add position link in your Experience section.
Update 6: Upload or Update Your Background Image
The background image is an important part of your profile. It’s also a little tricky to engineer, what with all the content fields overlapping your image.
If you’re a Premium subscriber, LinkedIn will offer templates to choose from. Now’s a good time to choose a new one to freshen up your profile. If you’re not a Premium subscriber, you have a couple options. You can make one yourself, or hire a graphic designer to make one for you (a site like Fiverr is a fast and inexpensive option here).
But what should your image contain? Here are a few ideas:
- Your company logo or slogan
- Cover images of eBooks you’ve produced
- A picture of your office
- Your favorite saying
- A value proposition or offer
Because the spacing can be complicated, many people choose to upload a simple background image without text. Examples include a keyboard, a landscape, a picture of your office, etc. If you have a bit of design savvy, you can use a template (like the one provided here) to add a logo, offer, or favorite quote.
Be sure you check your profile as soon as you upload your image. The spacing and dimensions may take a few tries to get right. If you’re adding text, try to keep it in the top-center of your image; it’s likely to get cut off or covered if you place it on the sides. The tutorial linked above shows you how to do that.
Update 7: Add Images, Slide Decks, Videos, or Docs
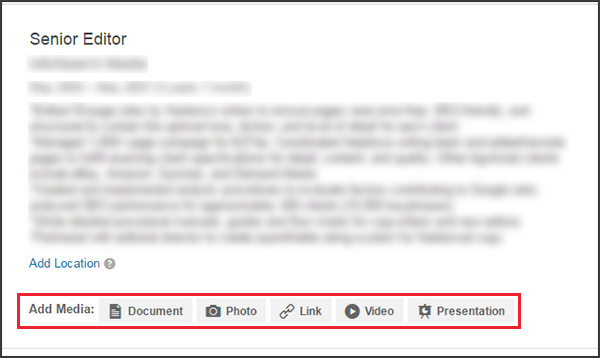
You can add media to your summary, as well as any position in your employment history. It’s a great way to make your profile more eye-catching and showcase your presentations, eBooks, and more. LinkedIn refers to this media as your “work samples” – here’s their tutorial on how to add media to your profile.
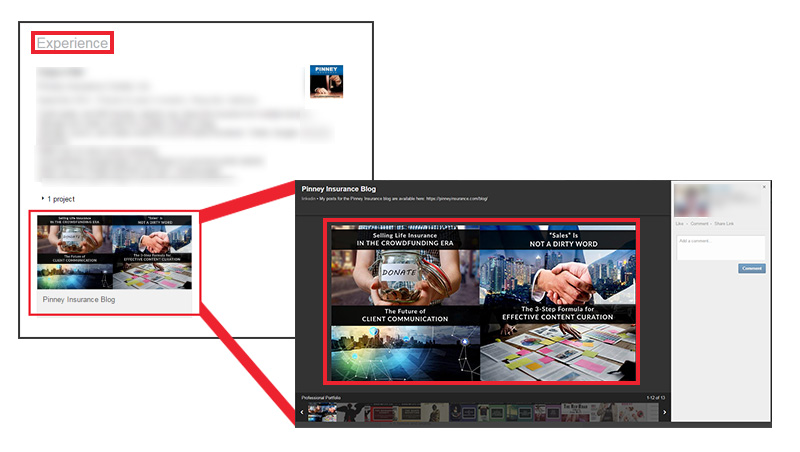
If you haven't uploaded any media yet, you'll see the choices lined up for you beneath each position in your Experience section:
When you upload or add media, you can also add a title and description. People who view your profile will see a rectangular image and the title you gave your upload, as shown below. If anyone clicks on the item, they’ll see your description in a pop-up modal. That description is a great place to include a hyperlink for more information. Here's what that looks like:
So what should you add? Here are a few ideas:
- Images of you receiving awards or giving presentations
- Press releases
- Reports or eBooks in PDF or DOC format
- Your personal or agency media kit
- Guest blog posts you wrote
- Project pages on a website
- Video of a presentation you gave
- Presentations and slide decks
You’d be surprised what you can add to your profile—including any content you created with the services listed on this page. From Flickr to Quora to SlideShare to Prezi to MSNBC to Forbes, you can embed the content that makes you shine brightest.
If you don’t have any media to add, don’t worry! Now that you know you can add it, keep an eye out in 2017 for things that would make a valuable addition to your profile. This may mean taking more pictures, creating a press release or media kit, writing a guest blog post, or spiffing up an old slide deck.
Update 8: Customize Your Connection Requests
When you want to connect with someone new, LinkedIn gets you started with a standard message. The problem? It’s not very descriptive.
The standard message says, “I’d like to add you to my professional network on LinkedIn.” That doesn’t tell your recipient how you know them, where you found them online (if you don't know them personally), or what you find interesting about them.
This is especially important if you’re reaching out to people you haven’t met yet, such as influencers. It’s in your best interest to customize these requests and tell them why you're asking to connect. Be honest - if you're a longtime reader of their blog, say so. If you listen to their podcast, tell them. Be truthful and sincere, and as specific as possible.
If you’ve already met, you might say something like, “Hi Joe, I met you at the recent NAIFA conference in Las Vegas. We talked about marketing automation strategies for 2017. Let’s connect and stay in touch.” If you haven’t met, you might say something like, “Hi Joe, I’m a regular reader of your blog, How to Succeed in Business. I get a lot of ideas and inspiration from your work, and I’d like to connect here on LinkedIn.”
How to Customize Your Connection Requests
Type the person's name into the search bar and select the correct person from the list of matches. You'll be taken to their profile.
Click Connect. You'll then have the option to include a personal note in the text field. This option is available on the desktop version, as well as the latest version of iOS and Android apps.
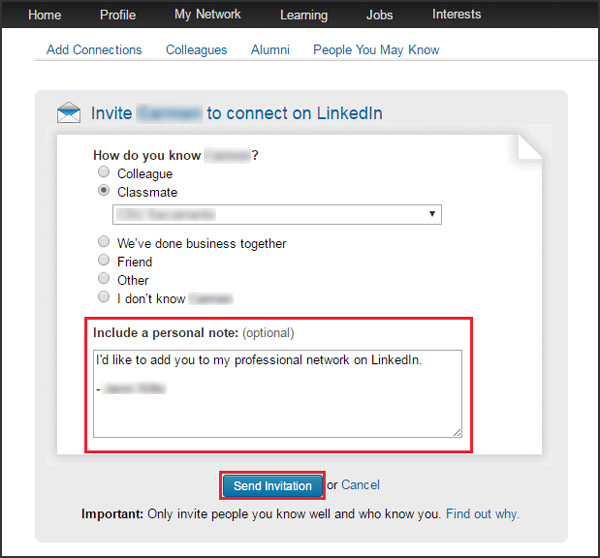
TIP: You are not allowed to customize connection requests sent through LinkedIn's People You May Know feature. If you use this feature to connect, LinkedIn will fire off its standard connection request.
Update 9: Perform a Random Act of Kindness
Scroll through your contacts and choose someone you enjoy working with. Then write them an unsolicited recommendation without asking for anything in return. Once they get the notification from LinkedIn and read your recommendation, they’ll think of you with a smile. Isn’t that a good way to start the year?
The other person may return the favor and write you a recommendation, too. Don’t go into this expecting it—let it be a pleasant surprise if it happens. If it does happen, pay it forward one more time. Choose a second contact and write them an unsolicited recommendation, too. You never know when your random act of kindness could pay off with a referral or new business opportunity.
