No time to read? Catch the highlights in our video recap below!
Let's say you want to ask a friend or family member a quick question. Do you text them or call them to get the answer? If you said text, you’re not alone.
Texting and messaging are now more common than calling. 80% of adults and 91% of teenagers use messaging apps every day, according to a Greenberg study on messaging. It’s no surprise that consumers want to use the same fast, easy method of communication with businesses. So how do we adapt to give consumers what they want?
Turns out, it’s easier than you think. Your Facebook page already has a way for clients to message you. But did you know you can make a few easy tweaks to customize the greetings and auto-replies they see? It’s a fast, easy way to deliver better customer service without obsessively monitoring your message notifications. Or, if you don’t plan on using Facebook Messenger at all, you can suggest other ways to get in touch.
Here are 6 ways life insurance agents can use Facebook Messenger.
Jump to a section:
Put a Messenger Link on Your Website
Add a Messenger Button to Your Website
Add a Messenger Chat Pop-Up to Your Website
1. Turn on Your Greeting
What exactly is a greeting? It’s the text your client sees as soon as they click the “Send Message” button on your Facebook page. It’s a good way to inject your personality into the messaging experience, as well as set expectations. Here's what a greeting looks like when someone messages you.
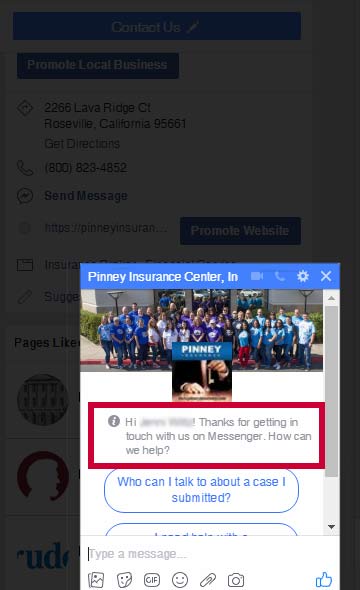
We'll show you how to customize that greeting in just a few steps. As of June 2018, you can only do this using a desktop computer.
1. Go to your business page’s Settings tab.
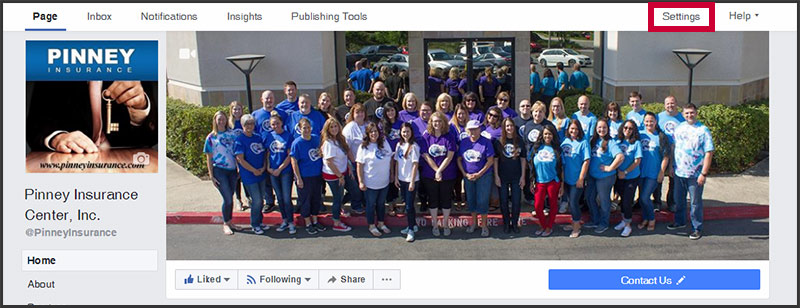
2. Click Messaging.

3. Scroll down to the Response Assistant section and set Show a Messenger greeting to On.
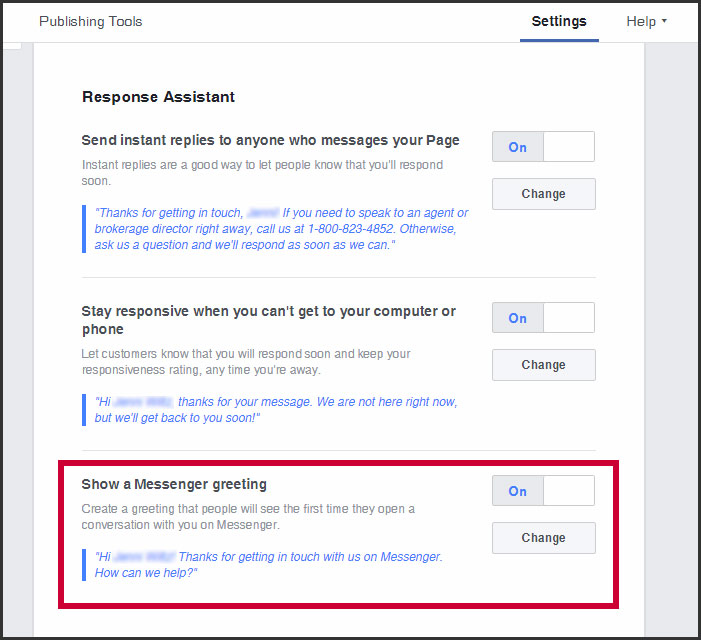
4. Click Change and enter a new greeting. Facebook will show you a preview. When you’re done, click Save.
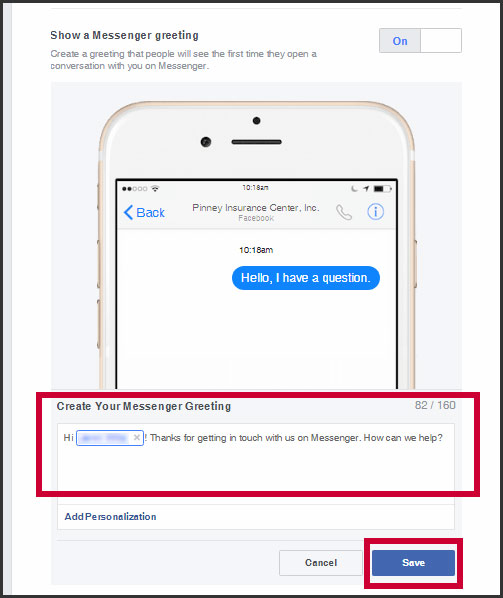
Wondering what to say in your greeting? Make it personal. Give them a warm welcome and explain what they can do via Messenger. For example, “Hi there! I’m here to answer your questions about life insurance and help you get coverage. What can I help you with?”
2. Create an Auto-Reply
Your auto-reply is what a prospect sees after they send you a message. It will only post in response to their first message, and it won’t display at all if you’ve set your status to Away. It’s helpful because it can direct them to do something other than wait for your reply. You can acknowledge their question and tell them you’ll answer as soon as you can. In the meantime, you can also suggest they call you or visit your website for FAQs, a free quote, and more.
Think of your auto-reply as a traffic cop. If someone just wants to know how to get a quote, for example, it can tell them. As of June 2018, you can only customize your Messenger auto-reply from a desktop computer. Here's how it's done.
1. Go to your business page’s Settings tab.

2. Click Messaging.

3. Set Send instant replies to anyone who messages your Page to On.
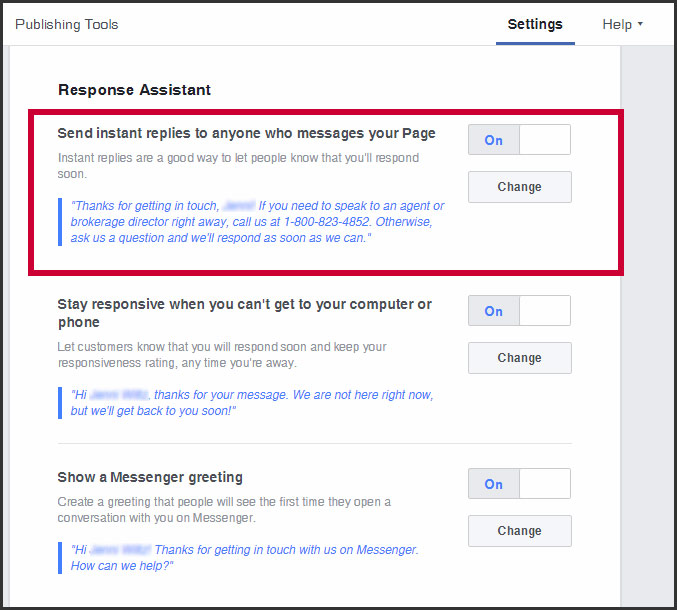
4. Click Change and enter your instant reply. Facebook will show you a preview. When you’re done, click Save.
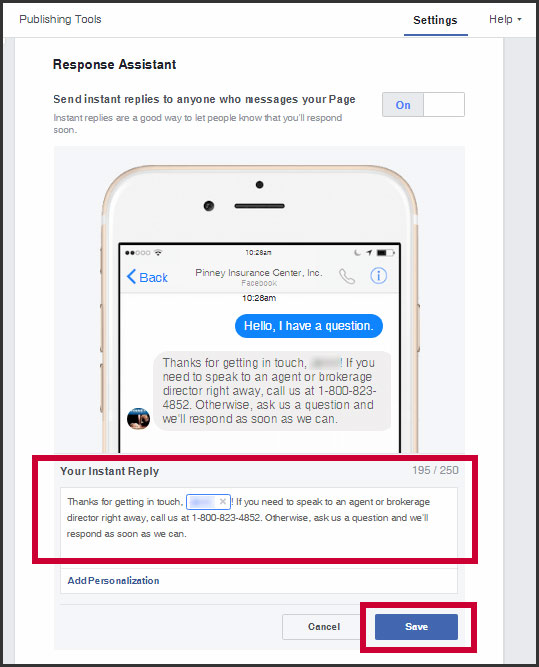
3. Set Your Away Message & Hours
Your away message is what a prospect sees when they message you while your Messenger status is set to away. Using the directions below, you can set particular times for your away status, like nights and weekends. As with your instant reply, it’s a good way to direct queries elsewhere and/or set expectations. As of June 2018, you can only customize your Messenger auto-reply from a desktop computer.
1. Go to your business page’s Settings tab.

2. Click Messaging.

3. Set Stay responsive when you can’t get to your computer or phone to On.
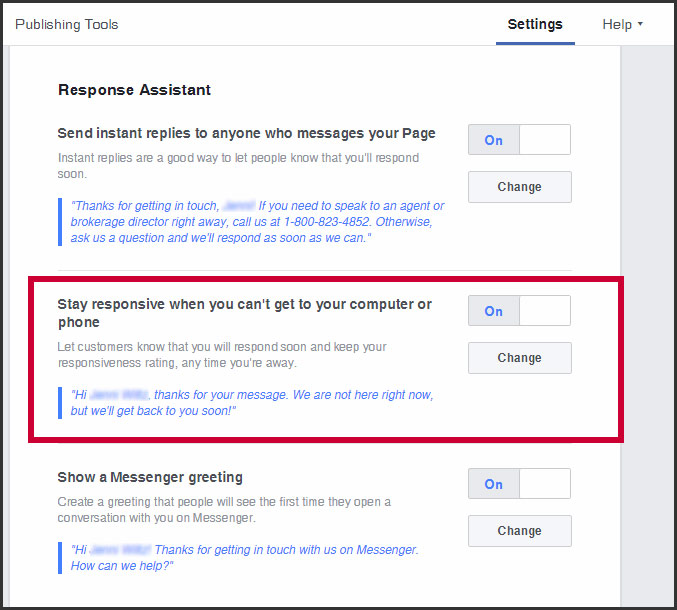
4. Click Change and enter your away message. Facebook will show you a preview. When you’re done, click Save.
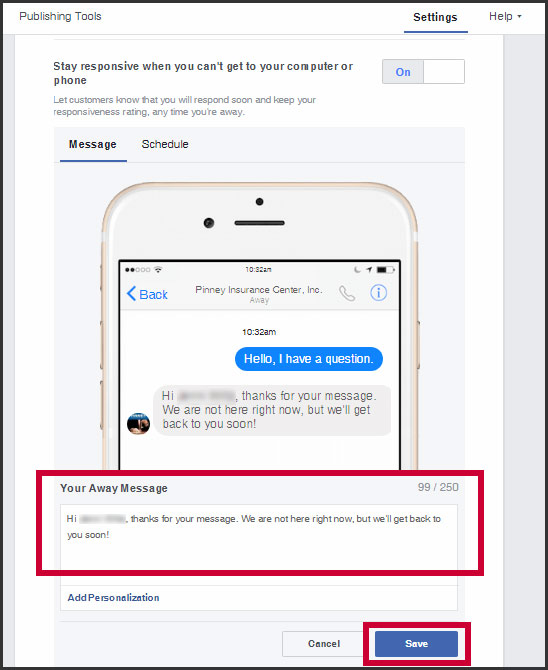
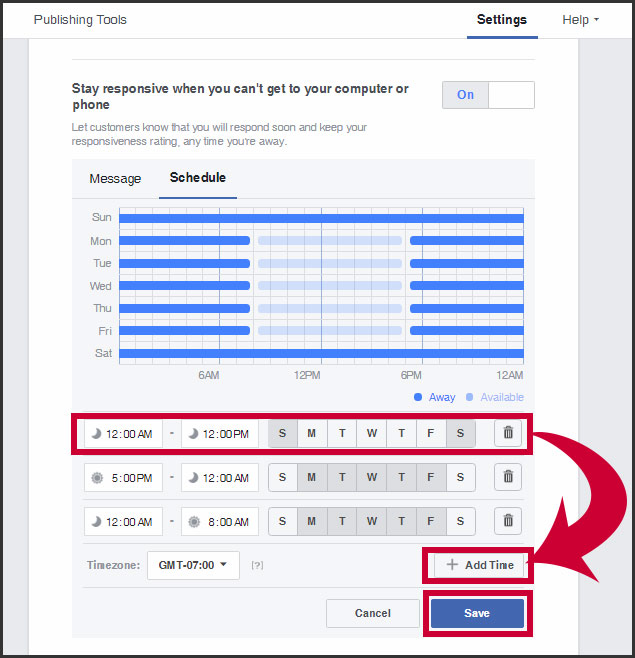
5. Click Change again, in the Stay responsive section. This time, click the Schedule tab above the phone mock-up. If you keep regular office hours, you’ll add three lines to your away schedule:
- Saturday and Sunday, 12 am – 12 pm
- M, T, W, R, F, 12 am – 8 am
- M, T, W, R, F, 5 pm – 12 am
Double-check your timezone, then click Save.
4. Put a Messenger Link on Your Website
Did you know you can add Facebook Messenger functionality to your website? Adding a link is super-easy and takes no code knowledge. You can also add a button or a pop-up, but you do need to be able to copy and paste code to your site to DIY these. Both are definitely do-able, but if you’re not comfortable adding code to your site, you may want to outsource this. Let's start with the link.
1. From your Facebook page, click the Settings tab.

2. From your left-hand menu, select Messenger Platform.

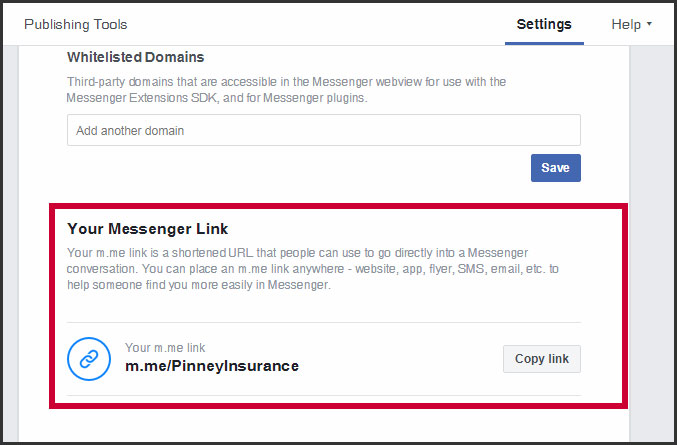
3. Scroll down to Your Messenger Link. That link is unique to your page. Anyone who clicks it will go directly into a Messenger conversation with your page. If they’re on a laptop, the Messenger web page will open. If they’re on mobile, the Messenger app will open. All page admins will then receive a notification via web and mobile. Nifty! Use this link on social media, your website, and more.
5. Add a Messenger Button to Your Website
There are a few extra steps you or your developer will need to complete before you add a Messenger button or pop-up to your site. Here’s the prep work:
- Get your Facebook page ID. Click About from your left-hand menu while viewing your page (don't click into the "Settings" options). Your ID is listed for you here.
- Create a Facebook Developer account. Click here to sign up.
- Create an App from within your developer account. This is way easier than it sounds! All you need is a display name for your app (your agency name works), a contact email address, and a category for your app (Finance or Apps for Pages will work).
- Copy the JavaScript code snippet you’ll need to add to your site’s HTML after the opening <body> tag. From your app dashboard, click Settings. Then, under the Website heading, click Quick Start. This code will be pre-loaded with the ID of the app you just created. It will need to be present on every page you want the Messenger button to appear. It loads asynchronously (phew!), so you don’t need to worry about it affecting your site speed. If you’re using WordPress, you can access your code via the Editor.
- Go to the Facebook developer page for web plugins and copy the relevant code. We provide all the relevant links you need for each method in the steps below.
Now you’re ready to add your button!
When your site visitor clicks this button, they’ll be taken to Messenger's web page (on desktop) or the Messenger app (on mobile).
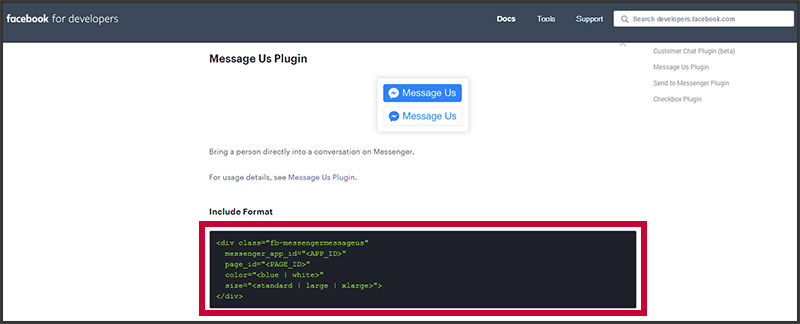
1. Grab the Message Us plugin code from the Facebook web plugins page. You’ll see the code under the heading Include Format, like in the image below. You’ll need to swap the placeholder code APP_ID and PAGE_ID for your actual app ID and page ID, which you gathered in the steps above.
2. Add the plugin code to the HTML for the relevant web page exactly where you want the button to appear.
3. Choose your button color and size. In the code, you’ll see all options listed. By default, the button is blue and large. If this is okay, you don’t need to change anything. If you want to change this, simply delete the options you don’t want. For more info, check out Facebook’s instructions here.
6. Add a Messenger Chat Pop-Up to Your Website
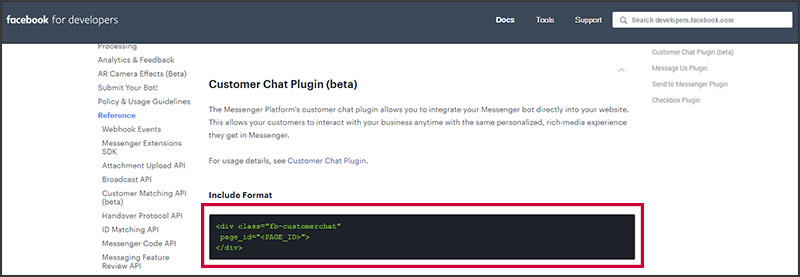
1. To start, grab the Customer Chat plugin code from the Facebook web plugins page. You’ll see the code under the heading Include Format, like in the image below. You’ll need to swap the placeholder code PAGE_ID for your actual page ID, which you gathered in the prep work for method 5 above.
2. Next, whitelist your website. Your website must have HTTPS enabled for this to work. These are both security precautions that protect you and your site visitors. At the top of your Facebook page, click Settings, then Messenger Platform (in your left-hand menu). Type your domain, including the https://, into the whitelisted domains box. Click Save.
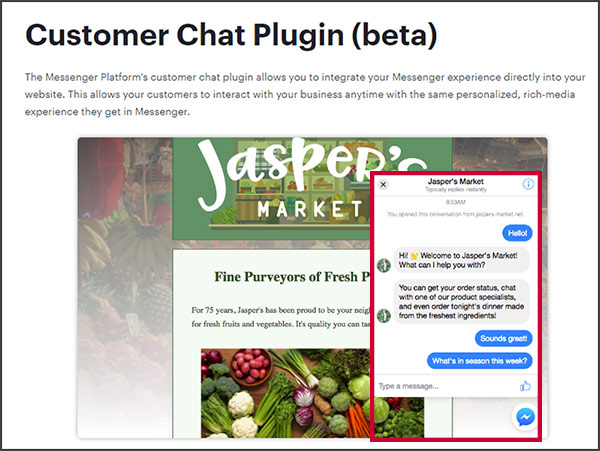
3. Add the Customer Chat plugin code to the HTML for the relevant web page. The pop-up will appear in the lower right-hand corner of your webpage. If you’re comfortable adding more code to the plugin, you can tweak the color, greeting, and more. The attributes and descriptions required to make those tweaks are all described here.
Here’s what the pop-up looks like on your site:
That’s our look at 6 ways life insurance agents can use Facebook Messenger!
Even if you don’t plan on using messaging as a marketing strategy, it’s still worth setting your auto-replies and greetings. Use the opportunity to drive traffic elsewhere or ask people to contact you a different way.
There are also more advanced things you can do with Messenger, like build a chatbot or opt people in to a Messenger mailing list. We’re not covering those in this post since they’re a bit more complicated and, for non-developers, require a third-party service. If you’d like us to go over them in a future post, tell us in the comments!
