Your email list is a treasure chest of prospecting opportunities. We explained why in our previous post. Essentially, your list contains prospects who haven’t bought a policy yet, but who could be converted with drip marketing. It contains clients who trust you and may need additional insurance products to fully protect their families and businesses. It’s a valuable marketing tool if you want to use retargeting ads, and an asset if you want to sell or pass on your business.
The money, as they say, is in the list.
But what if you don’t have a list? Or what if your list is too small to generate new leads for you?
Here are 10 ways to grow your email list using face-to-face meetings, web traffic, social traffic, and more. Build your list with these tactics, and you’ll always have a ready source of prospects and clients available for referrals, cross-sell, and up-sell.
Method 1: Collect email addresses every time you meet with prospects
If you do business face-to-face
Chances are you meet with many prospects who don’t buy from you right away. You probably also attend business mixers, community meetings, and Chamber of Commerce events. These are all opportunities to provide value for your prospects and grow your email list at the same time. The easiest way to get sign-ups is to offer something for free. That might be a consultation to go over their insurance needs, or it might be a handout, brochure, or direct mail marketing piece. Once you decide on an offer, here's how to get it in front of them:
- Order a second set of business cards and use them as intake forms. The card should contain blanks for the client’s name and email address. You could even include checkboxes where they can indicate topics they’re interested in. Be sure you also provide your offer - what do they get for signing up? Hand out these cards in meetings and let interested prospects give them back to you with their information. Attach them to folders, applications, or brochures you leave with clients, then ask for the card at your follow-up meeting.

If you do business online as well as in person
You can use the strategy outlined above for your in-person meetings, but you have another option available, too. Your free offering can be something your prospect doesn't need to contact you to get, such as a free downloadable guide from your website (see method 4 below). Because you'll have a way to capture their information on your site (see method 2 below), you don't have to use an intake card to gather it at the moment of initial contact.
- Revise your current business cards to include a website URL dedicated to mailing list sign-ups. Ideally, your website will have multiple ways to sign up, but for the purposes of a business card, a dedicated landing page works best. A landing page is a simple, stripped-down page with one call to action. Landing pages do not usually include your main menu, sidebar, or footer. This way, visitors can't get distracted by other content on your site. That's what makes a landing page ideal for including on a business card. You can still include your quoter URL or your home page URL on the card. If you’re encouraging mailing list sign-ups, however, you should use a dedicated URL for this purpose and make it clear that's where they need to go to sign up.
Method 2: Create a dedicated sign-up landing page on your blog or website
As mentioned above, your website should have multiple ways to capture a prospect’s email address. For those who visit your site specifically because you've asked them to sign up, a dedicated landing page works best. This page should explain what subscribers get by signing up, and contain nothing but your sign-up form. This eliminates distractions and improves conversions.
If you don’t have a web designer, there are several ways to create this landing page yourself:
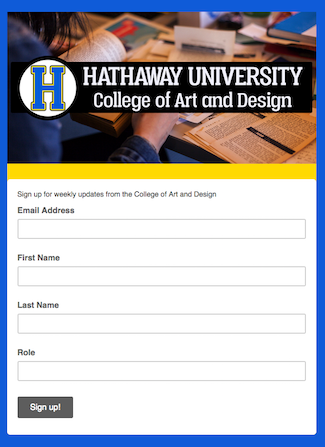
- Most email marketing software providers will create a hosted landing page for you. Subscribers who sign up using this page are instantly added to your list, with no messy transfer of names using plugins or CSV downloads. So what’s the catch? Your styling options for the page may be limited, and the page URL won’t be on your domain, which means you won't have Google Analytics data on its performance. However, this is definitely the fastest and easiest way to get started. Here’s an example of MailChimp’s hosted landing page as shown in their Knowledge Base:
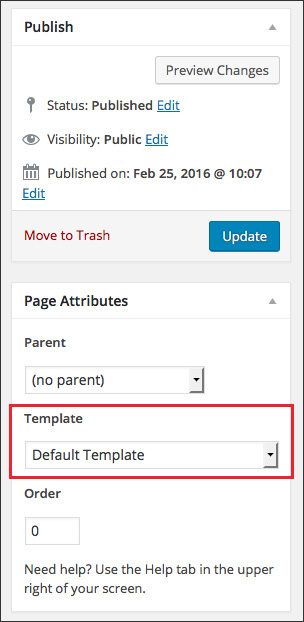
- If you use WordPress, your theme may have a built-in landing page template. The advantage of building your landing page in WordPress is that your page URL will be on your domain. You’ll have to connect WordPress to your CRM or email marketing software, but in most cases, this is as easy as installing a plugin. To find out if your theme offers custom page templates, look beneath the Publish menu on your right-hand side. If you have a Page Attributes menu, click the dropdown and look for a template called “landing page” or “blank – no container, no header, no footer.”
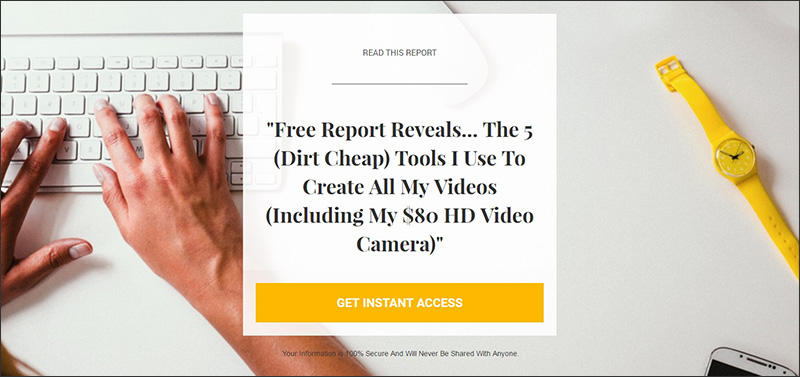
- Purchase software like LeadPages or Unbounce. Both feature drag-and-drop landing page builders, and offer plugins for WordPress. Connect your landing page software to your email software or CRM, and you’re in business. Here’s an example of a landing page from the LeadPages template library:
Method 3: Add sign-up widgets to high-traffic areas of your blog or website
Your goal is to make it easy for prospects to sign up for your mailing list no matter where they land on your website. Your home page, about page, and FAQ page are crucial. If you use Google Analytics, it’s a good idea to identify your most-visited pages and be sure they contain opt-in opportunities.
Here’s how to find those pages in Google Analytics. First, click Behavior from the left-hand menu. Click Site Content and All Pages. Scroll down beneath the graph to see a list of your site’s pages ranked by number of page views.
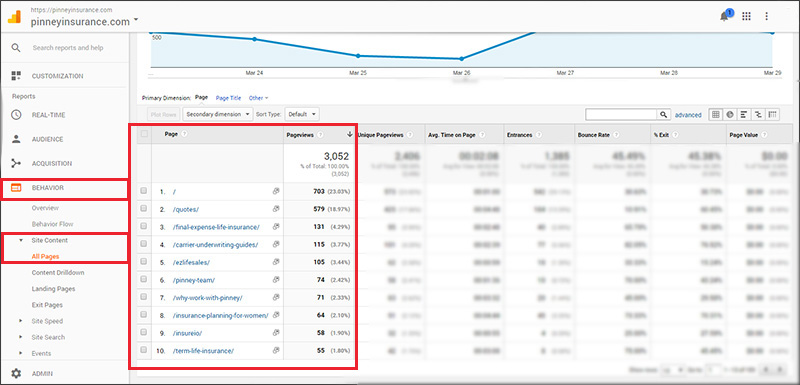
Once you've identified your most-viewed pages, be sure those pages contain a sign-up widget in the sidebar, footer, or page content. In addition to a hosted landing page, most email marketing software providers have pre-built widgets you can add to a sidebar or footer by copying and pasting the provided code. As with the landing pages, however, your design options may be limited unless you're willing to experiment with CSS.
As an alternative, there are a number of plugins you can use to add signup widgets that offer more design options than the ones provided by your email marketing software. Two of the most popular are Sumo (free and paid versions) and OptinMonster (paid). These give you the option of placing signup forms in different locations: a top bar, a sidebar, in text, in a pop-up window, in a fullscreen welcome window, and more.
If you have a web designer, they can create a signup form for you. You may want to study the types of forms provided by Sumo and OptinMonster, then ask your designer to recreate them for you. For example, we created a slide-in modal that fires on every page:
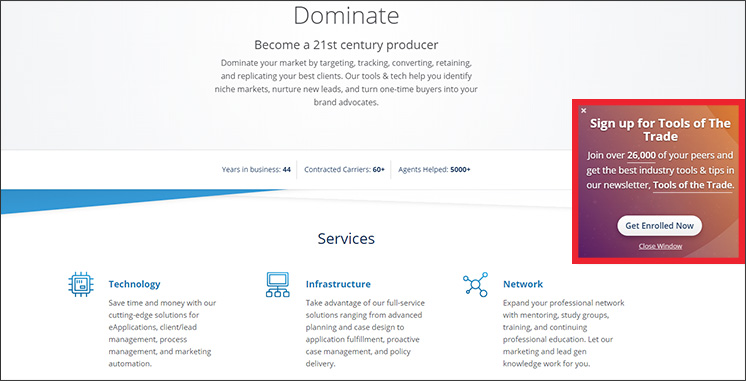
When you create your signup widget, pay close attention to the following:
- Your headline. It should be brief, attention-grabbing, and relevant.
- Your body text. In short sentences or bullet points, tell the reader what they get for signing up.
- Your button text. You’ve probably seen plenty of generic buttons that say “Sign Up Now.” That’s acceptable, but not very enticing. One good piece of advice is to imagine the words “I want to…” preceding your button text. If you nail the emotion your site visitor is feeling, the impulse to click will be that much stronger. Here are just a few ideas: “Get My Bonus,” “Get the List,” “Get the Guide,” “Read It Now,” “Join the Club,” “See the Book,” “Claim My Copy,” "Discover the Secret," etc.
Method 4: Add a sign-up link to your email signature
How many emails do you send every day? If only a fraction of those recipients signed up for your list, how many new sign-ups could you add every week? Chances are it's a lot…and you don’t have to change your workflow at all in order to do it.
This is one of those times when a dedicated landing page URL will be more effective than using your home page. You want to make it as easy as possible to sign up, which means reducing or eliminating obstacles.
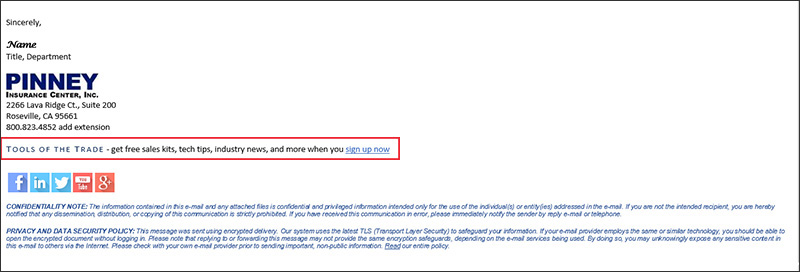
In your email signature, add a brief invitation to sign up and link that invitation to your landing page. You don’t have to delete your home page link, if that’s already included in your signature. You’re just adding a second link with a specific purpose and offer. Here's our email signature template:
Method 5: Offer a lead magnet
A lead magnet is something you give away to prospects in exchange for their email address. It has to provide value to your prospect, but it doesn’t have to be difficult to create. Remember, your specialized knowledge already provides value. Your lead magnet just needs to present that knowledge in a consumer-friendly package. Here’s an example of a lead magnet offer:
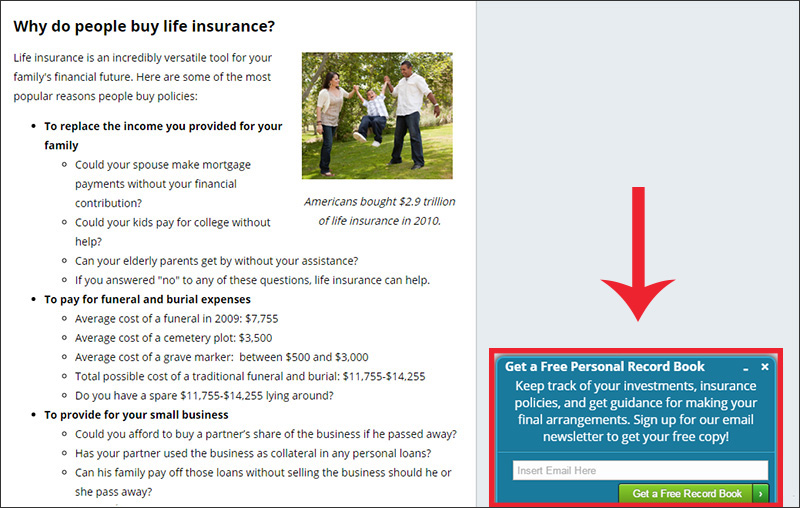
What should you use as a lead magnet?
- A PDF with the 5 most common questions your clients ask about life insurance. This provides value by saving your prospects time. Instead of having to scan the FAQs or send you an email, you’re giving them the answers they need right away.
- A consumer guide. What information can you give them about bigger topics like personal finance or retirement planning? Like an FAQ PDF, this educates your prospect and saves them time by gathering information they’d have to look elsewhere to find.
- A consumer worksheet. You can create a worksheet in Microsoft Word, save it as a PDF, and offer it as a free download. For example, what information should they have handy before meeting with an advisor? How can they estimate how much coverage they need?
- A collection of your 5 most-read or most-commented blog posts. Did you know there are apps that convert web content to PDFs with next-to-no effort? Try Beacon for free.
- A PowerPoint presentation. Do you have a killer PowerPoint client presentation? First, give it a catchy title, save it as a .WMV video file (here’s how). Next, upload the .WMV file to your YouTube channel. Set the permissions on the video to private (here's how). This means that only people who have the link can view your video. Email your new subscribers a screenshot of your video, along with the link to view it. Voila...you now have subscribers-only exclusive video content!
- A video of you delivering a talk or presentation. Did you give a presentation to a local group or charity? Did you give a talk at an industry event? If the event was filmed, ask organizers for a copy and permission to use it. If you can't get a copy, you could film yourself giving the same talk or presentation with your smartphone. To keep the video exclusive to subscribers, set the video’s YouTube permissions to private as described above.
Method 6: Add content upgrades to the best-performing pages on your blog or website
A content upgrade is bonus material that expands or enriches a page's content. This is different from a lead magnet because content upgrades are tailored specifically for one page or post. Think of them like the director commentary or deleted scenes from a DVD. In return for an email address, your visitor can download your upgrade for free. Both Sumo and OptinMonster, mentioned in method 3, make this easy to do.
Content upgrades are a great way to convert an already-interested reader into a subscriber. They don't have to be complicated or time-consuming to produce, either. If you have more to say on that topic, put it into your upgrade. If not, you can still produce something that’s valuable to your reader. For example, you can translate that page’s content into a checklist, to-do list, or resource list.
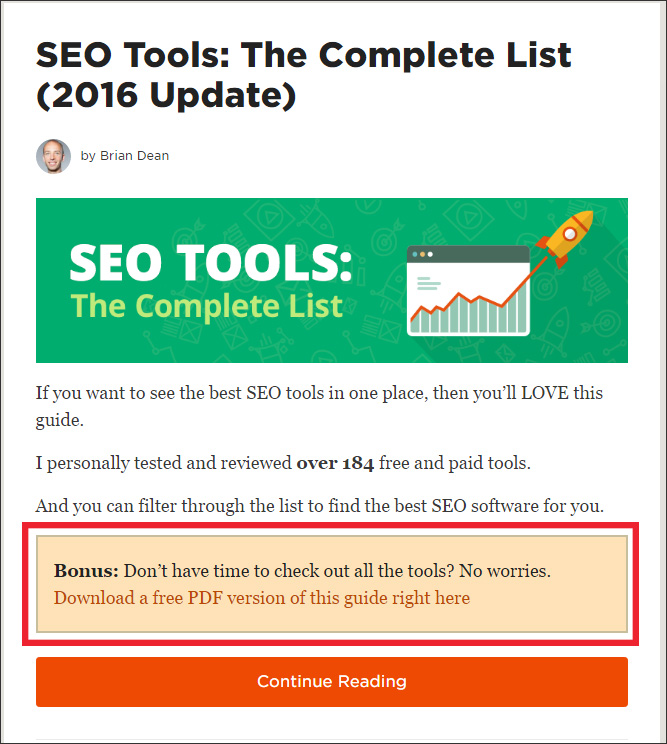
Here’s an example of a content upgrade from Brian Dean of Backlinko, a fantastic SEO blog:
Method 7: Add a sign-up link to your online bios
Are you a member of any online forums? Do you write for an industry publication? Do you include your bio at the end of each blog post on your site? If so, add your email list sign-up link to your bio to make sure everyone who reads your work knows about your offer.
Creative entrepreneur Jeff Goins includes a link at the end of his bio, which appears on every blog post on his site. Note that he’s offering something remarkably simple: a weekly newsletter with tips on writing and creativity. He’s not offering a special PDF or eBook. This is proof that you can use this strategy even if you don’t have a specially prepared guide to give out.

Method 8: Add a sign-up link to your social media bios
Each of your social media bios is valuable real estate.
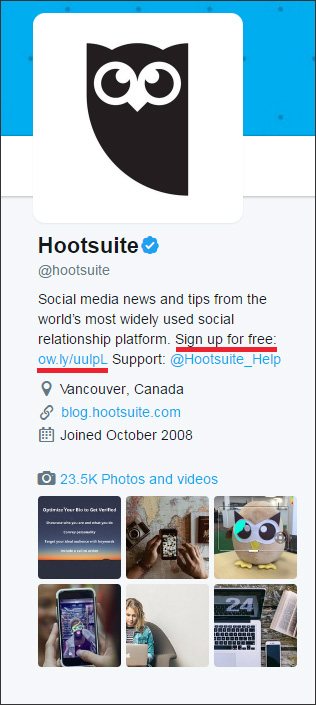
This is another case where a dedicated landing page URL works better than a home page to generate mailing list sign-ups. Mention your lead magnet or best offer in your bio, and follow it up with your link. If you’re on Instagram, this is especially important because your bio link is the only one you get. Here's how social media management platform Hootsuite offers a newsletter sign-up link in their Twitter bio:
Method 9: Add a sign-up button to your Facebook page
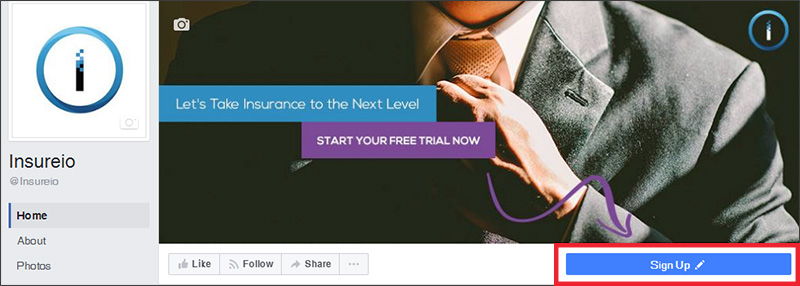
If you have a professional Facebook page (not your profile), you can use the call-to-action button to ask people to sign up for your mailing list. The call-to-action button appears below your cover photo. Our partners at Insureio added this feature to their Facebook page:
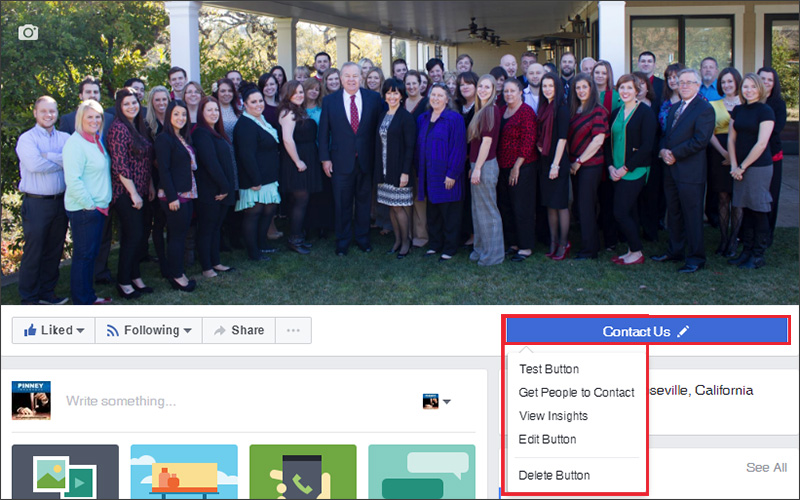
- To add a button for the first time, click Add a Button from the options below your cover photo:
- To edit your existing button, hover your mouse over it and select Edit Button from the dropdown menu.
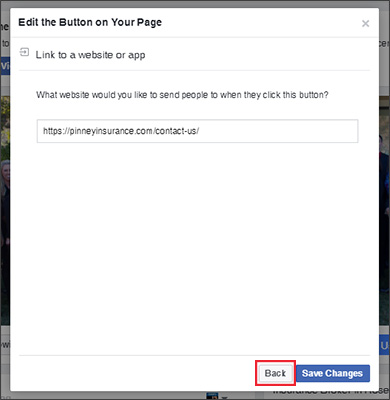
- Click the pop-up’s Back button if you want to change the type of button (from a “Contact Us” to a “Sign Up,” for example).
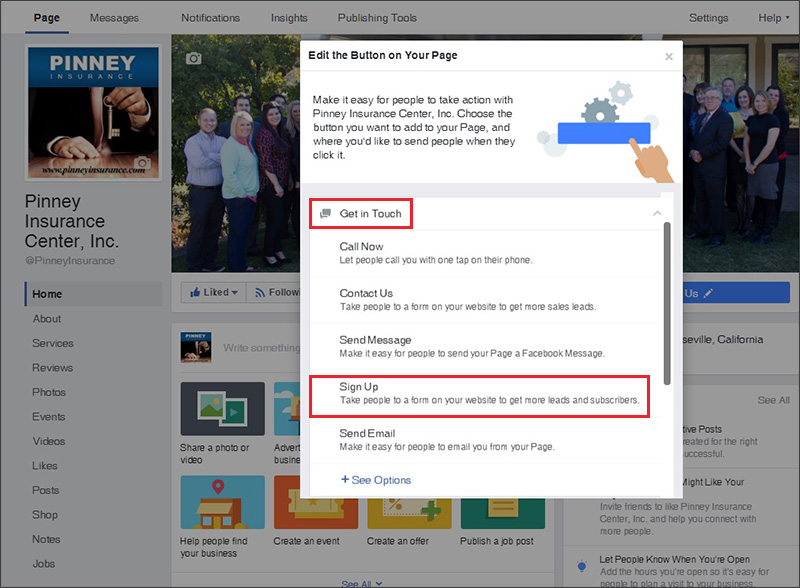
- Click to open the Get in Touch options. Select Sign Up.
- Enter the URL of your mailing list sign-up page.
- Click Save.

Method 10: Collect email addresses through your quoter
If you don’t already, you can collect email addresses through your quoter. Here's how to check that setting in Insureio, our CRM of choice.
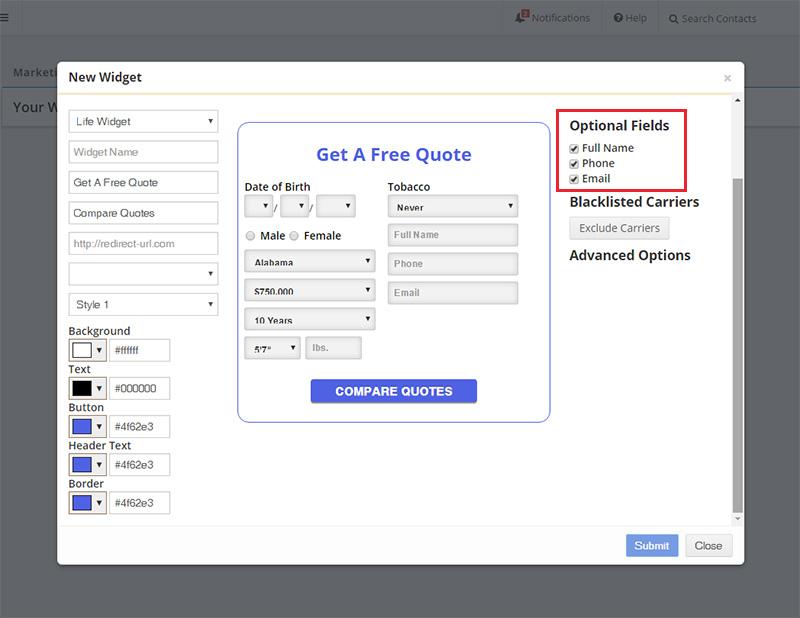
Insureio’s quoting widget includes a default setting to collect an email address. If you customized your widget before installing it, double-check to make sure you left that field checked. From your left-hand main menu in Insureio, click Marketing and Quoting Widget. Click New Widget or, if you’ve already created a widget, Show. Double-check your email address setting, outlined in red below. If you make any changes, be sure you click Submit.
And there we have it – 10 tips to grow your email list!
If you guys have more ideas, we’d love to hear them. Post in the comments and tell us what works best for you!
Check out our other posts on creating, growing, and managing your email list:
