
Google search console helps you monitor your website. It gives you crucial information like the number of your site's pages indexed by Google, and the search queries prospects used to find your site. If you use your website to generate leads, schedule some time to get familiar with Google Search Console.
This free tool is easy to set up and use. We’ll walk you through the basics below. If it’s been a few years since you last checked your SEO, you may remember this platform under its old name, Google Webmaster Tools (GWT). As of late January 2018, there's a redesign rolling out - your screen may look a little different than the screenshots shown below.
We’re going to cover initial setup, and four easy tasks:
How to Set Up Google Search Console
Get Your Site (and Site Updates) Indexed
Find Site Errors
Get SEO Tips Straight from Google
See Which Queries Prospects Use to Find You
How to Set Up Google Search Console
Log into Search Console using your Google account. First, you'll add your website. Click Add a Property, then type in the URL (including http:// or https://) and click Continue.
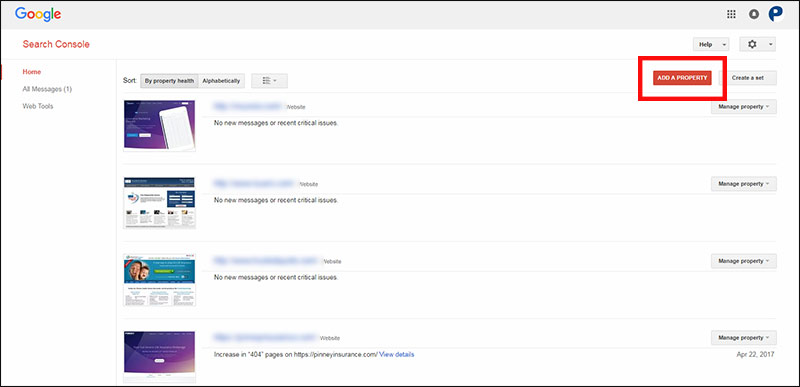
Next, you'll verify your website. This is how you prove to Google that you own the site. Then Google will share interesting data about your site's visitors and performance. You’ll see the “Not verified” tag on the screenshot of your website. On the right, click Manage property and select Verify this property.

There are three different ways to verify your site. They’re all a tiny bit technical, but still do-able for the average person who maintains their own website. Your developer or IT department can also help with this. You’ll see two tabs, one with a Recommended method and one with Alternate methods.
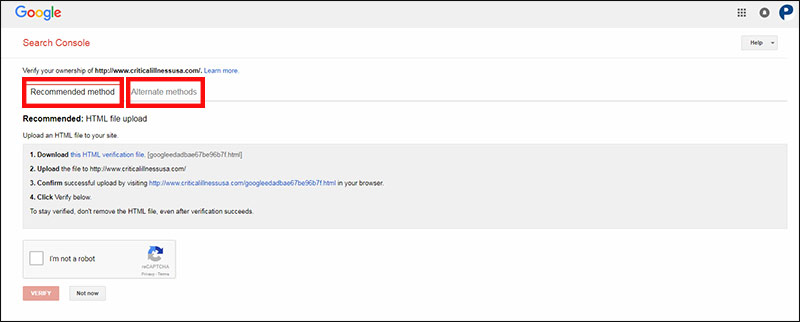
- Recommended method: Download a small HTML file and upload it to your site. You can do this via FTP, or your cPanel. Your web host may also be able to do this for you.
- Alternate method 1: Add a meta tag to your site’s home page. This goes in the header, so if you use WordPress, you’ll need a plugin to give you access (try Head, Footer and Post Injections or Insert Headers and Footers).
- Alternate method 2: Use your domain name provider to verify site ownership – you’ll need to sign into your domain name provider account.
- Alternate method 3: Use your Google Analytics account. If you’ve already set up analytics, you can use that to bypass other verification methods.
- Alternate method 4: Use your Google Tag Manager account. If you’ve already set up a Tag Manager account, you can use that to bypass other verification methods.
That's all there is to it!
Get Your Site (and Site Updates) Indexed
If you have a new site or make substantial updates to pages on your site, you want to make sure Google indexes the new version right away. You can submit your new or revised pages manually to make sure Google knows about them. If you’ve done SEO work to a page, for example, you want to get those updates indexed so you can start ranking and reaching new leads.
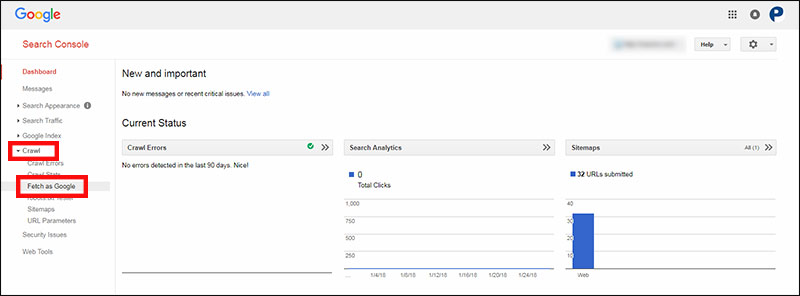
From the left-hand menu, click Crawl and then Fetch as Google.
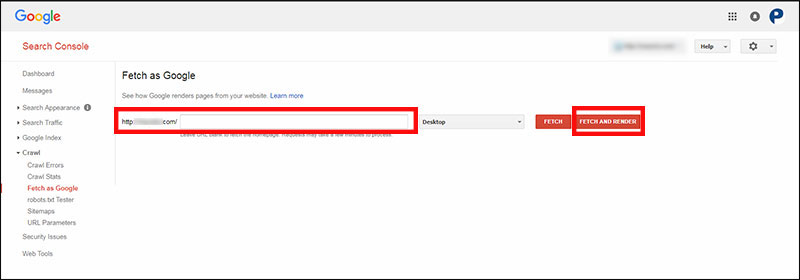
Type in the URL of the page you want Google to crawl. If you want it to re-crawl your whole site, leave the box blank. Click Fetch and Render. It may take a few minutes.
When Google fetches your page, you’ll get a status update that shows your request is complete. Click Request indexing to submit this page to Google. If you only want Google to crawl that page, choose Crawl Only This URL. If you want Google to crawl the entire site, choose Crawl This URL and its Direct Links.
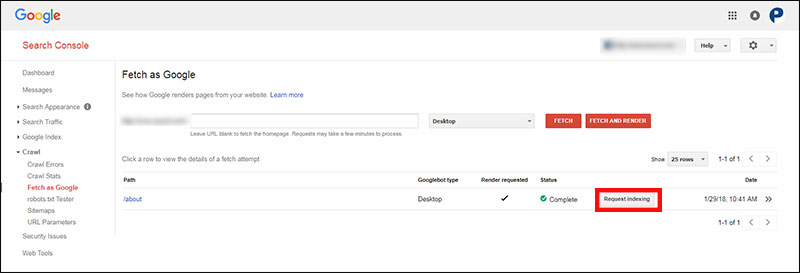
Now, Google’s bots will crawl your freshly updated page. The new version of your page should be visible in search results within a few days.
Find Site Errors
A beautiful, well-written web page won’t do any good if crawl errors prevent prospects from finding it. But how do you find those errors? Search Console will tell you.
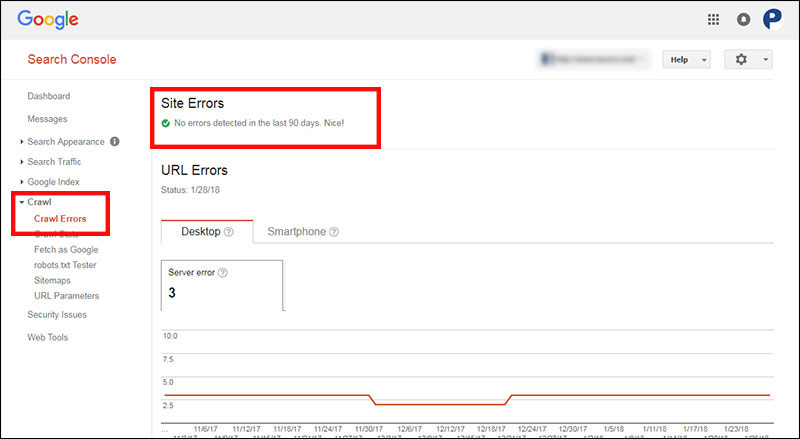
From your left-hand main menu, click Crawl and then Crawl Errors. You’ll see a list of any site errors at the top of the page – these are the most important. Site errors affect your entire site, so they need to be addressed as soon as possible. Moz wrote a great guide going over common types of site errors. If all is right with the world, you’ll get the “No errors detected” message.
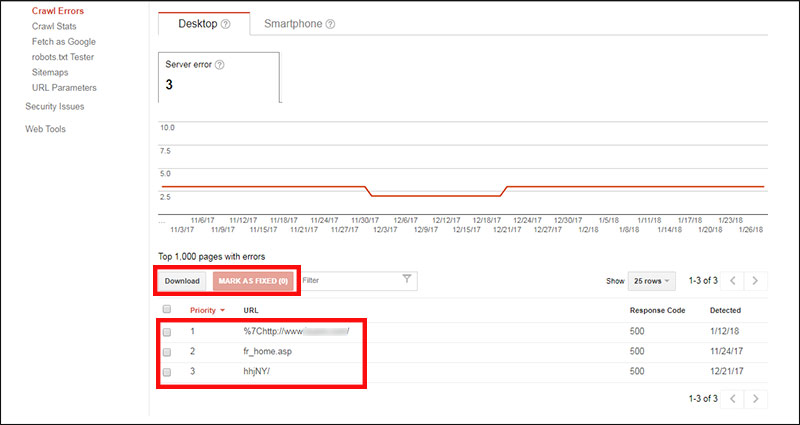
Below the crawl errors, the URL Errors section shows you less urgent errors that only affect a single page. The list will give you the URL at which there’s an error, the response code, and when Google first detected the error. You can download this list (if you have a lot), or mark them as fixed if you know you’ve already dealt with it. Here's what it looks like:
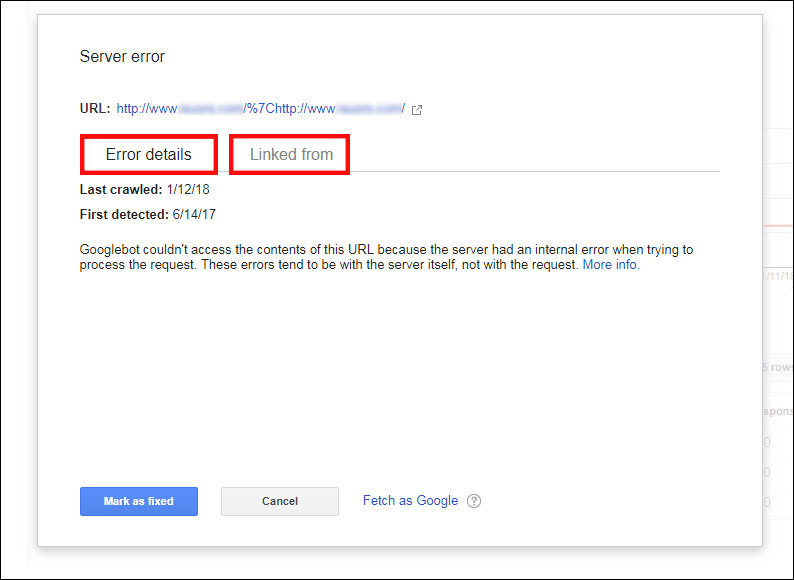
Click a particular error for more information. The pop-up screen will give you more detail, as shown below. Take a look at the URL listed. In some cases, like the one shown below, the site doesn’t even have a URL that’s an exact match for the URL shown. So how did it get there? It’s likely an error from a referring site. Click the Linked from tab to see where the link came from.
If it’s a reputable site you know and trust, you may want to contact them and let them know their link is pointing to a page that doesn’t exist. If the faulty links are coming from your own site, just go update the link on that page and mark it as fixed in Search Console.
Get SEO Tips Straight from Google
Search Console gives you pointers about simple SEO tasks that are easy to ignore but really help your discoverability. Some of these are as simple as adding or removing characters from a title tag. Others may require a bit more research to solve.
From your left-hand main menu, click Search Appearance and then HTML Improvements.
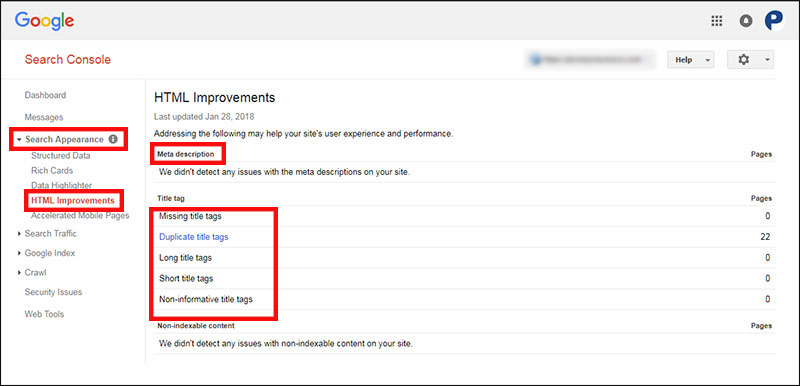
Search Console will tell you if your meta descriptions, title tags, and non-indexable content present any obvious SEO issues. If you see an issue listed in blue, click it for more information.
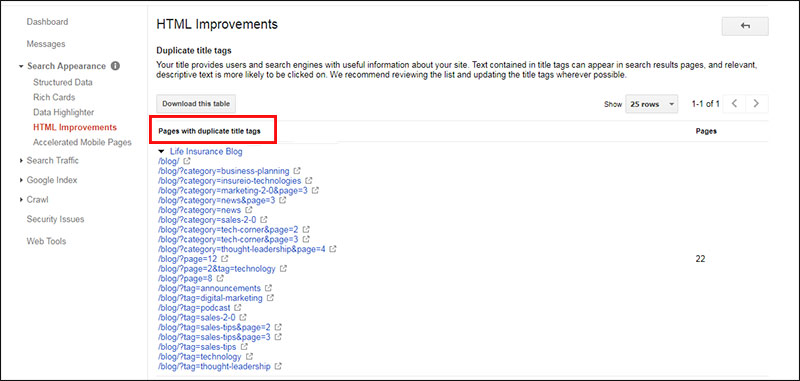
In the example above, Search Console pointed out that our blog archive pages all have the same title tag. That’s not a huge deal, but it raises a bigger issue: do we really need to index blog tag and category pages? Many webmasters don’t index these pages to avoid issues like this. That’s getting into the weeds a bit, but it’s an example of the kinds of issues you may see when you dive into Search Console. Luckily, Google is your friend here. For example, when we Googled the issue above, this Moz community post offered a great solution.
See Which Queries Prospects Use to Find You
You may think of Google Analytics as the go-to resource for information about your site visitors, but there’s a lot Search Console gives you, too.
From your left-hand main menu, click Search Traffic and then Search Analytics. This graph will show you a quick count of total clicks to your site. By default, Clicks is checked at the top of the graph. Go ahead and click Impressions as well.
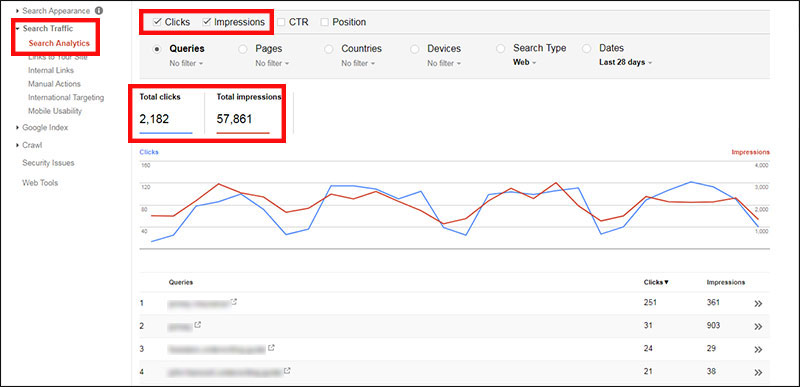
Scroll beneath the graph. You’ll see the number of impressions you have for each query, as well as how many clicks you got. This provides a good estimate of the percentage of people who click through when you’re listed in the search results for that query. Of course, it doesn’t tell you if those searchers found what they were looking for on your site, but it does tell you how enticing your page titles, meta descriptions, and URLs are for those query searchers.
Next, click Pages (above the graph) to see exactly which pages on your site are getting visited most.
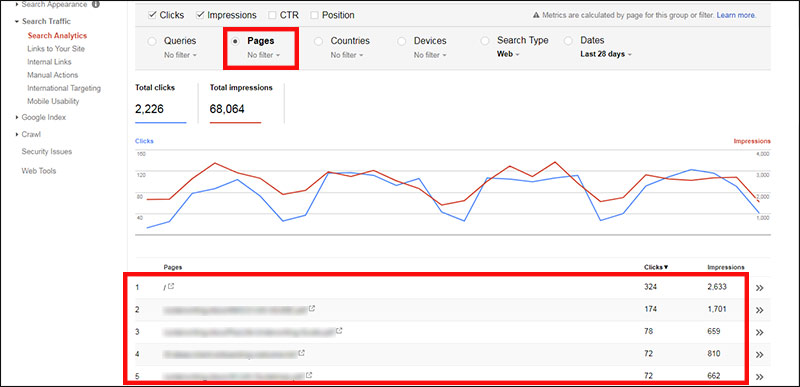
These pages are your top-performing content. Do you have additional material you can add to those pages to make them even better for visitors? Can you flesh out those topics with additional pages? Be sure you submit your new or revised content as described above.
That’s our quick look at Google Search Console!
There’s a lot more you can do with Search Console – this is just the tip of the proverbial iceberg. We hope this post demystified it a bit, to the point where you’ll check it out and see what else you can discover.
Have questions about Search Console? Tell us in the comments and we’ll do our best to answer them for you.
