Google and Yahoo recently announced new requirements for email marketers.
If you’re sending emails to recipients with Gmail and Yahoo addresses, as of February 2024, you need to follow these new rules to be sure your emails reach those recipients. It’s a process called “authentication,” and we’ll walk you through it below.
Jump to a section:
Good News / Bad News
Purpose
Prerequisites
Action Items for Everyone: Install DKIM and SPF records
Action Item to Send 5,000+ Emails Per Day: DMARC Record
Additional Requirements for All
Email Authentication: Good News / Bad News
The good news? The process isn’t as scary or as complicated as it seems. The acronyms and tech-speak make it sound worse than it is, but all you’re actually doing is copying information from one place to another. By completing this process, you’re telling email inboxes everywhere which domain and which email sending service is allowed to send on your behalf. That’s it.
The bad news? You’ll need more than our instructions below. Everyone uses different email marketing software and domain registrars. Some of you may use more than one sending address from your domain, or may use multiple domains to send marketing emails. Some of you may have modified your DNS records for other purposes and will need to amend rather than create new ones for this process. As a result, there is no one-size-fits-all set of instructions.
Important!
We’ll provide an overview of the process here, but it’s crucial that you seek out precise instructions from your domain registrar and email marketing software provider. Work with your IT staff or check with your host, registrar, and software provider for walk-throughs and resources.
If you already know (a) that you own a domain, (b) where your DNS records are held, and (c) which email marketing software provider you use, you may want to go straight to their customized instructions. Here are links to some of the most common.
Email Marketing Software Instructions
Don’t see your software below? Google “[insert your software name] email domain authentication.”
- Twilio/SendGrid: How to Set Up Domain Authentication
- Google Workspace: Turn on DKIM for Your Domain
- Constant Contact: Google and Yahoo Email Authentication Changes
- MailerLite: New Requirements from Google and Yahoo
- MailChimp: Email Domain Authentication
- Pinpointe: The New 2024 Email Authentication Requirements
DNS Registrar Instructions
If you have no idea what this is or how to find it, you can look up your DNS hosting provider using mxtoolbox.com. Use the dropdown menu to the right of the entry box to select "DNS Lookup." Type in your domain and, in the results, look for the gray box that says “Your DNS hosting provider is”:

Don’t see your registrar below? Google “[insert your registrar name] manage DNS records.”
- GoDaddy: Manage DNS Records
- Google Workspace: Verify Domain Ownership (includes instructions for adding a TXT and CNAME record)
- Cloudflare: Manage DNS Records
- Domain[.]com: How to Update DNS Records
Purpose
Why is this happening? Because of spammers, spoofers, and scammers. Without proper email authentication, anyone can say they’re sending an email from a particular domain or email address.
Without authentication, the name and even the email address you see in the “from” notation in your inbox is simply whatever the sender decided to input. But when you authenticate your email, you’re telling the world that only emails from your domain sent through an approved sender are valid.
Before February of 2024, these steps were a best practice to implement, but not required. Now, because of the Google and Yahoo updates, we all need to implement authentication to help reduce spam, spoofing, and phishing. Not only does this make your inbox a safer place, it enhances your reputation as a safe sender and increases the chances of your emails landing in the recipients’ inbox rather than in a spam folder.
Prerequisites
- You must have your own domain with an active email address from which to send emails. If you currently send marketing emails from your own Gmail or Yahoo address (i.e., [email protected]), you will need to buy a domain. You may be able to do this through your marketing email software provider. Once you own a domain (mysamplebusiness), you can create a new email address to send from, something like [email protected]. Once both of these tasks are complete, add your new sending email and domain to your email marketing software. Check with their help documentation for specific instructions on how to do this – it usually involves entering an email address and clicking a verification link on the email sent to that address.
- You must be able to access the DNS records for your domain. This is usually done through your hosting provider, such as GoDaddy. If you use Cloudflare, your DNS may be managed through them. DNS records are basically naming systems that link your domain (mysamplebusiness) to the IP address(es) where that domain can be found (the server provided by your hosting company) or the domain allowed to send emails on its behalf (the server provided by your email marketing provider).
Action Items: Install DKIM and SPF records
The Bare Minimum You Need to Know to Understand What’s Going On
To authenticate your domain and sending email, there are two records you will need to add and/or update:
- DKIM: DomainKeys Identified mail. This authenticates your sending domain.
- SPF: Sender Policy Framework. This authenticates your “return path” – the email address that should receive any delivery problem notifications. A domain can only have one SPF record, but that record can include multiple senders allowed to send email on its behalf.
Your email marketing software provider will give you the updates that need to be applied. Both records are stored at your domain registrar. They can be stored in either of the following two filetypes. Their instructions will tell you which one(s) of the following records you will need to add or modify:
- CNAME: Canonical name. This maps an alias to a canonical domain name. You don’t have to understand what that means. If required, you will just have to select “CNAME” as a new record type when you paste the required information.
- TXT: Text record. This holds notes about a domain, including which servers are authorized to send emails from that domain as well as a public-private key pair, which verifies an email actually came from the domain it says it did. You don’t have to understand what this means. You will just have to select “TXT” as a new record type when you paste the required information, or look for an existing TXT file that fits the description below in order to edit it.
How to Install DKIM and SPF Records
- Get the DKIM and SPF records from your email marketing software. Every software provider has its own instructions to show you where in your account to find this information. It’s often under headings like Domains, Verification, Add Domain, or DNS Settings. Pay special attention to whether they ask you to add a CNAME or TXT file.
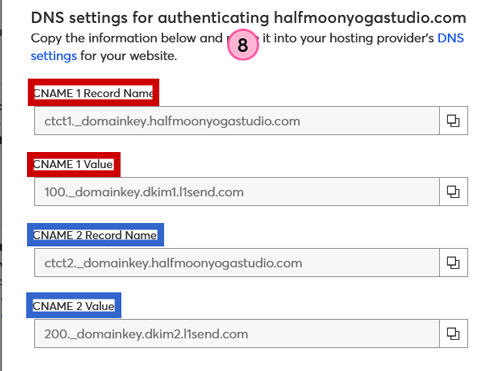
- Example: Constant Contact wants you to create 2 CNAME files. Each one will have a record name and a value. Note that this only applies to Constant Contact; your email marketing software will likely show you something similar but different.
- Example: Constant Contact wants you to create 2 CNAME files. Each one will have a record name and a value. Note that this only applies to Constant Contact; your email marketing software will likely show you something similar but different.
- Log into your DNS provider. Look for the option that allows you to update or manage your DNS records.
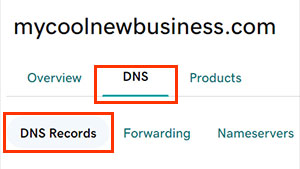
- Example: At GoDaddy, click the domain you want to update, then click DNS and DNS Records. Note that this only applies to GoDaddy; if you use a different registrar, you will see something similar but different.
- Example: At GoDaddy, click the domain you want to update, then click DNS and DNS Records. Note that this only applies to GoDaddy; if you use a different registrar, you will see something similar but different.
- Add or update the existing DNS records with the information from your email marketing software.
- DKIM: In your DNS provider, you will have the option to select the type of record you want to add. Select CNAME or TXT as directed by your email marketing software’s instructions. Paste in the data provided by your email service for the two components of the record: (a) “name” or “hostname,” and (b) “value.” Click save or add.
Now, double-check the new record you just created. For the “name,” you may actually only need to enter part of the data provided. For example, if you entered “k2._domainkey.mysamplesite.com” and your new record reads “k2._domainkey.mysamplesite.com.mysamplesite.com,” edit the record and re-paste in the name as “k2._domainkey” without the “.mysamplesite.com.”
Not allowed to edit the record? Screenshot or copy everything inside the current record, delete it, create a new record, and enter the correct details. - SPF: In your DNS provider, you will need to create or modify your existing SPF record. It’s likely you already have one – most hosts create one for you when you purchase hosting for your domain.
How do you find it? It will be a TXT file that begins with v=spf1. Here’s an example, provided by MailerLite:
Every sender authorized to send emails on your behalf will have an “include:” notation, followed by their specific information. Here is a sample entry, showing that this domain is allowed to send emails using Google Workspace:
v=spf1 include:_spf.google.com ~all
PRO TIP: You may want to validate your update before adding it to your DNS records. You can do this using EasyDMARC’s free SPF validation tool.
Edit your existing SPF file to include the code provided by your email marketing software. Keep in mind that the approved sender must appear EXACTLY as your email software provided it to you. If it begins with an underscore, don’t forget that underscore. The “include” notation you are adding should be preceded and followed by a blank space. Unless you are an advanced user and know what you’re doing, do not change any other part of the file. For example, here is how your file would look if you want to authorize MailerLite to send emails on your behalf:
v=spf1 include:_spf.mlsend.com ~all
Save your file. DNS records can take up to 48 hours to propagate, but are often much faster.
- DKIM: In your DNS provider, you will have the option to select the type of record you want to add. Select CNAME or TXT as directed by your email marketing software’s instructions. Paste in the data provided by your email service for the two components of the record: (a) “name” or “hostname,” and (b) “value.” Click save or add.
- Return to your email marketing software. There will usually be a “check DNS status” or “verify” option, which tells the software to check your DNS records. If the check is successful, you’re done with this portion! If it’s not successful, you may need to wait the full 48 hours before rechecking. An unsuccessful check at that point means there may be a mistake in the code you pasted in. Double-check your work and try again, or ask your email marketing software’s support staff for help.
Action Items to Send 5,000+ Emails Per Day: DMARC Record + One-Click Unsubscribe Header
DMARC Record
If you’re a bulk-sender who regularly sends 5,000+ emails per day, there’s an extra step you need to complete in order to authenticate: adding a DMARC record. DMARC (Domain-based Message Authentication, Reporting and Conformance) is a policy you publish in your DNS records to tell your email recipients’ mailbox providers how to deal with emails from your domain: how to authenticate them, and what to do with emails that fail authentication.
Not sure if your domain already has a DMARC policy? You can check for free, using MXToolbox.com’s DMARC Check Tool.
To publish a policy, you have to create a DMARC record in your DNS settings. Here’s what to do:
- Wait at least 48 hours after successfully setting up DKIM and SPF. You need these two additions to be functioning correctly for at least two days before adding a DMARC record.
- Generate a DMARC record. Use the most basic text we provide in step 4 below, or generate your own using several free tools: try EasyDMARC.com’s DMARC Record Generator or MXToolbox.com’s DMARC Record Generator.
- Log into your DNS provider. Look for the option that allows you to update or manage your DNS records.
- Example: At GoDaddy, click the domain you want to update, then click DNS and DNS Records. Note that this only applies to GoDaddy; if you use a different registrar, you will see something similar but different.
- Example: At GoDaddy, click the domain you want to update, then click DNS and DNS Records. Note that this only applies to GoDaddy; if you use a different registrar, you will see something similar but different.
- Add a new TXT file. Replace “yourdomain.com” in the sample below with your actual domain.
- For “host” or “hostname,” enter: yourdomain.com
- For the most basic possible “record,” enter: v=DMARC1; p=quarantine
Here's what those notations mean:
v=DMARC1 indicates the version number of your DMARC record (it must be DMARC1 - do not change this)
p=quarantine tells the recipient’s email provider what to do if the message doesn’t pass authentication. You actually have three choices here. Use p=none to take no action and deliver the message normally. Choose p=quarantine to send the message to the recipient’s spam folder. Use p=reject to bounce the message back to the sending server.
OPTIONAL: If you want to receive report emails that tell you DMARC activity for your domain, enter one using this notation: rua=mailto:[email protected] Do not use your regular email for this. If there are a lot of errors, you’ll get all of them in that inbox. Create a new email address specifically for these reports, something like [email protected] or [email protected]. If you want to include this optional email, your full DMARC record would look like this: v=DMARC1; p=none; rua=mailto:[email protected]
Save your new TXT record.
Now, double-check the new record you just created. For the “host” or “hostname,” you may actually only need to enter _dmarc.com. Some hosts will automatically fill in your domain name. For example, if you entered “_dmarc.mysamplesite.com” and your new record reads “_dmarc.mysamplesite.com.mysamplesite.com,” edit the record and re-paste in the host as “_dmarc.com”.
Not allowed to edit the record? Screenshot or copy everything inside the current record, delete it, create a new record, and enter the correct details.
One-Click Unsubscribe Header
An additional requirement for those who send more than 5,000 emails per day is to include a one-click unsubscribe link in your email header.
This allows your recipient to unsubscribe from your mailing list without having to search through the body of the email to find your regular unsubscribe link. Here's what that looks like in your recipient's inbox:

Many email marketing services will do this for you automatically as long as you include an unsubscribe link in the body of your email (which is required by law to comply with CAN-SPAM). Services that provide the header link automatically include MailerLite, Postmark, and Constant Contact. SendGrid will do so automatically if you use their subscription tracking feature; alternatively, you can create the unsubscribe link in your header without the tracking feature on by following their instructions here.
Check with your email marketing software provider for details and instructions.
Additional Requirements for All
Google and Yahoo’s changes also involve a spam rate threshold you must meet going forward to ensure your emails land in the recipient’s inbox. That threshold is 0.3%. You can do this by using common sense guidelines:
- Do not add people to your mailing list without their consent.
- Include text in the footer of your marketing emails that remind people why they are getting the email. Examples include: “You are receiving this email because you have purchased or requested a quote for life, disability, or long-term care insurance from me.”
- Periodically remove inactive or invalid email addresses from your list.
- Do not use formatting or text that may trigger spam filters. This includes using words and phrases commonly used in scams, like “free gift,” “additional income,” “no cost,” or “great offer.” Including text in all caps or using multiple exclamation points (!!!) can also trigger spam filters, as well as including too many external links or images.
That’s a quick overview of the new Google and Yahoo email authentication requirements!
It’s a lot to take in – we know. But it’s not as complicated as it seems, and almost all email software providers have provided extensive tutorials to get you through it. Email is such an important part of marketing that it's worth taking the time to get these things right! It's good for your recipients, it's good for you, and it makes everyone's inbox safer.